講義の目標
SQLiteを使ったデータベース操作を理解すること
GoogleMapSDKを使ったマップ操作ができるようになること
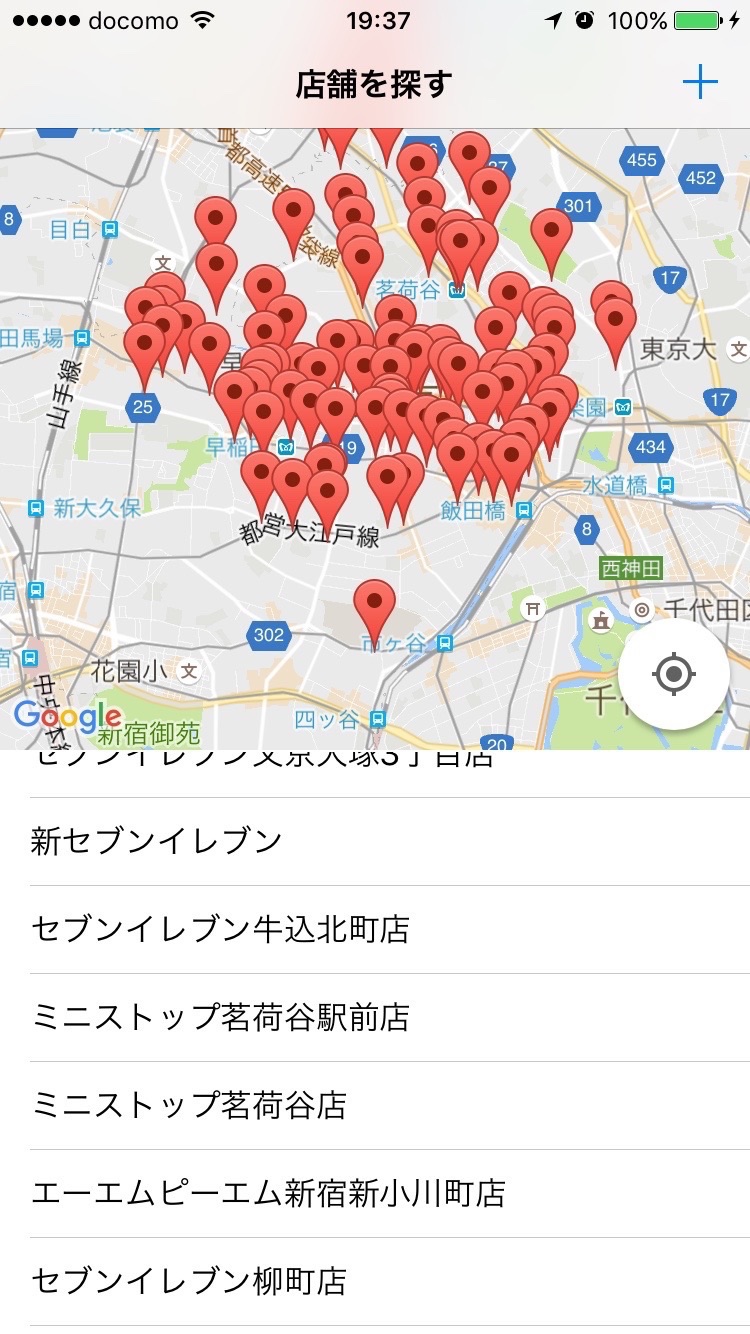
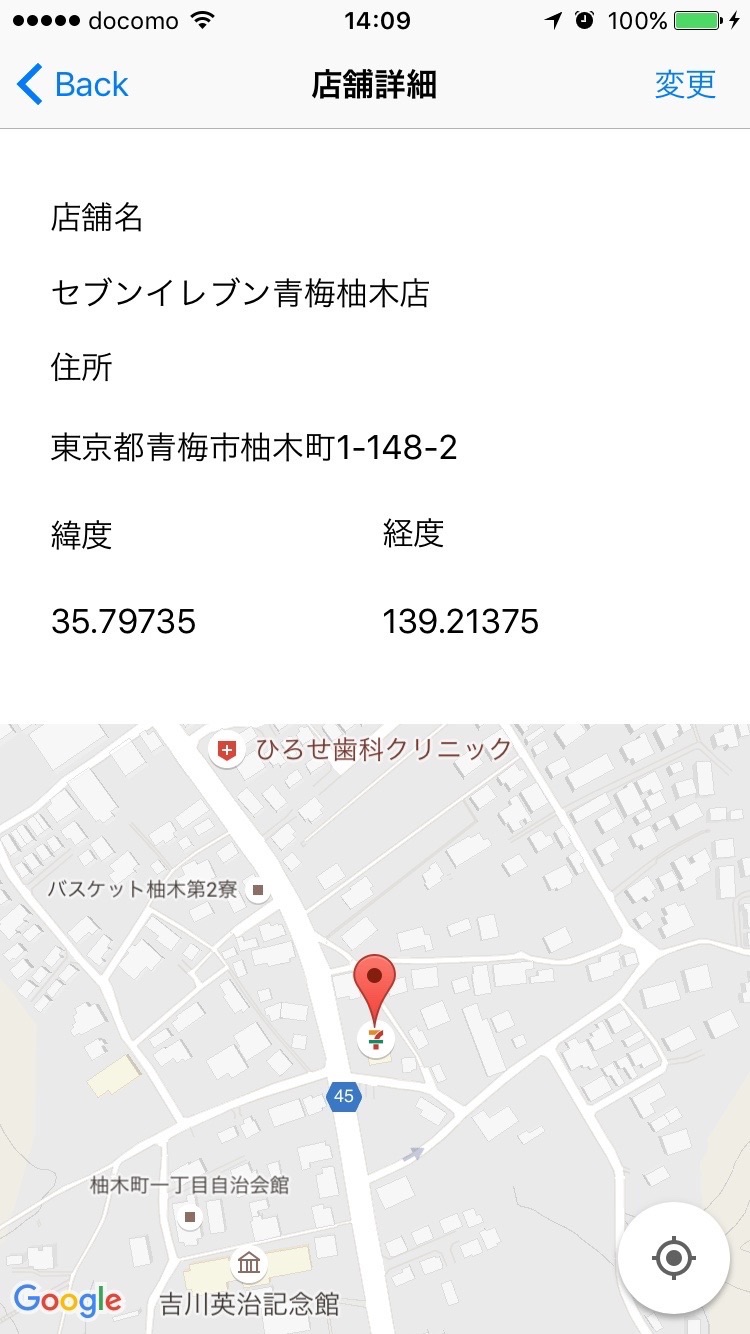
はじめに 今回のアプリは「店舗紹介」です。「店舗紹介」は起動すると、現在値から近い店舗が地図上に表示されます。TableViewに表示されている店舗名か地図上のマーカーをクリックすると、店舗詳細画面
完成品のサンプルは以下よりダウンロードできます。イメージが湧かない方は是非ご確認ください。
iOS完成品サンプル(店舗紹介アプリ)
それでは、早速開発を始めていきましょう!
店舗データの作成 CSVのダウンロード 今回は練習用として東京都内のコンビニのデータを利用します。
東京都内コンビニデータ
店舗名、住所、緯度、経度の情報がCSV形式でダウンロードできます。
SQLiteについて 今回はSQLiteというリレーショナルデータベースを使っていきます。
SQLiteの特徴 SQLiteは下記のような特徴をもっており、特にモバイルアプリで利用するデータベースとして利用されることが多いです。
データの保存に単一のファイルのみを使用する
中小規模ならば速度に遜色はない
ファイルを使わないインメモリ・データベースとしても利用可能
データ型を指定する必要がない
サポートしている型は、Null / Integer / Real / Text / BLOG のみ
Unicodeサポート
リレーショナルデータベースについて 今回は、お気に入りページを保存するのに、リレーショナルデータベース というものを活用します。コードの実装に入る前に、このリレーショナルデータベースに関する説明を行います。
リレーショナルデータベースの概要 リレーショナルデータベースとは、1970年にIBM社のEdgar F. Codd氏によって提唱されたリレーショナルデータモデルの理論に基づいたデータ管理方式の一種です。
1件のデータを複数の項目 フィールド の集合として表現し、データの集合を テーブル と呼ばれる表で表すことができます。さらに、ID番号や名前などのキーとなるデータを利用して、データの結合や抽出を容易に行うことができます。
一応公式な説明をすると、このような形になりますが、身近なところで行くと、「表」をイメージしていただいて、構いません。例として、今回店舗情報を保存するための「テーブル」の概観を以下に示します。
id
name
address
longitude
latitude
1
セブンイレブン
東京都渋谷区…
35.77…
139.77…
2
ローソン
東京都新宿区…
35.88…
139.88…
3
サンクス
東京都港区…
35.999…
139.99…
このテーブルでは、「id」、「name」がそれぞれフィールド(カラム)名となっています。このように「表」のような形でデータを管理するデータベースをリレーショナルデータベースといいます。
リレーショナルデータベースは現在主流のウェブサービスで、ユーザーのデータを保存する代表的手法です。主な製品としては、MySQLやSQLiteなどがあり、双方とも世界中で広く普及しています。
iOSにおけるリレーショナルデータベース iOSにおいては、リレーショナルデータベースとして、SQLite というものを利用することができます。SQLiteは手軽かつ軽量なリレーショナルの代表格です。これは1つのデータベースを単一のファイルとして扱うことができます。
SQL言語 リレーショナルデータベースにおいて、データを保存したり、読みだしたりする場合、通常はSQLという言語を使います。このSQL言語を用いることで、データの登録、抽出、更新、削除ができます。
まずは、データを登録する例から見て行きましょう。今回の「MyFavorites」というテーブルに新たにデータを登録する場合、SQL言語を用いると以下のようになります。
INSERT INTO shop (name, address,...) VALUES ("セブンイレブン","東京都渋谷区...");
このように、テーブル名とフィールド名をしてした上で、任意の値を新しく登録INSERTすることができます。
次に、データを読み出す例を見てみましょう。同様に shopというテーブルから全データを参照する場合、以下のようになります。
SELECT * FROM shop;
このように、リレーショナルデータベースはSQL文によって、データの登録や参照が行えるようになっています。
SQL言語にはこれ以外にも様々な命令があります。今ここでは、全てを扱うことはできませんが、興味のある人はぜひ調べてみて下さい。
SQLiteのインストール SQLiteはMacであればインストールする必要はありません。
SQLiteBrowserのインストール SQLiteのデータベースやテーブルを作成したり、SQLを利用してデータベースを操作できるソフトウェアをインストールします。
下記URLよりダウンロードできるようになっていますのでアクセスしてください。
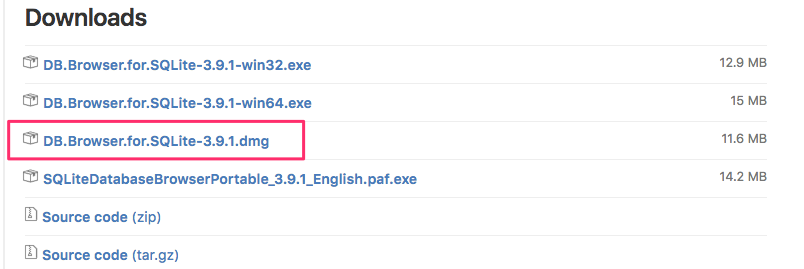
https://github.com/sqlitebrowser/sqlitebrowser/releases
ページの下の方に下記のダウンロードリンクがありますのでdmgファイルをクリックしてダウンロードしてください。
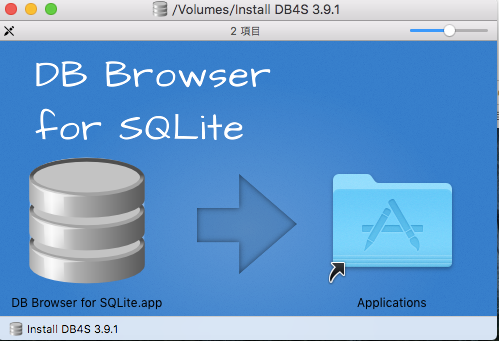
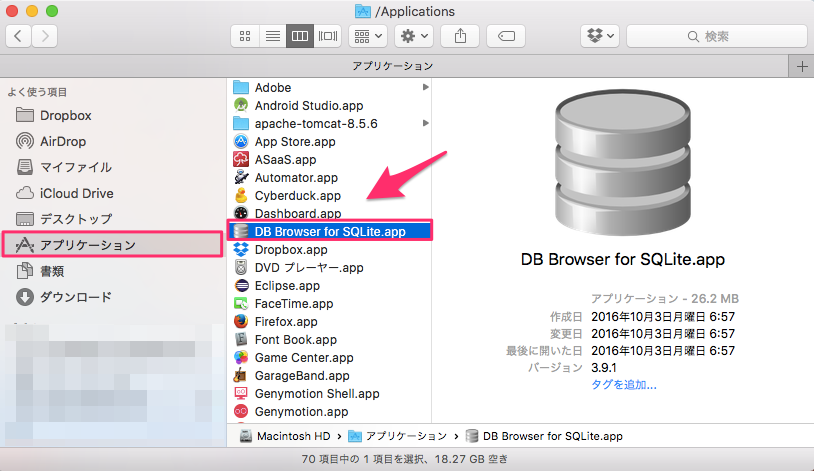
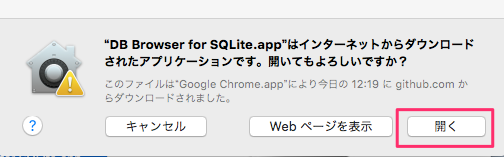
dmgファイルをダブルクリックして開いたものをアプリケーションフォルダに移動し、開いてください。
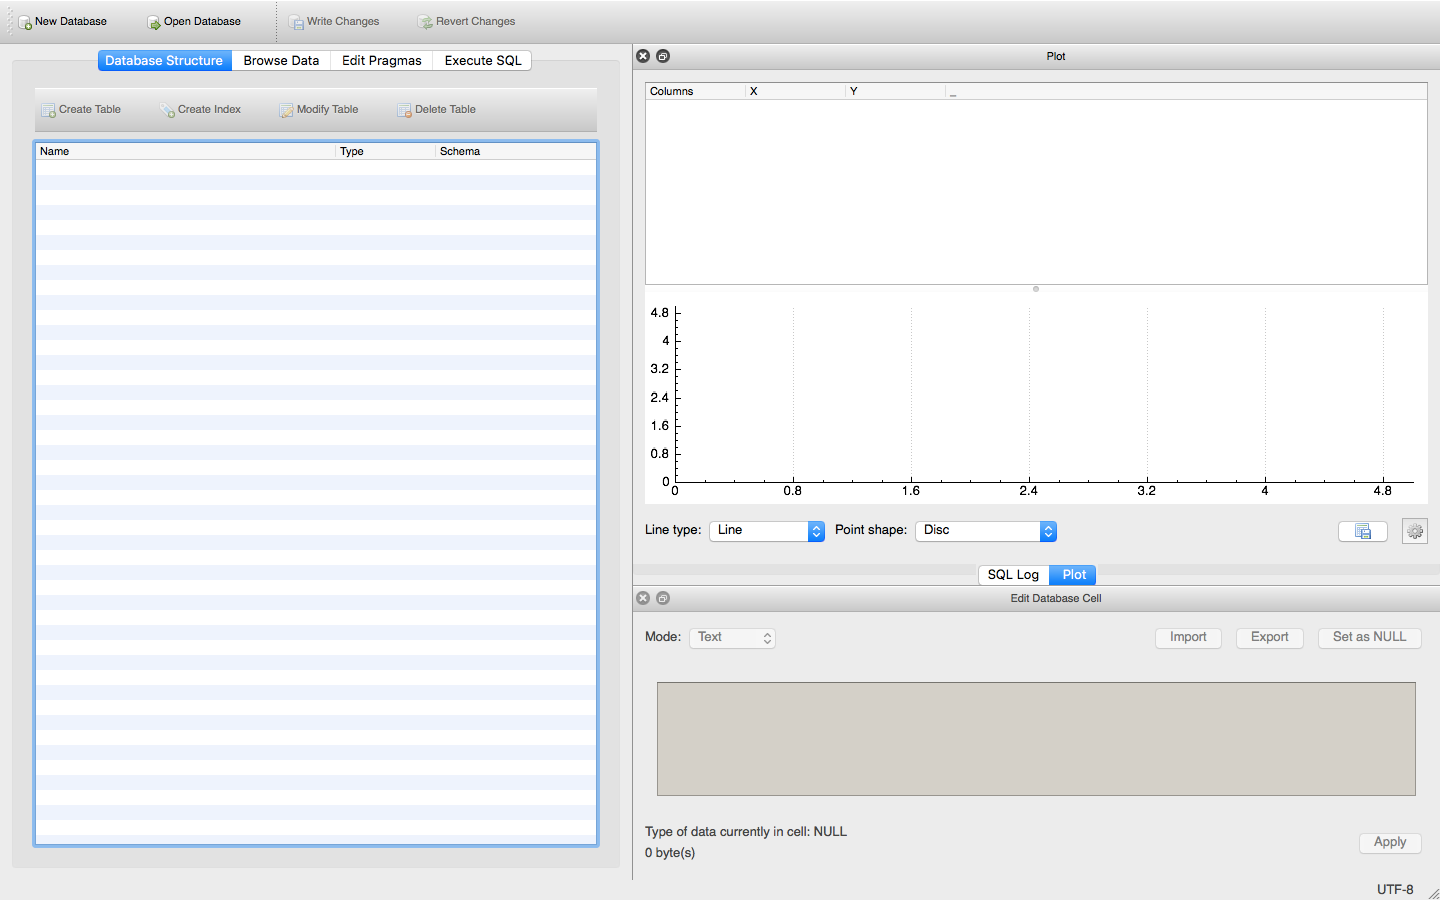
下記のような画面が開けばインストール完了です。
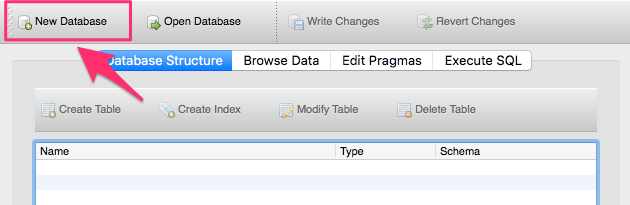
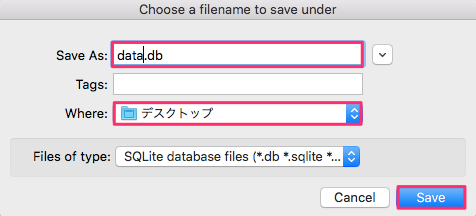
データベース作成 それではデータベースを作成していきます。New Databeseをクリックします。
今回はファイル名はdataにして保存先はデスクトップにしてsaveボタンをクリックして作成します。
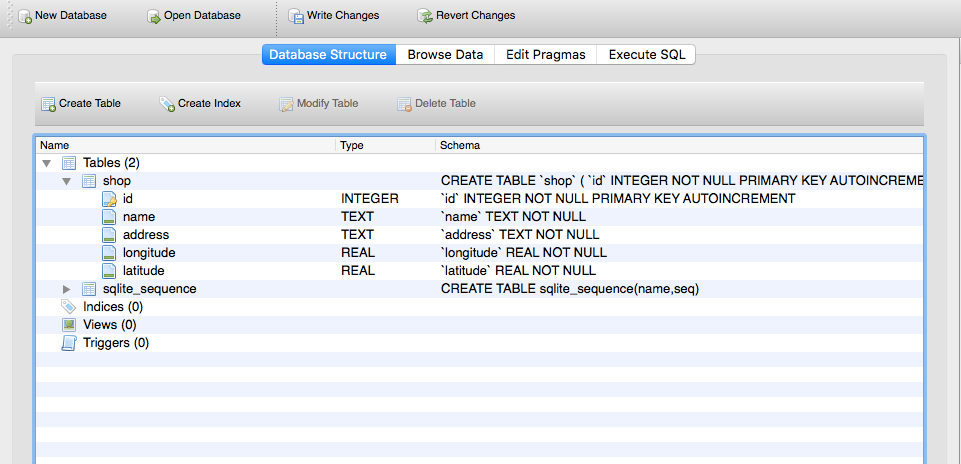
テーブルの作成 次にshopテーブルを作成します。下図のとおりの入力をしてOKボタンをクリックします。
Name
Type
No
PK
AI
U
id
INTEGER
✔︎
✔︎
✔︎
-
name
TEXT
✔︎
-
-
-
address
TEXT
✔︎
-
-
-
longitude
REAL
✔︎
-
-
-
latitude
REAL
✔︎
-
-
-
ちなみにここで設定している項目の説明は下記のとおりです。
項目名
説明
Name
テーブルのカラム名(フィールド名)
Type
カラムに格納するデータ型です。
NO
Nullを強要するかどうか。
AI
Auto incrementの略、レコードを追加したときに自動でナンバリングします。
U
UNIQUE制約
これでテーブルが作成されました。
レコードの挿入(INSERT) テーブルの中に実際のデータであるレコードを追加していきます。SQLを使って追加していきます。
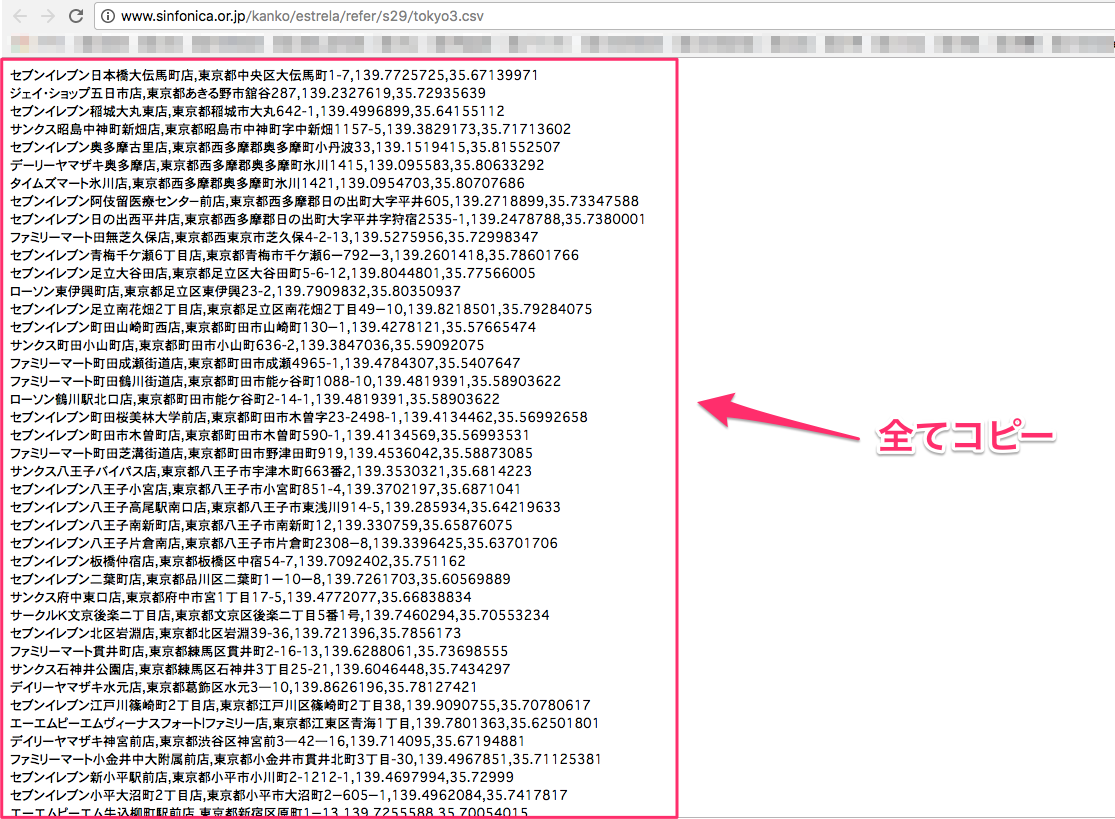
まずは、先程紹介したコンビニデータベースのCSVファイルのページにアクセスしてCSVデータをコピーします。
http://www.sinfonica.or.jp/kanko/estrela/refer/s29/tokyo3.csv
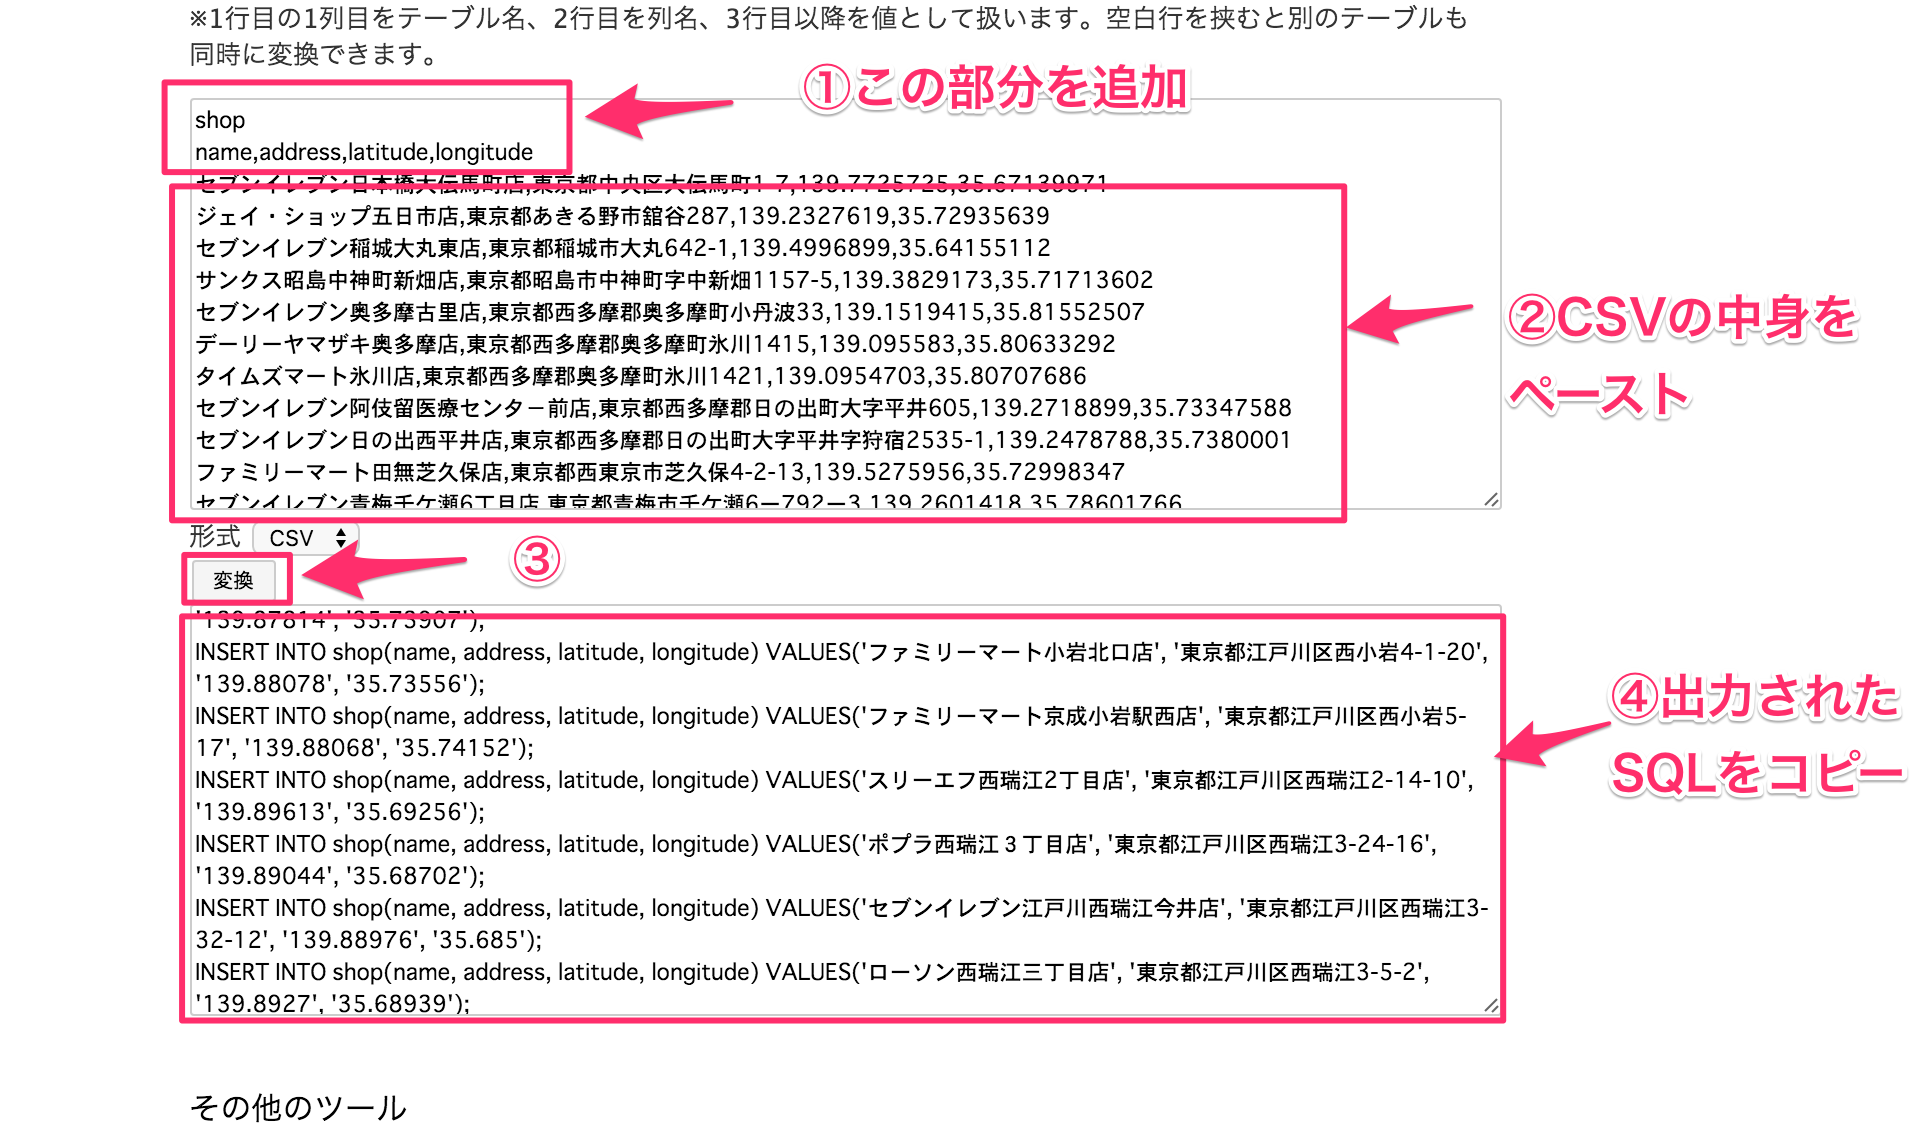
今回はCSVデータをもとにSQLを作っていきます。CSV→INSERT文変換のページを使って簡単にSQLに変換することができます。
http://tools.nissuk.info/csv-insert/
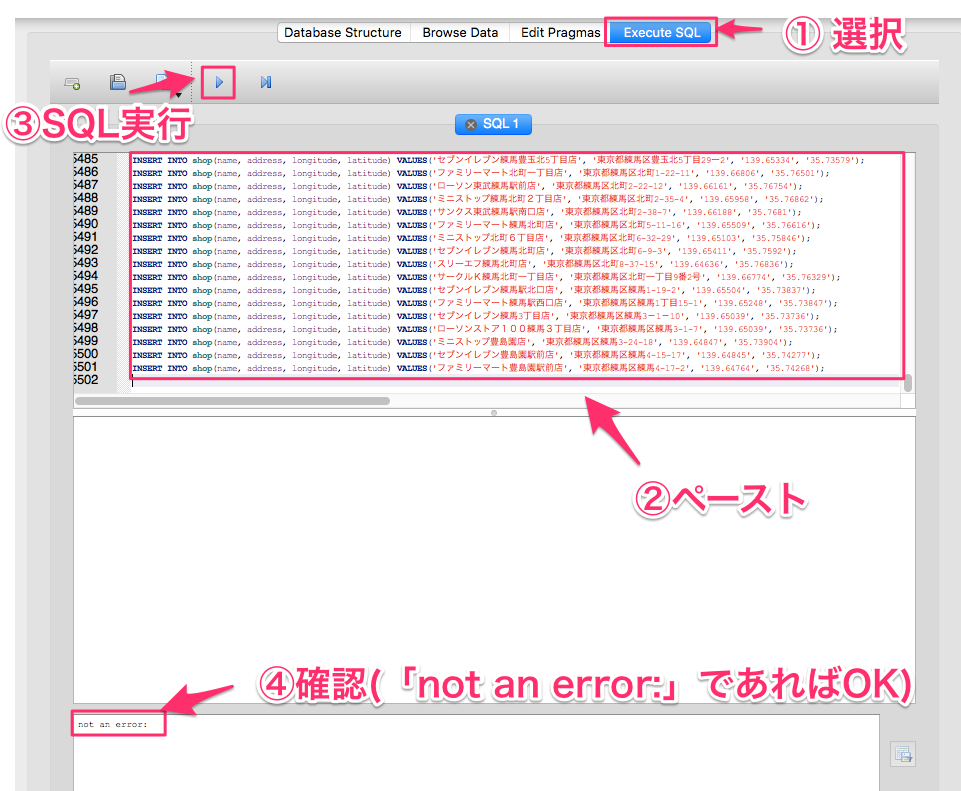
下記の手順にてCSVデータをSQLに変換してください。
shop
name,address,longitude,latitude
SQLに変換したものをSqlite Browserにてインポートします。not an error:が表示されればOKです。
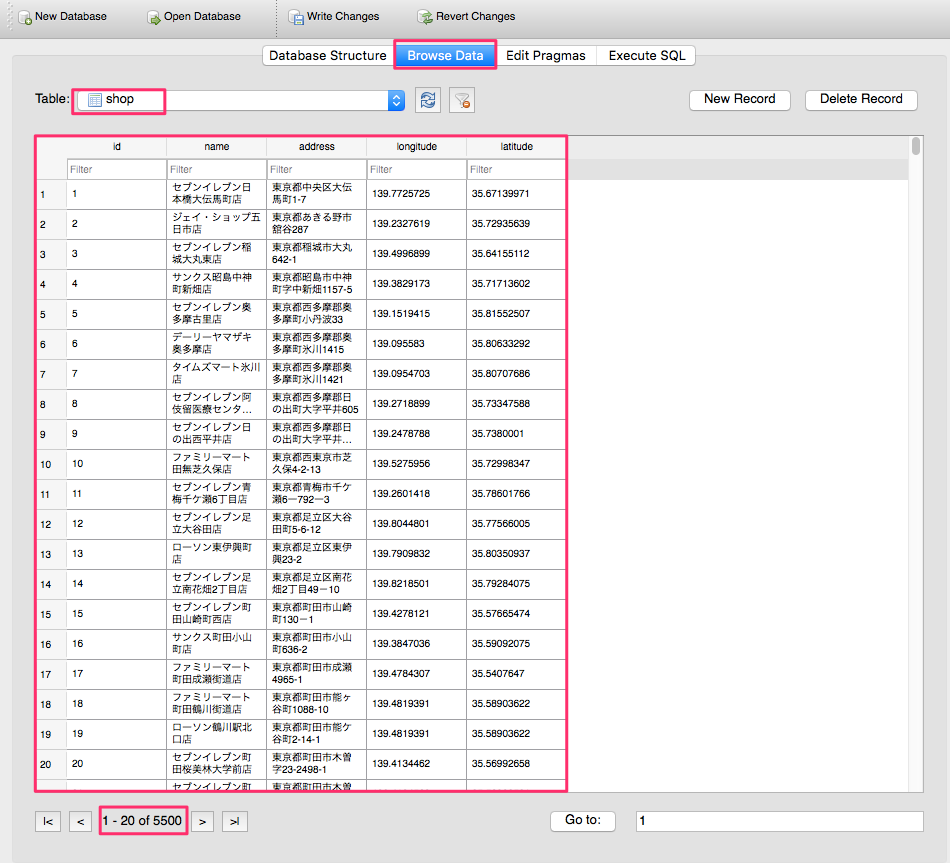
このようにBrowse Dataのタブをタップしてデータが保存されていることを確認してください。
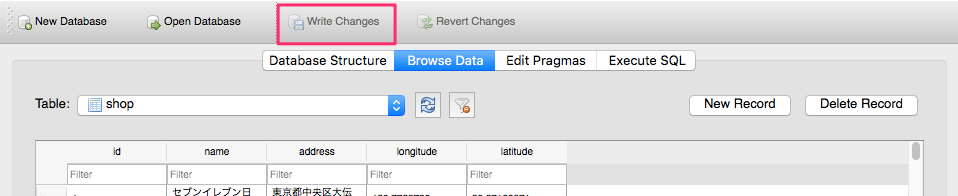
最後にWrite Changesをクリックして保存してください。
これでデータベースの作成は完了です。
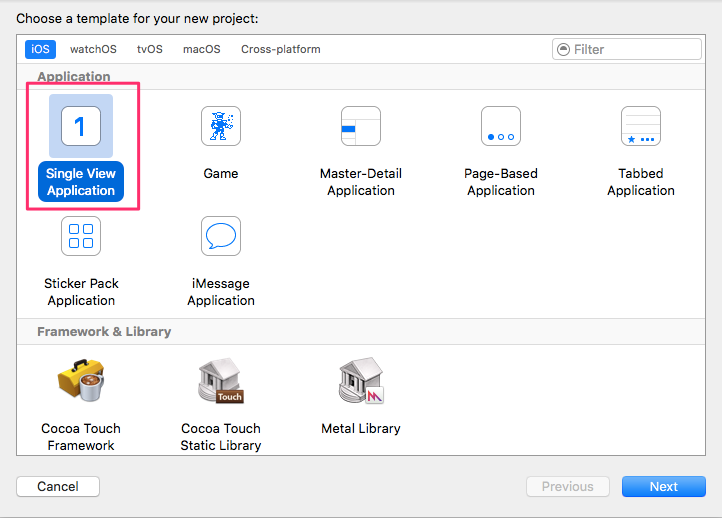
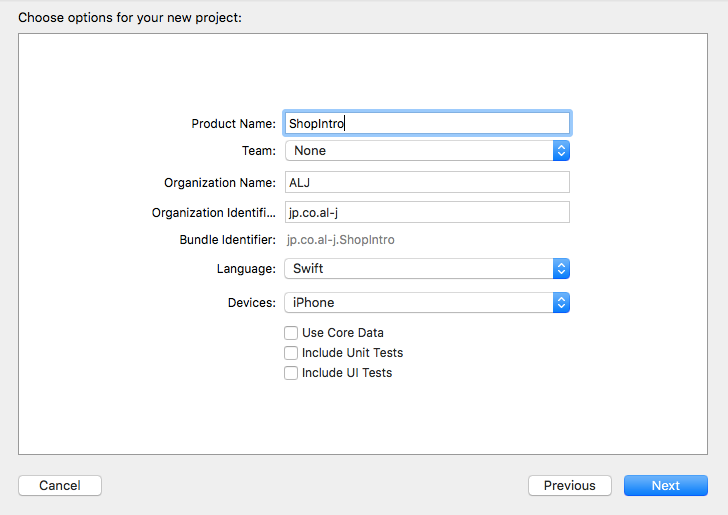
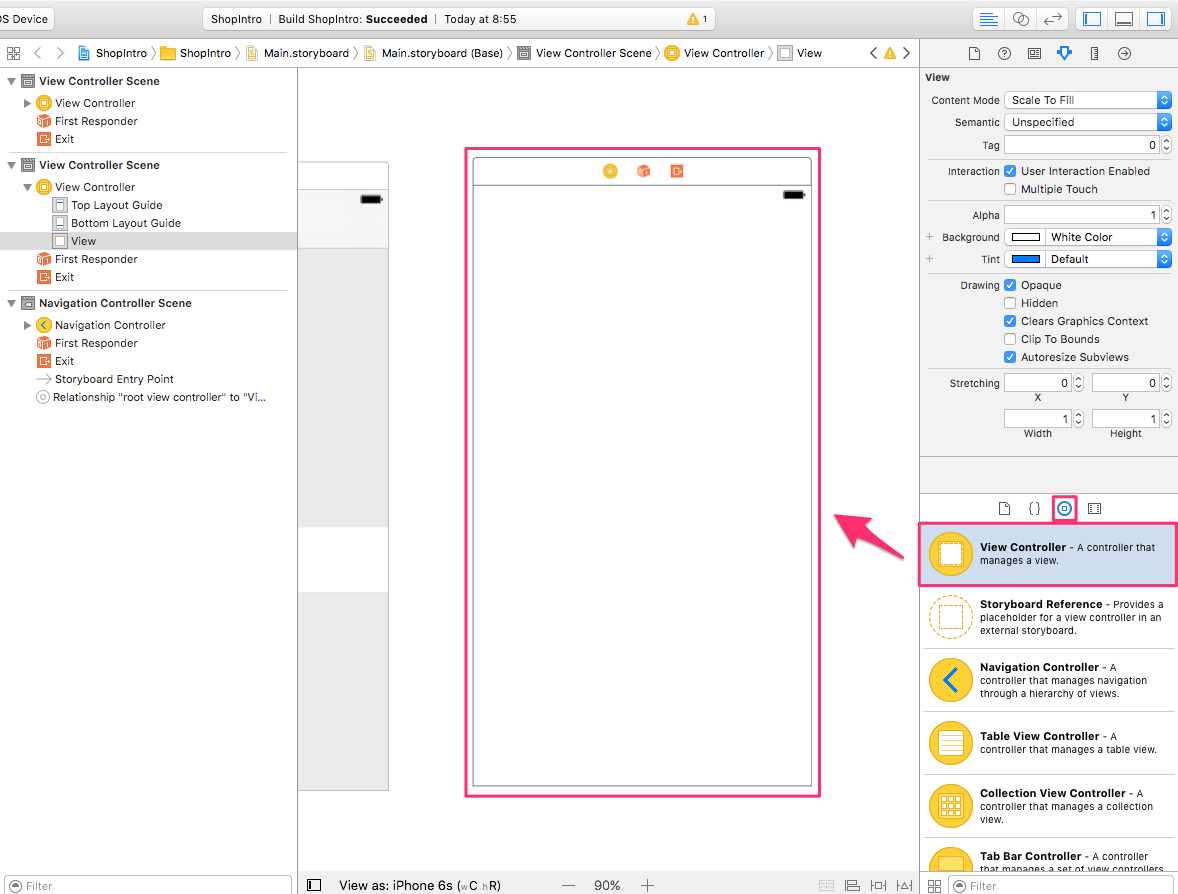
Xcodeプロジェクト作成 新規プロジェクトを立ち上げます。その際、使用するテンプレートはSingle View Applicationとなります。
入力項目
入力値
Product Name
ShopIntro
Team
None
Oganization Name
任意(”ALJ”など自分が所属している組織の名前を入れる)
Oganization Identifier
jp.co.al-j
Language
Swift
Devices
iPhone
Use Core Data
チェックを外す
include Unit Tests
チェックを外す
include UI Tests
チェックを外す
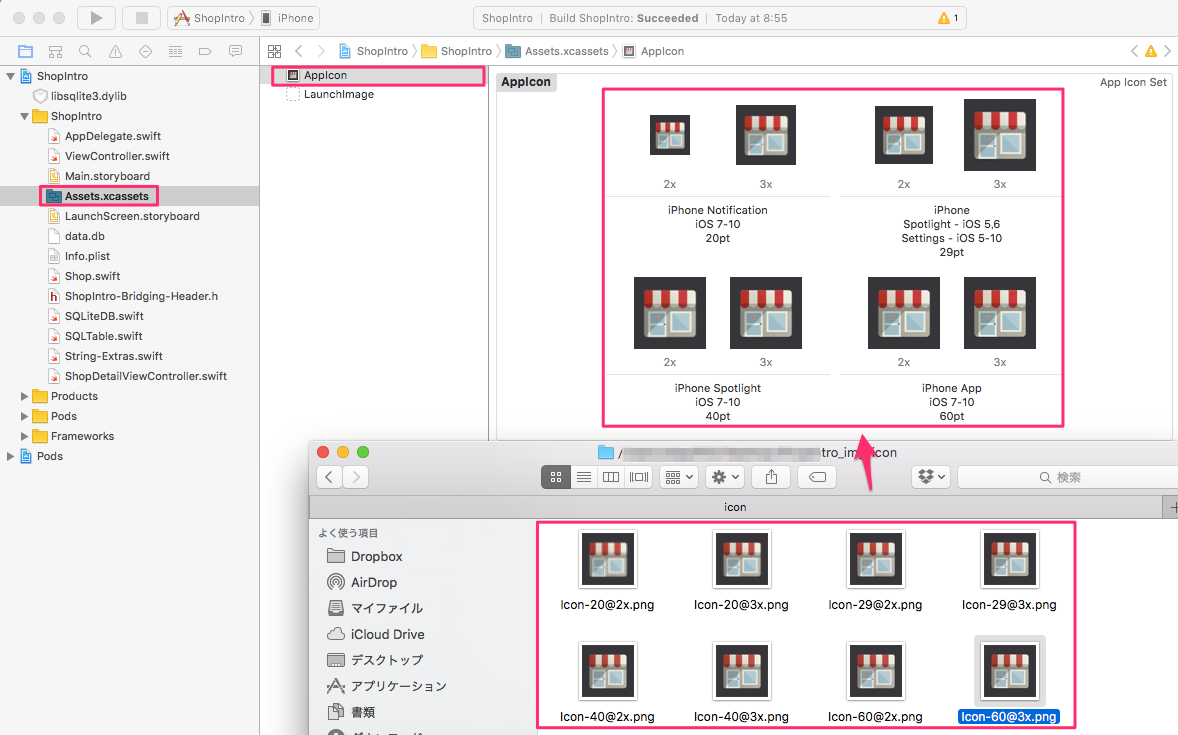
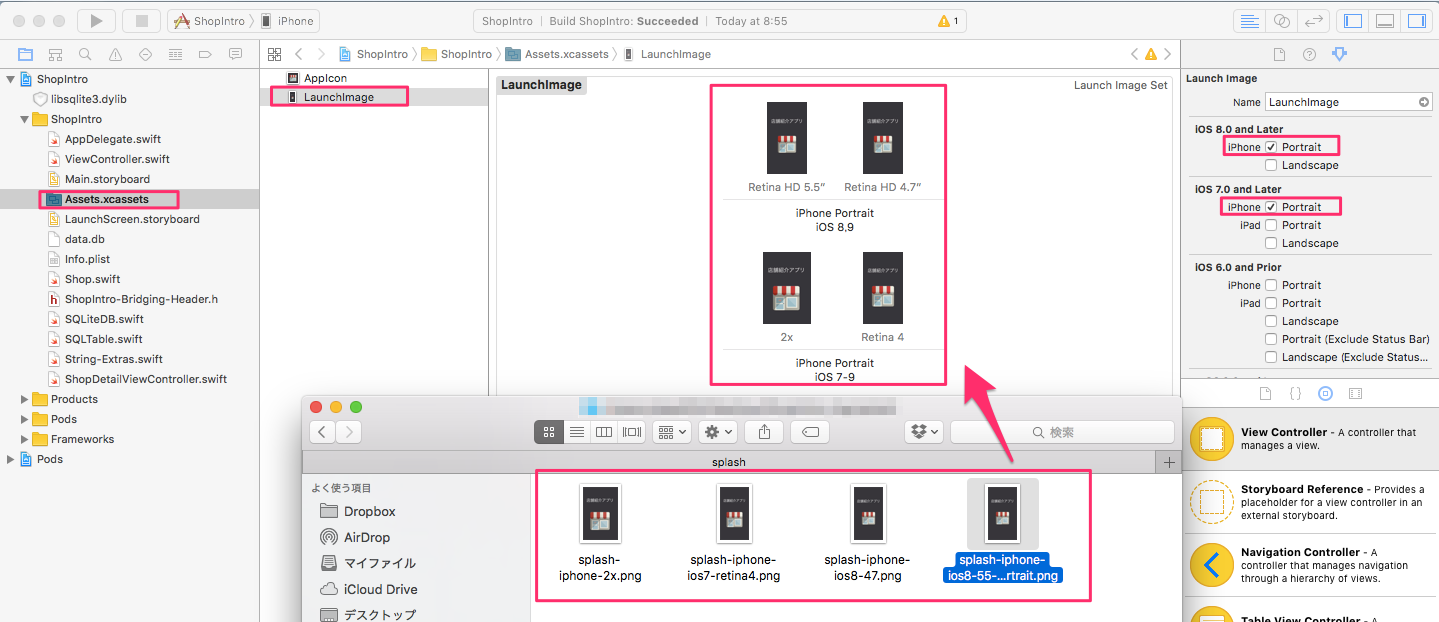
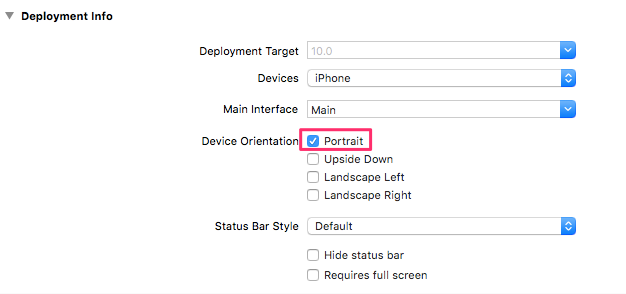
アプリの設定 新規プロジェクトを立ち上げたら、アプリの設定を行います。ここで、アプリのアイコンやアプリの表示タイトル(Bundle Name)、サポートするデバイスの向き(Device Orientation)を以下のように、設定します。
その前に、今回使用する外部素材ファイルを一気にインポートしてしまいましょう。
素材ダウンロード
今回使用する素材は以下の通りです。
ファイル名
説明
iphone-icon-60@2x.pngアイコンx2画像
iphone-icon-60@3x.pngアイコンx3画像
iphone-setting-29@2x.png設定x2画像
iphone-setting-29@3x.png設定x3画像
iphone-spotlight-40@2x.pngSpotlight用x2画像
iphone-spotlight-40@3x.pngSpotlight用x3画像
splash-iphone-2x.pngスプラッシュ画像x2画像
splash-iphone-ios7-retina4.pngスプラッシュiOS7画像
splash-iphone-ios8-47.pngスプラッシュiOS8画像 4.7インチ画像
splash-iphone-ios8-55-portrait.pngスプラッシュiOS8 5.5インチ画像
アイコン設定 画像素材のiconフォルダの中のアイコン画像をプロジェクトに取り込んでください。
スプラッシュ画像設定 画像素材のsplashフォルダの中のスプラッシュ画像をプロジェクトに取り込んでください。
サポートするデバイスの向きの設定 素材のインポートが完了したら、Project Editorを開き、アイコンをRetina Displayと書かれたエリアの上にドラッグします。
Bundle Nameの設定 アプリの表示タイトルを決めている設定項目「Bundle Name」を変更します。
入力項目
入力値
Bundle Name
店舗紹介
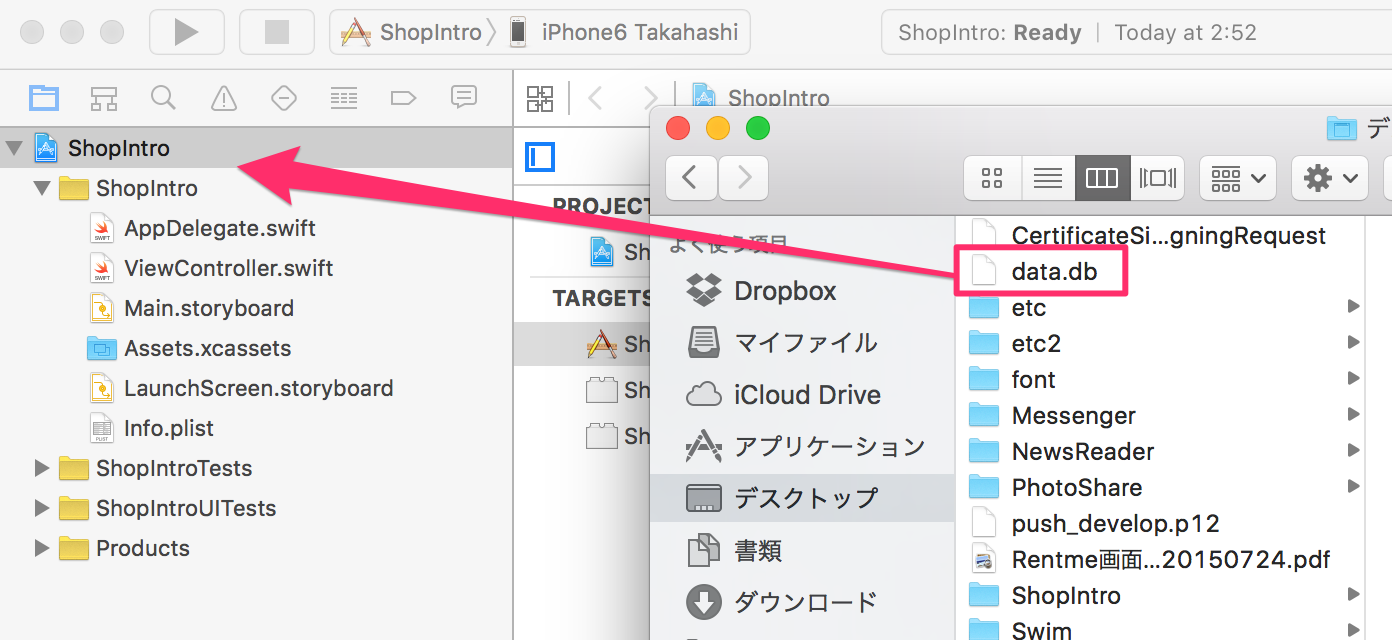
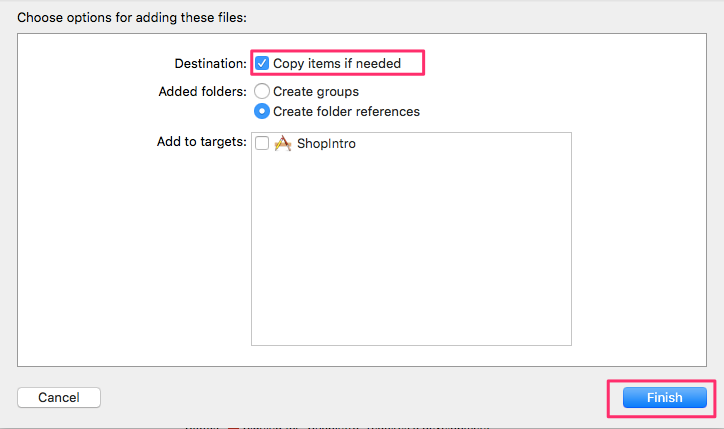
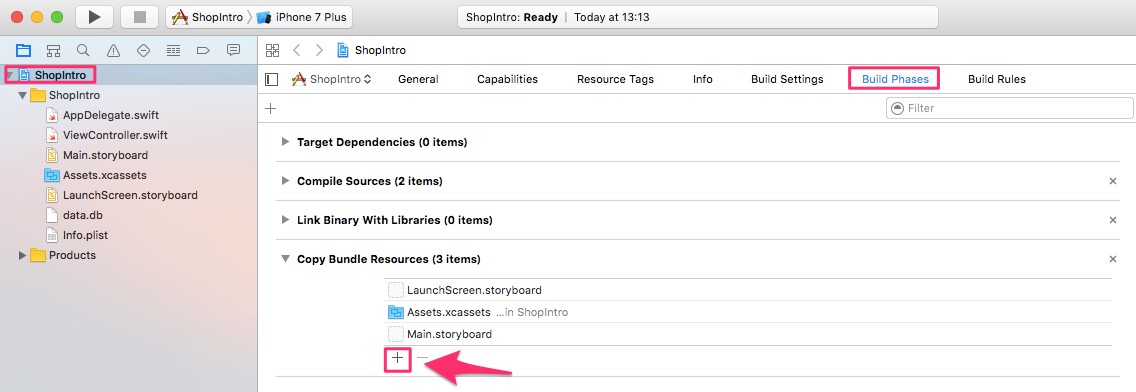
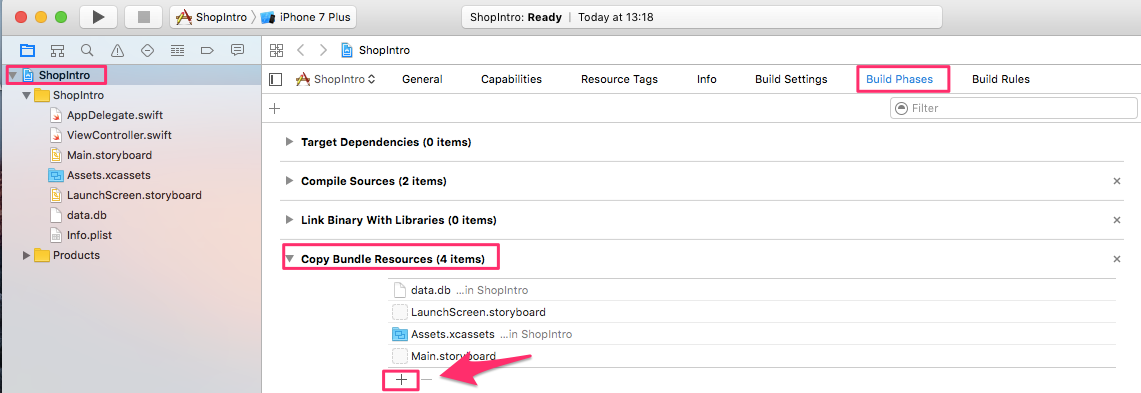
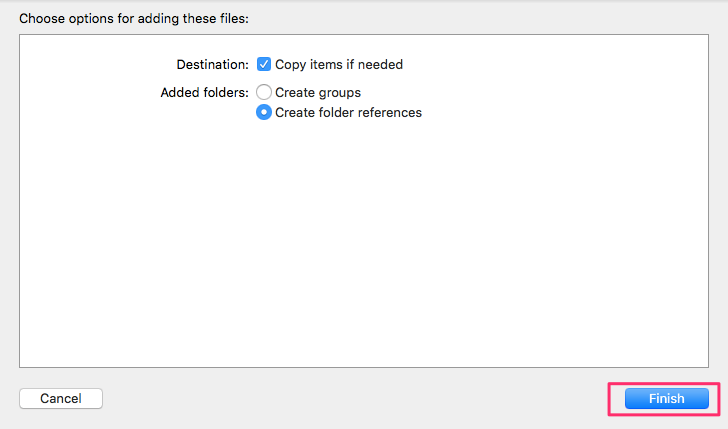
db.dataのインポート プロジェクトにdata.dbをドラッグ・ドロップし、Build PhasesのCopy Bundle Resourcesにdata.dbを追加します。
Copy Items if neededのチェックを有効にしてFinishをクリックします。
Build PhasesのCopy Bundle Resourcesの+(プラスボタン)をクリックします。
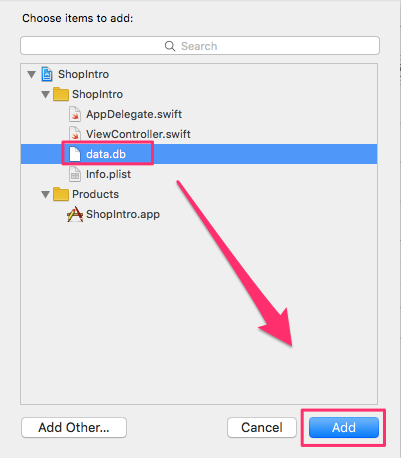
data.dbを選択してAddボタンを押して追加します。
以下のようにdata.dbが表示されていればOKです。
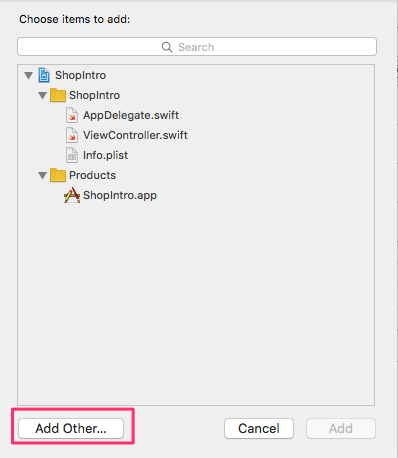
libsqlite3.0.dylibライブラリの追加 次にsqliteのライブラリをインポートします。
libsqlite3.0.dylibというライブラリを追加する必要があります。Build PhasesのLink Binary With Librariesを選択して+をクリックします。
次に表示される画面でAdd Other...をクリックします。
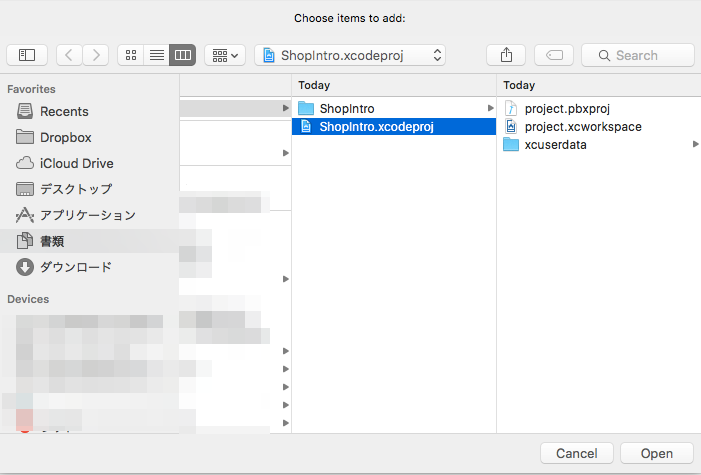
この画面が表示されているときにCommand + Shift + gをタイプしてください。
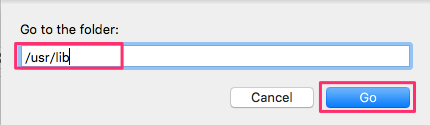
そうするとフォルダのパスを入力する画面が表示されるので/usr/libを入力してGoボタンをクリックします。
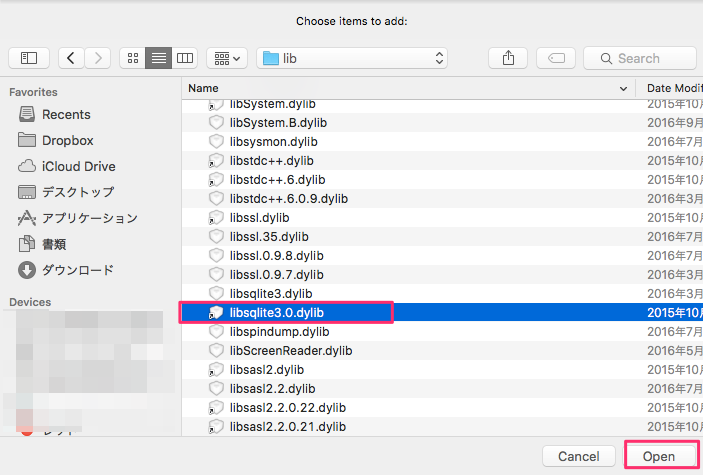
開いた画面で下にスクロールしlibsqlite3.0.dylibを選択してOpenボタンをクリックします。
これでライブラリが追加されました。
画面レイアウト Main.storyboardで画面レイアウトを構築していきます。
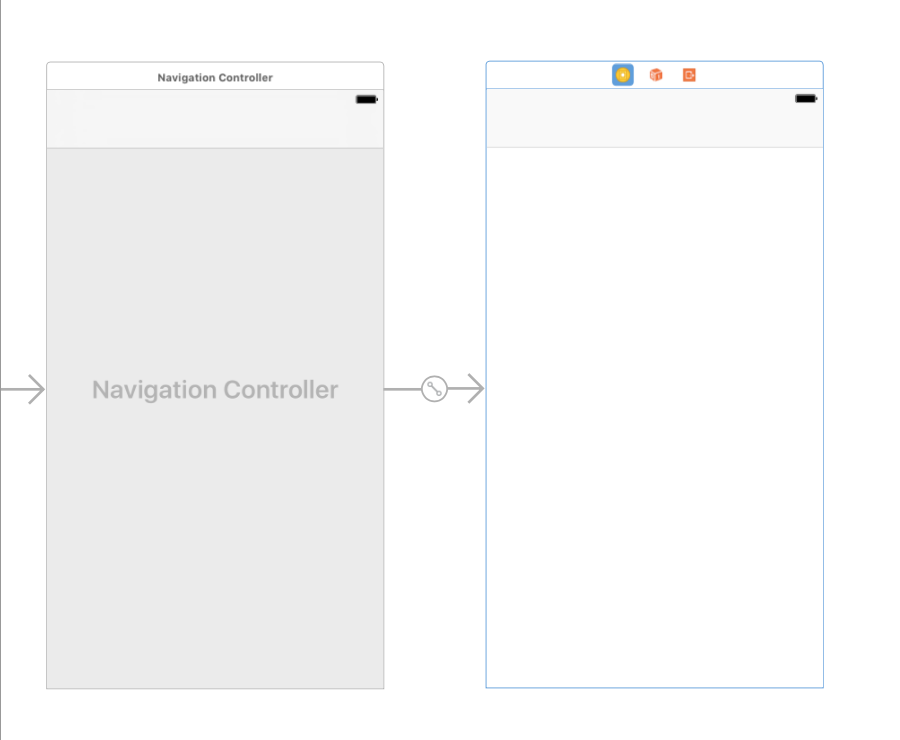
NavigationControllerを追加してTODOリストとTODO詳細を行き来できるようにします。Editer -> Embed in -> NavigationControllerを選択してください。
このようにNavigationControllerが追加されます。
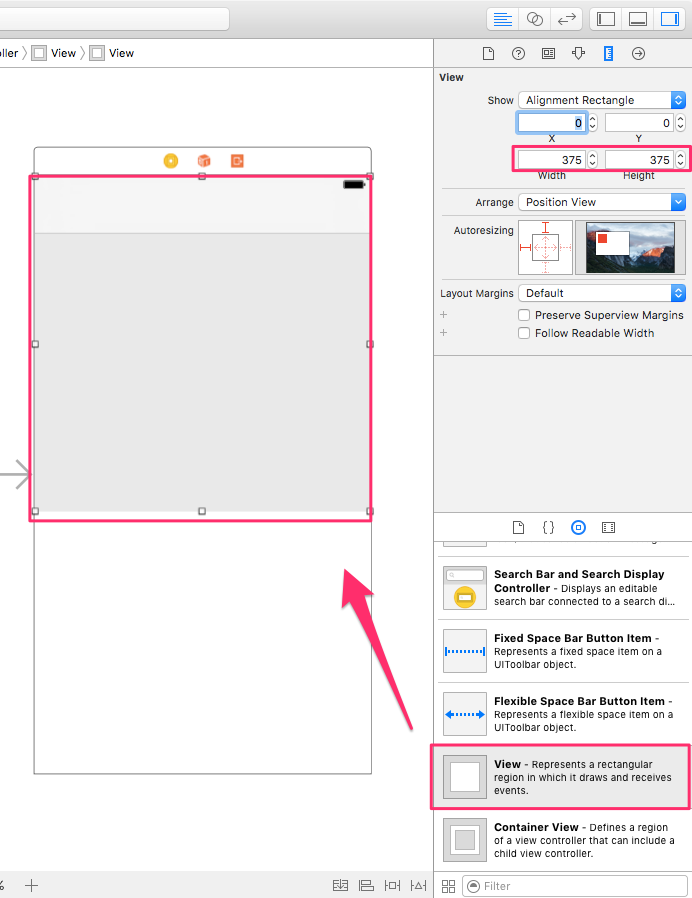
下図のようにViewを配置します。サイズ、位置も下図を見て設定してください。背景色はデフォルトだと白でわかりづらいので変更しておきましょう。
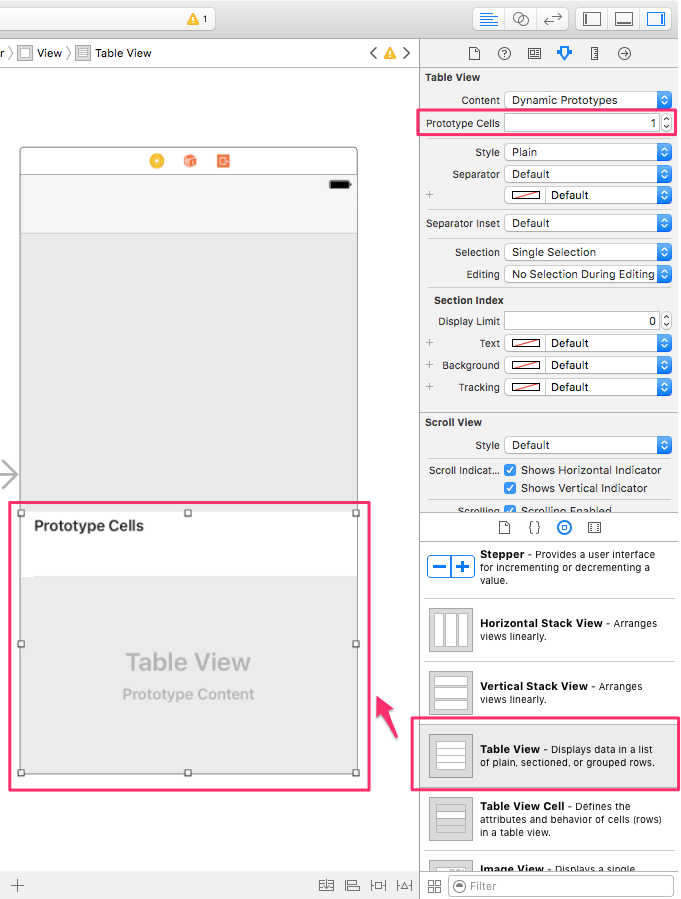
Viewの下のスペースにTableViewを配置します。Prototype Cellは1にしてください。
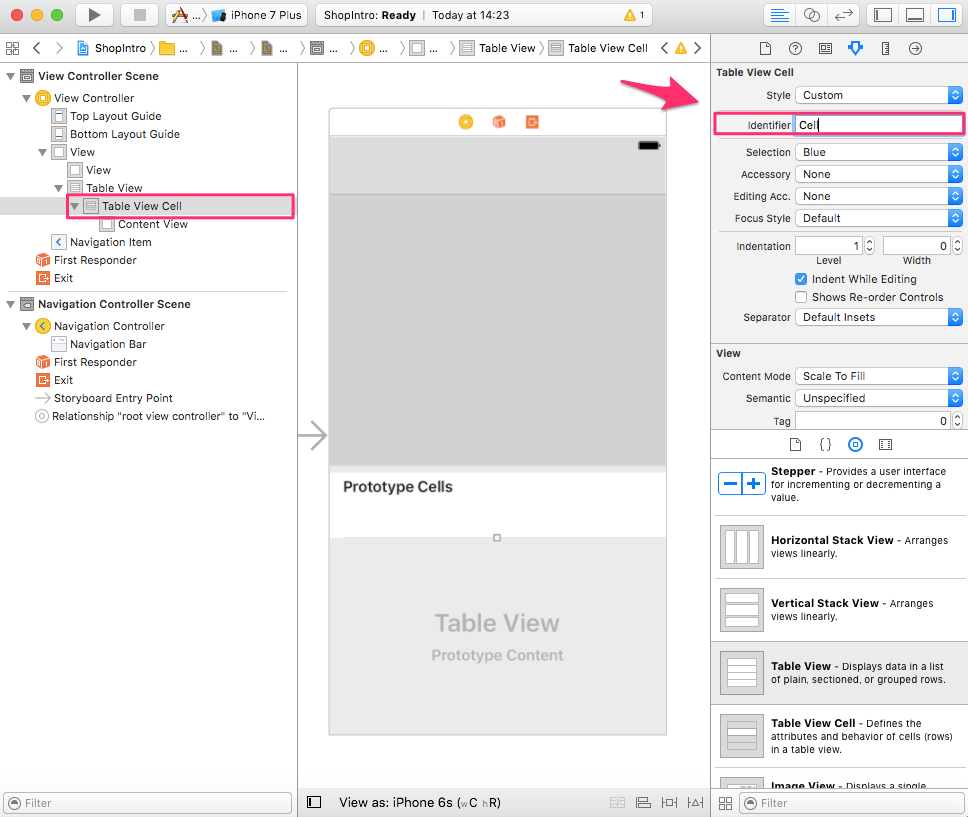
TableViewCellを選択して、IdentifierをCellにします。
Google Mapの利用 CocoaPodsにてGoogleMapSDKをインストール ターミナルでプロジェクトフォルダに移動し、下記のコマンドを実行します。
Podfileが作成されますのでそれをテキストエディタで開き、下記内容になるように修正し、保存してください。
ターミナル操作
Podfile
# Uncomment the next line to define a global platform for your project
# platform :ios, '9.0'

target 'ShopIntro' do
  # Comment the next line if you're not using Swift and don't want to use dynamic frameworks
  use_frameworks!

  # ▼▼ 追加 ▼▼
  pod 'GoogleMaps'
  # ▲▲ 追加 ▲▲

  # Pods for ShopIntro

end
そしてpod installをしてGoogleMapsとSQLite.swiftの導入します。
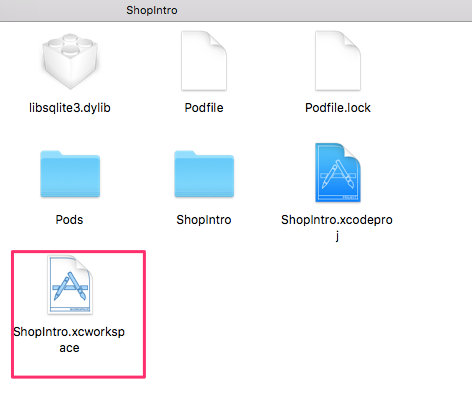
ShopIntro.xcworkspaceをダブルクリックして開き直します。
Google Maps SDK for iOSからAPIキーを取得する。 次にGoogleMapのAPIキーというものを設定します。GoogleMapはGoogle APIs ConsoleのServicesタブでGoogle Maps SDK for iOSをONにして、今回のアプリ用にAPIキーを発行しないと使用できません。
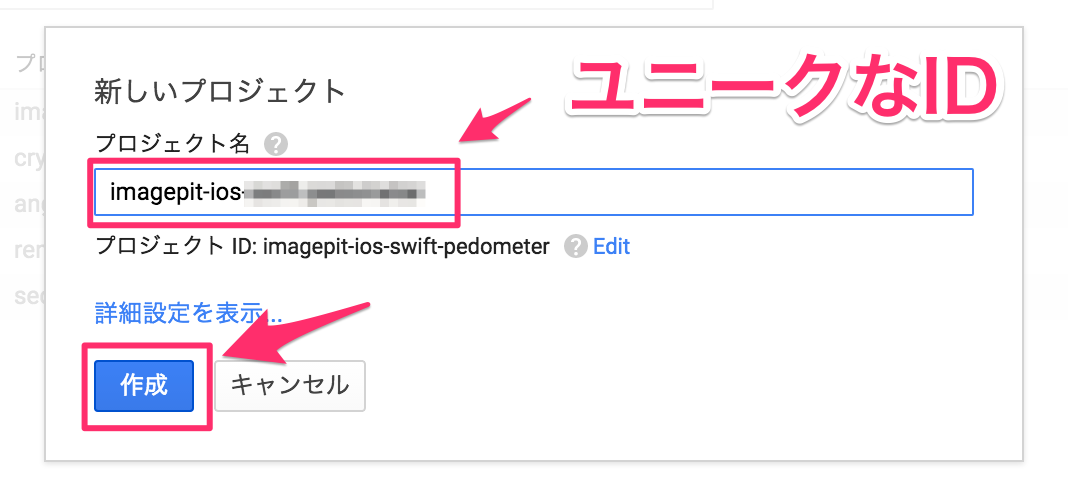
Google Maps SDK for iOSの利用手順 まずGoogle Developer Consoleにアクセスして新しいプロジェクトを作成します。
Google Developer Console
下図のとおりの操作でApi Keyを取得してください。
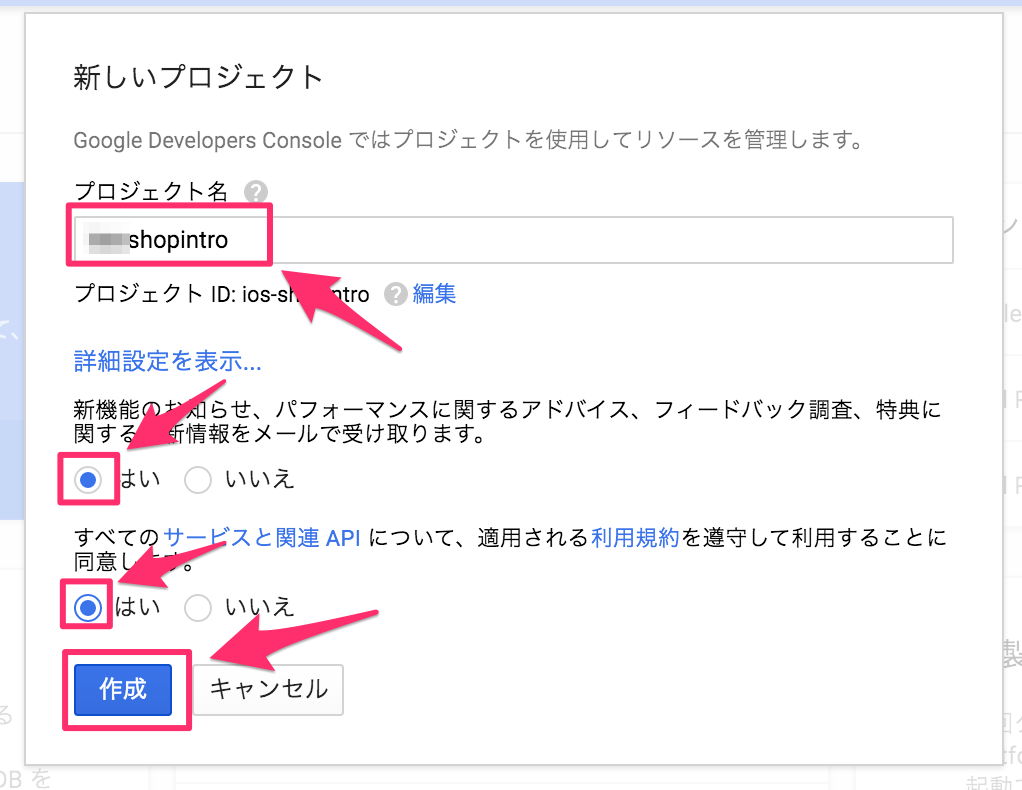
プロジェクト名を任意に入力し、ラジオボタンの箇所をはいを選択して作成ボタンをクリックします。
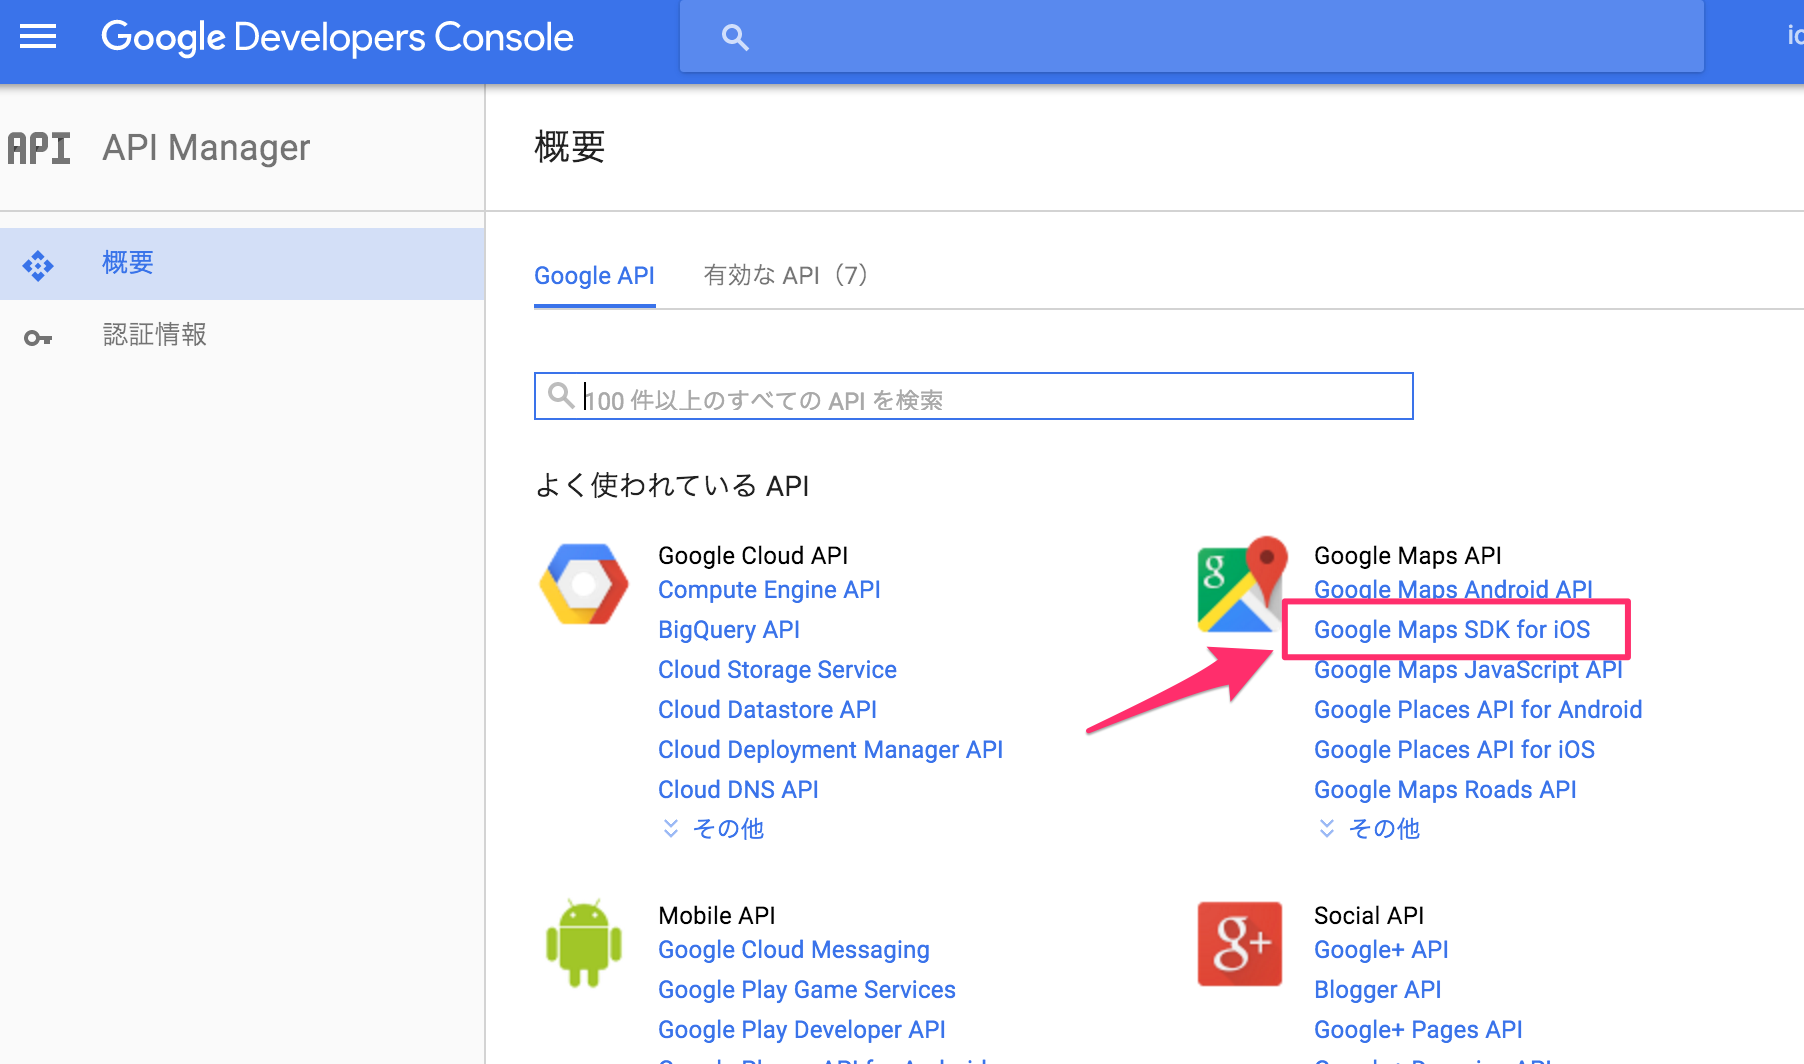
Google Maps SDK for iOSをクリックします。
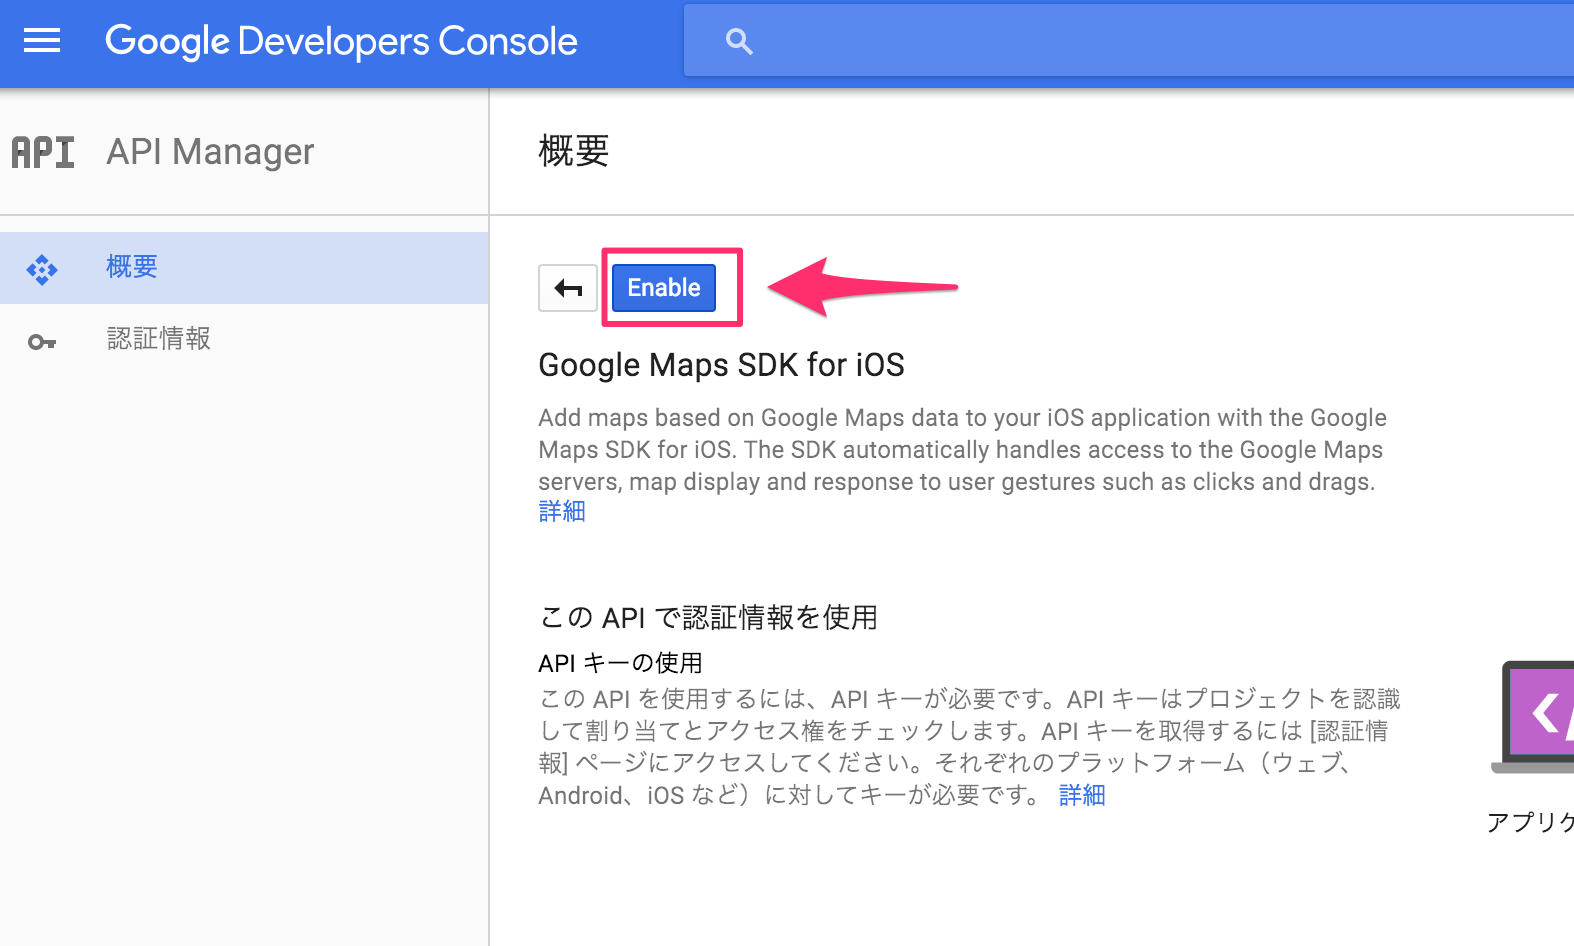
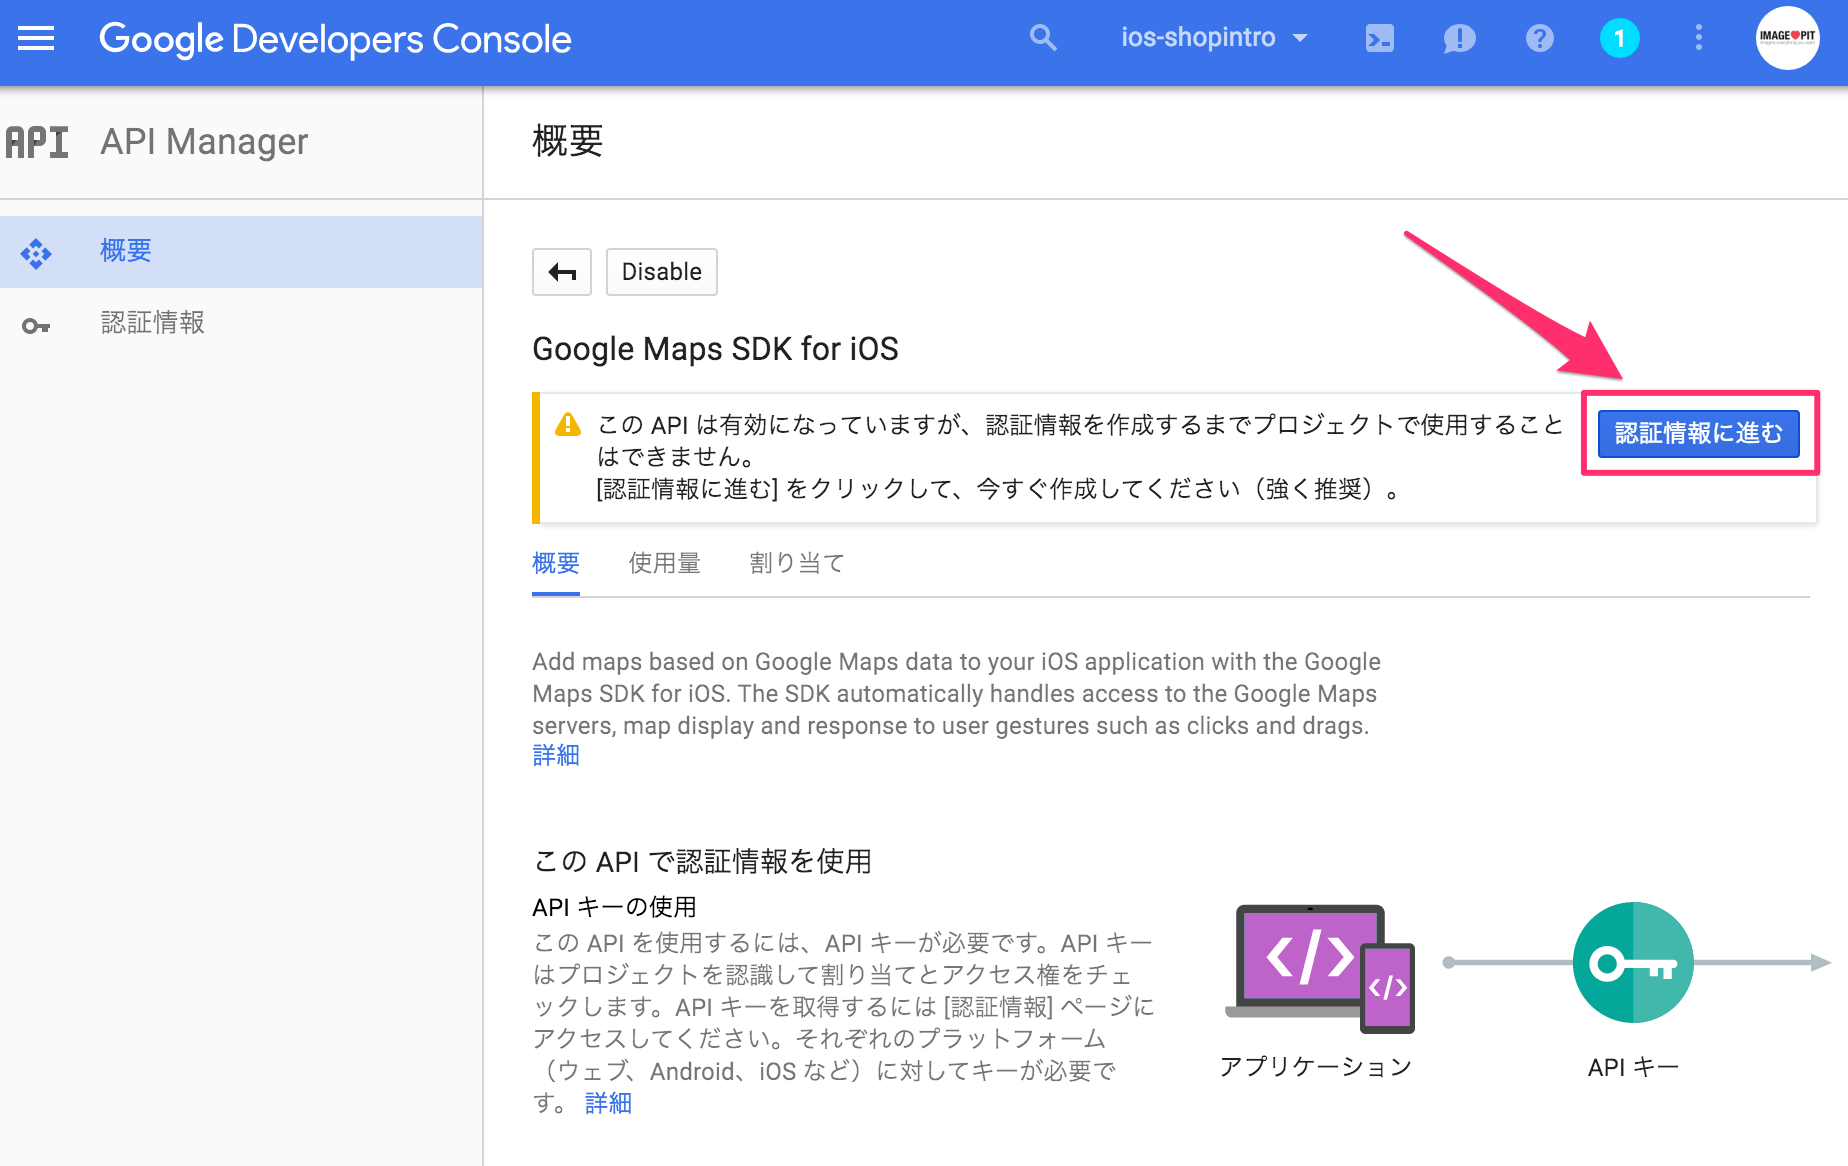
Enableをクリックします。
認証情報に進むをクリックします。
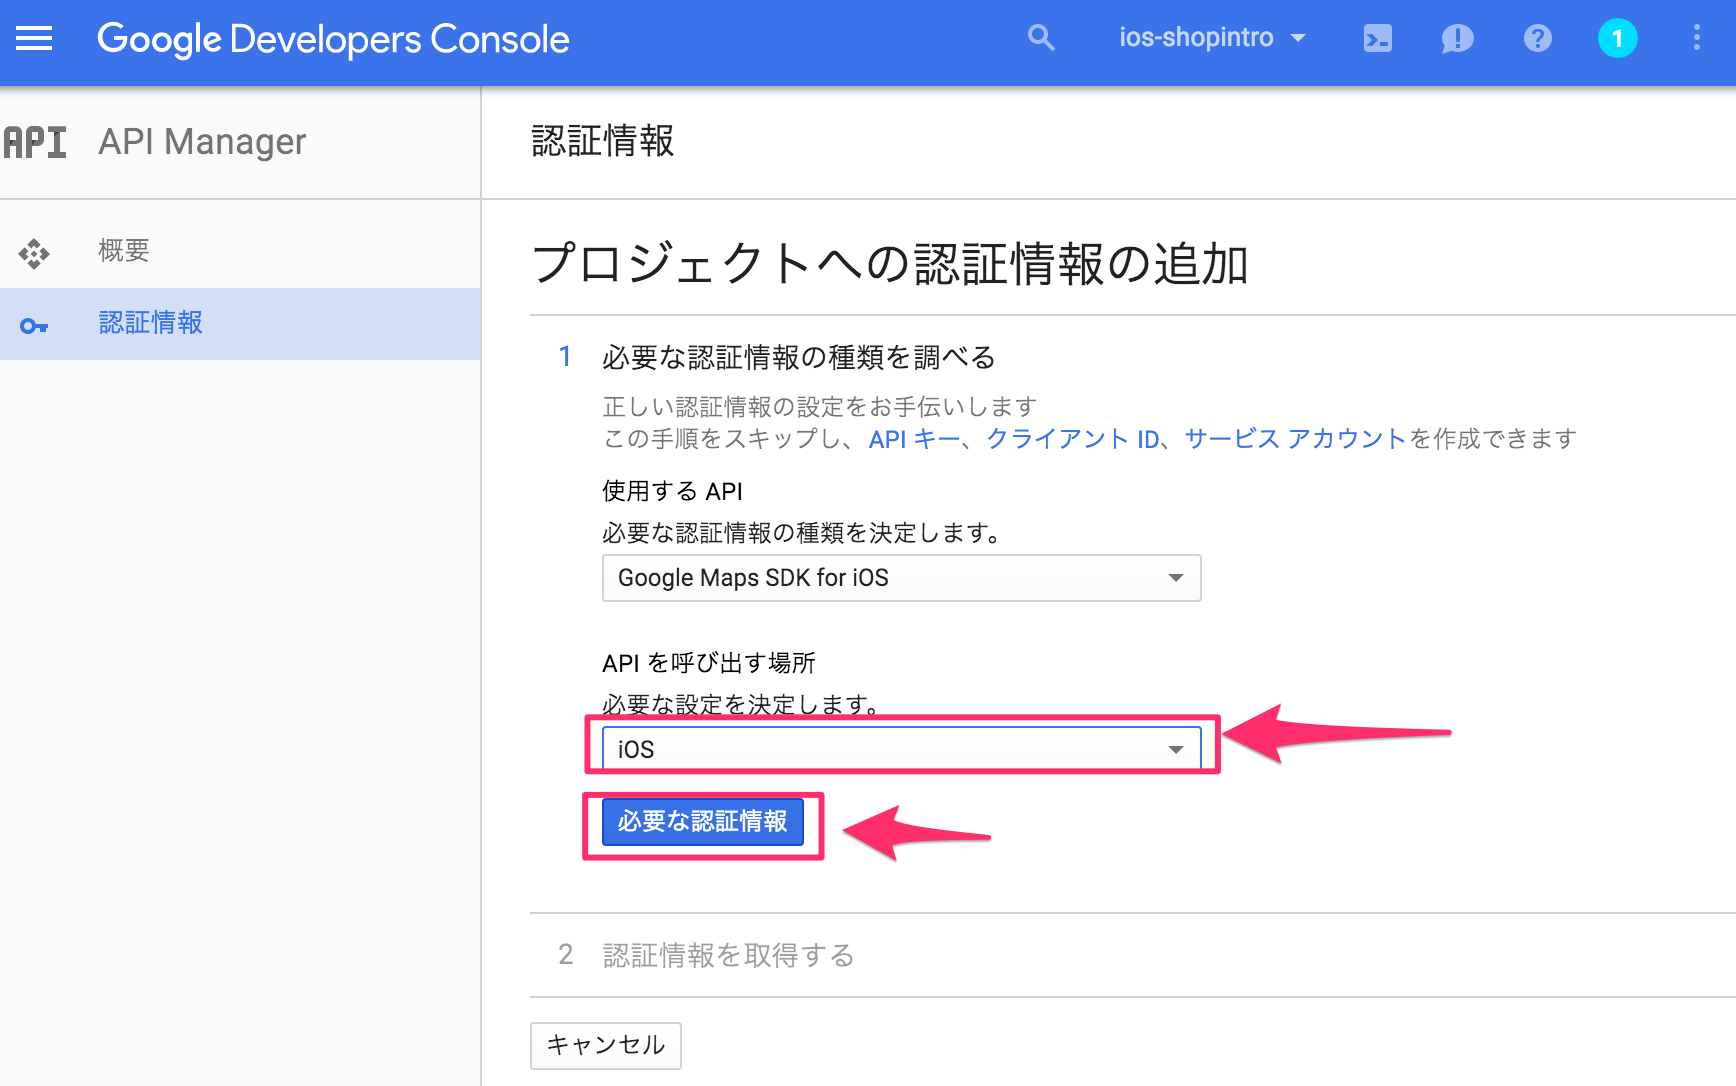
「APIを呼び出す場所」をiOSにして、必要な認証情報ボタンをクリックします。
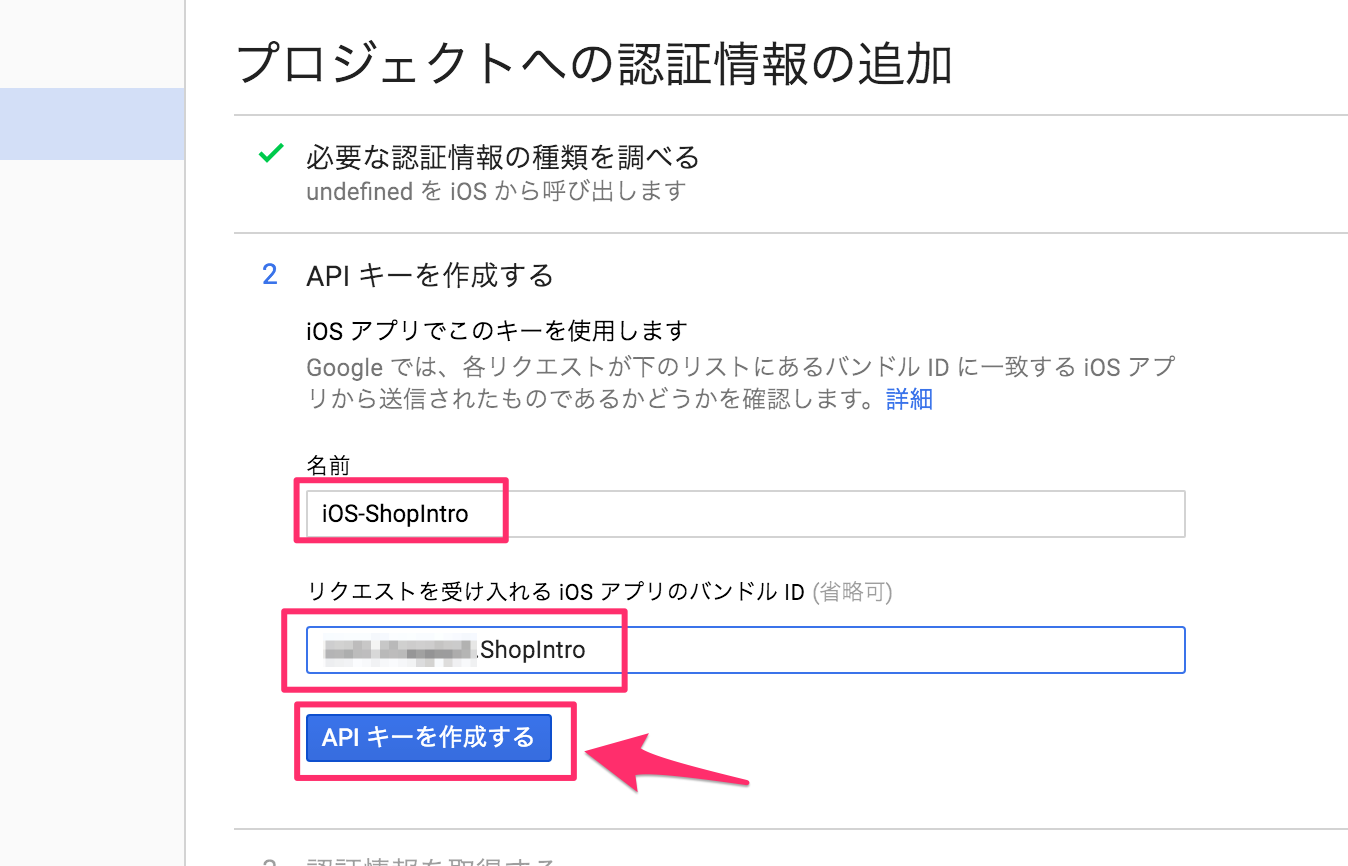
名前を任意に入力し、Xcodeプロジェクトに設定しているBundle Identifierを入力してAPIキーを作成するボタンをクリックします。
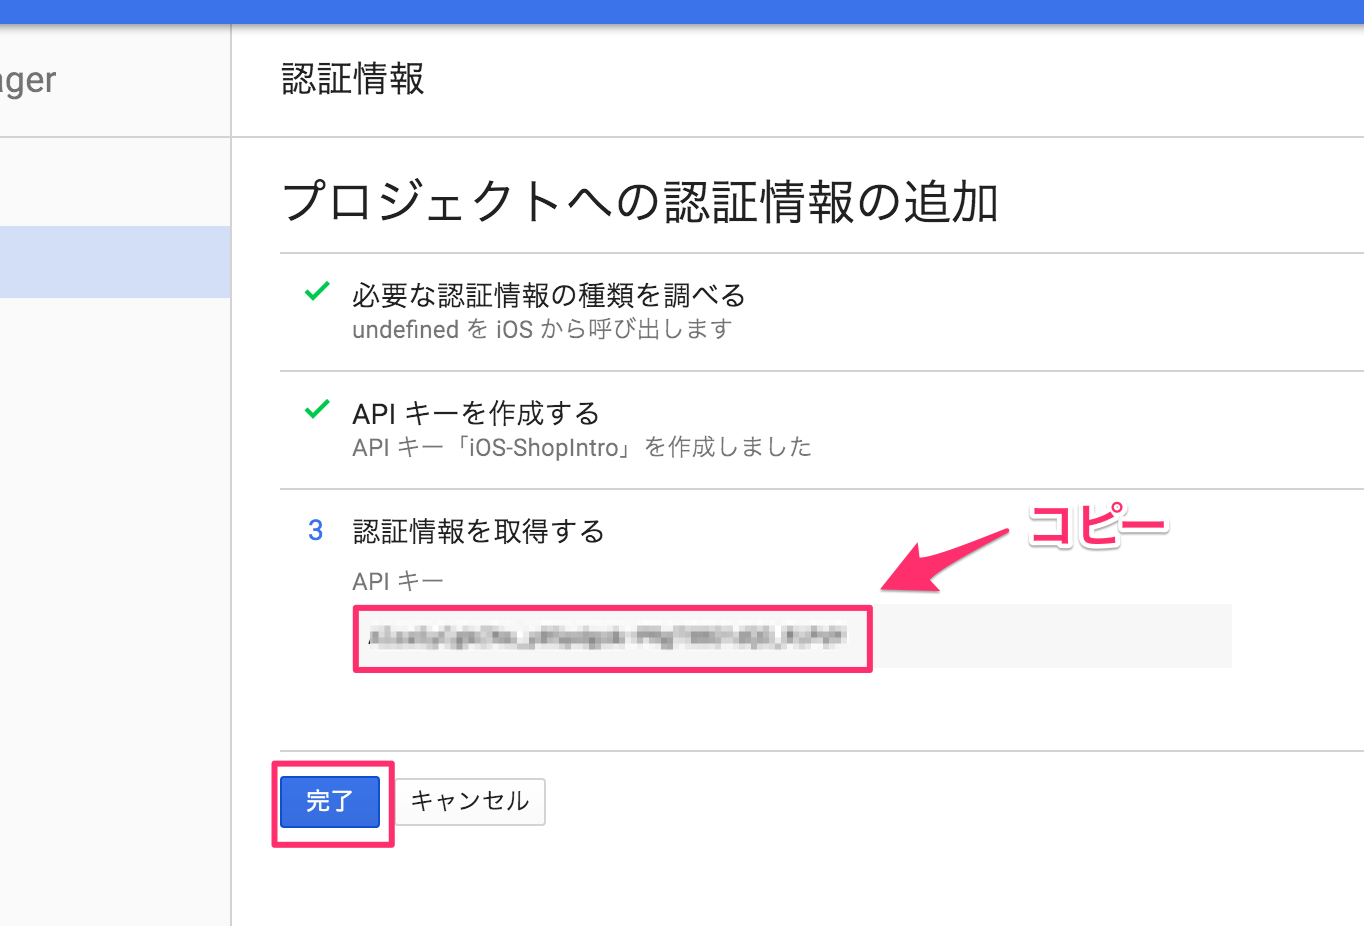
画面に表示されているAPIキーをコピーして完了ボタンをクリックしてください。
最後にAppDelegate.swiftにAPIキーの設定を行います。下記のように「AppDelegate.swift」にコードを追加してください。
AppDelegate.swift
import UIKit
// ▼ ▼ ▼ ▼ ▼ ▼ ▼ ▼ ▼ 追加 ▼ ▼ ▼ ▼ ▼ ▼ ▼ ▼ ▼
import GoogleMaps
// ▲ ▲ ▲ ▲ ▲ ▲ ▲ ▲ ▲ 追加 ▲ ▲ ▲ ▲ ▲ ▲ ▲ ▲ ▲
@UIApplicationMain
class AppDelegate: UIResponder, UIApplicationDelegate {

var window: UIWindow?

func application(_ application: UIApplication, didFinishLaunchingWithOptions launchOptions: [UIApplicationLaunchOptionsKey: Any]?) -> Bool {
    // Override point for customization after application launch.
    // ▼ ▼ ▼ ▼ ▼ ▼ ▼ ▼ ▼ 追加 ▼ ▼ ▼ ▼ ▼ ▼ ▼ ▼ ▼
    GMSServices.provideAPIKey("API keyをペースト")
    // ▲ ▲ ▲ ▲ ▲ ▲ ▲ ▲ ▲ 追加 ▲ ▲ ▲ ▲ ▲ ▲ ▲ ▲ ▲
    return true
}
これでGoogleMapを利用するための準備が整いました。
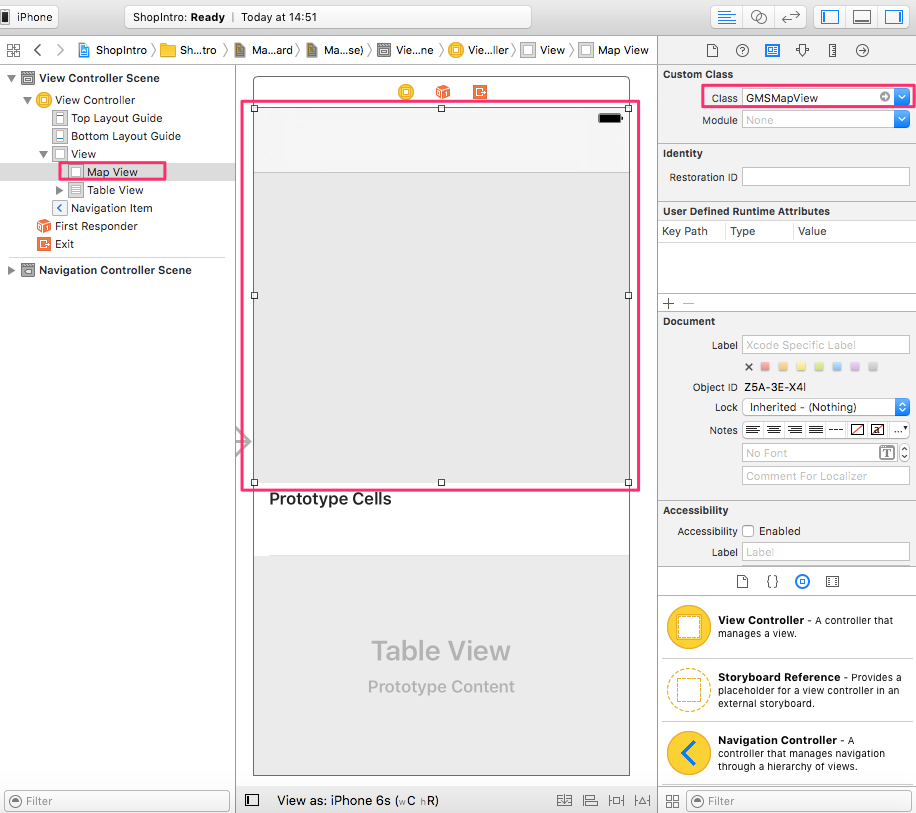
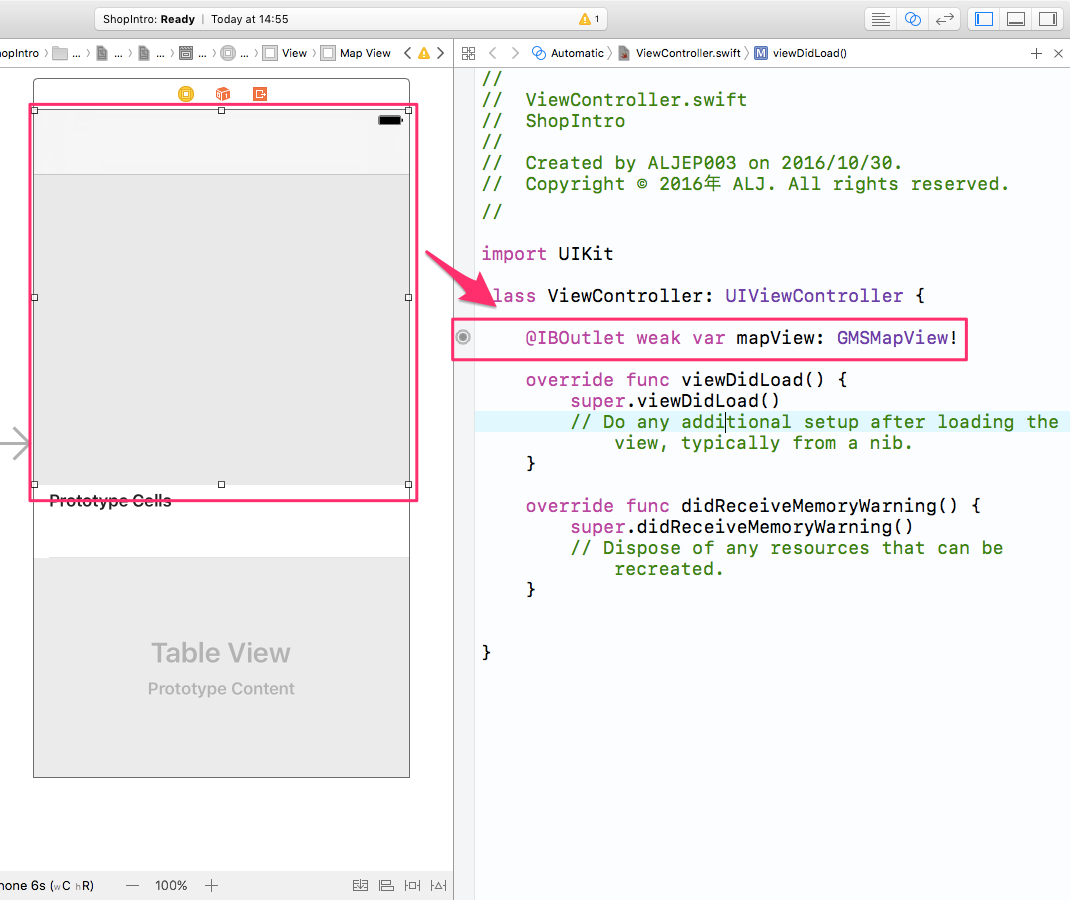
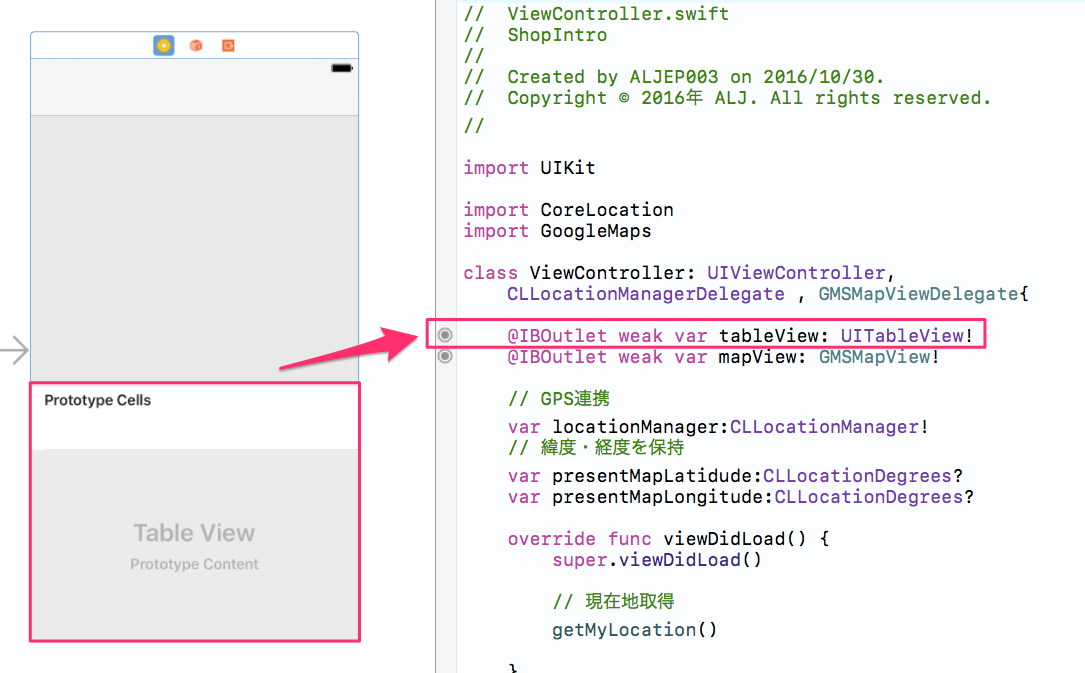
店舗を探す画面 Main.storyboardを開き先程配置したViewの要素を選択しGMSMapViewに変更しておきます。
IBOutLetにて接続しておきます。
現在地取得 ViewController.swift
import UIKitimport GoogleMapsimport CoreLocationclass ViewController : UIViewController ,CLLocationManagerDelegate : : var locationManager:CLLocationManager ! var presentMapLatidude:CLLocationDegrees ? var presentMapLongitude:CLLocationDegrees ? : : override func viewDidLoad () super .viewDidLoad() getMyLocation() } func getMyLocation () locationManager = CLLocationManager () locationManager.delegate = self locationManager.desiredAccuracy = kCLLocationAccuracyBest locationManager.distanceFilter = 100 locationManager.startUpdatingLocation() let status = CLLocationManager .authorizationStatus() if (status == CLAuthorizationStatus .notDetermined) { print ("didChangeAuthorizationStatus:\(status) " ); self .locationManager.requestAlwaysAuthorization() } locationManager.startUpdatingLocation() } func locationManager (_ manager: CLLocationManager, didChangeAuthorization status: CLAuthorizationStatus) var statusStr = "" ; switch (status) { case .notDetermined: statusStr = "NotDetermined" case .restricted: statusStr = "Restricted" case .denied: statusStr = "Denied" case .authorized: statusStr = "Authorized" case .authorizedWhenInUse: statusStr = "AuthorizedWhenInUse" } print (" CLAuthorizationStatus: \(statusStr) " ) } func locationManager (_ manager: CLLocationManager, didFailWithError error: Error) print (error) } func locationManager (_ manager: CLLocationManager, didUpdateLocations locations: [CLLocation]) locationManager.stopUpdatingLocation() let cordinate = locations[0 ].coordinate print ("緯度:\(cordinate.latitude) " ) print ("経度:\(cordinate.longitude) " ) presentMapLatidude = cordinate.latitude presentMapLongitude = cordinate.longitude } : : }
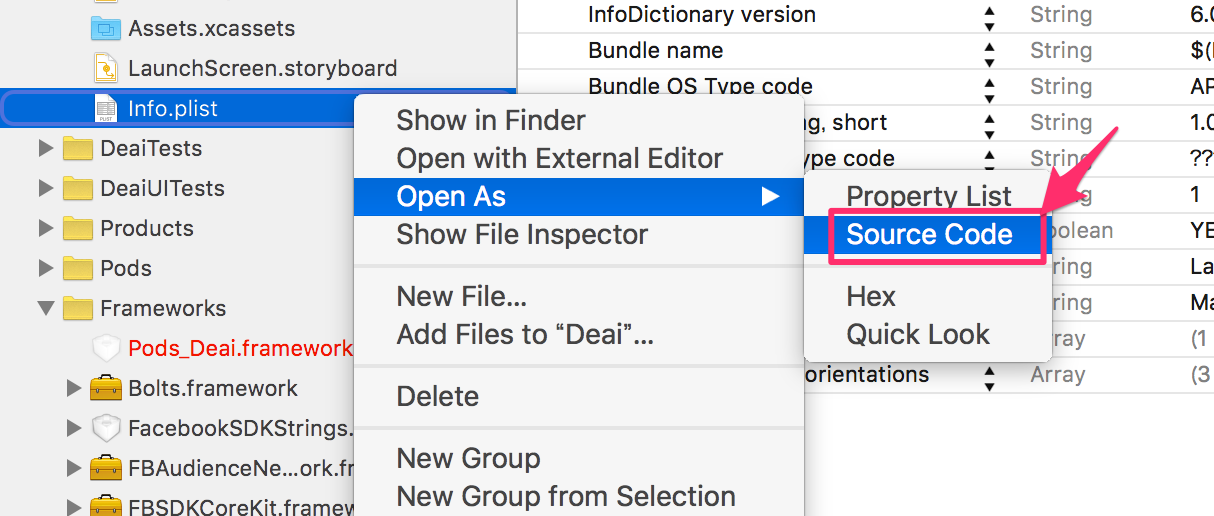
現在地を取得するためにはinfo.plistファイルに下記の内容を追加する必要があります。info.plistで右クリックし、Open As -> Source Codeをクリックします。info.plistの中身であるXML形式のファイルがエディタエリアに表示されます。
XML形式の中身が表示されたら以下の要素を追加します。
LSApplicationQueriesSchemes
NSLocationWhenInUseUsageDescription
NSLocationAlwaysUsageDescription
<?xml version="1.0" encoding="UTF-8"?>
<!DOCTYPE plist PUBLIC "-//Apple//DTD PLIST 1.0//EN" "http://www.apple.com/DTDs/PropertyList-1.0.dtd">
<plist version="1.0">
    <!-- ▼▼ 追加 ▼▼-->
    <key>LSApplicationQueriesSchemes</key>
    <array>
        <string>googlechromes</string>
        <string>comgooglemaps</string>
    </array>
    <key>NSLocationWhenInUseUsageDescription</key>
    <string>Use CoreLocation</string>
    <key>NSLocationAlwaysUsageDescription</key>
    <string>Use CoreLocation</string>
    <!-- ▲▲ 追加 ▲▲-->
    <key>CFBundleDevelopmentRegion</key>
    <string>en</string>
    <key>CFBundleExecutable</key>
    <string>$(EXECUTABLE_NAME)</string>
    <key>CFBundleIdentifier</key>
    <string>$(PRODUCT_BUNDLE_IDENTIFIER)</string>
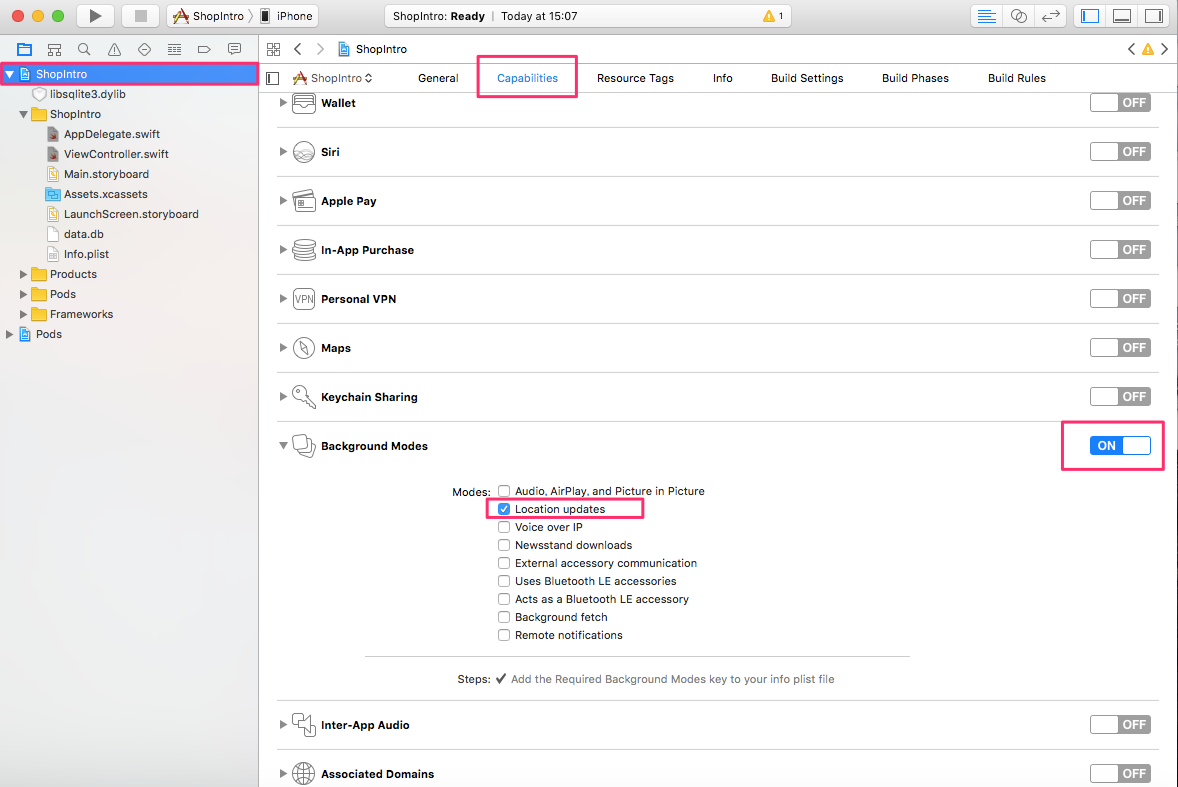
またプロジェクトエディタのCapabilitiesのBackground ModesをOnにしLocation updatesのチェックボックスを有効にしてください。
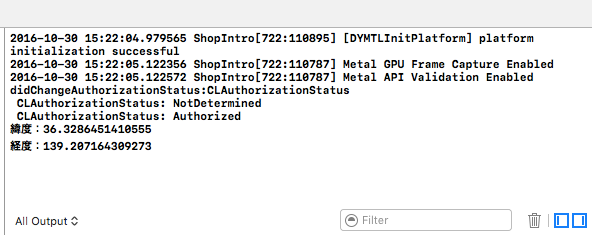
この状態で一度実機でRunして動作確認しておいきましょう。
Google Map表示 GMSMapViewDelegateを追加してMapの中央を現在地に移動させるようにしてみましょう。
import UIKitimport CoreLocationimport GoogleMapsclass ViewController : UIViewController ,CLLocationManagerDelegate ,GMSMapViewDelegate : : : func locationManager (_ manager: CLLocationManager, didUpdateLocations locations: [CLLocation]) locationManager.stopUpdatingLocation() let cordinate = locations[0 ].coordinate print ("緯度:\(cordinate.latitude) " ) print ("経度:\(cordinate.longitude) " ) presentMapLatidude = cordinate.latitude presentMapLongitude = cordinate.longitude moveCameraPosition(latitude: cordinate.latitude,longitude:cordinate.longitude) } func moveCameraPosition (latitude: CLLocationDegrees,longitude:CLLocationDegrees) let camera = GMSCameraPosition .camera( withLatitude: latitude, longitude: longitude, zoom: 17 ) mapView.isMyLocationEnabled = true mapView.settings.myLocationButton = true mapView.delegate = self mapView.camera = camera } }
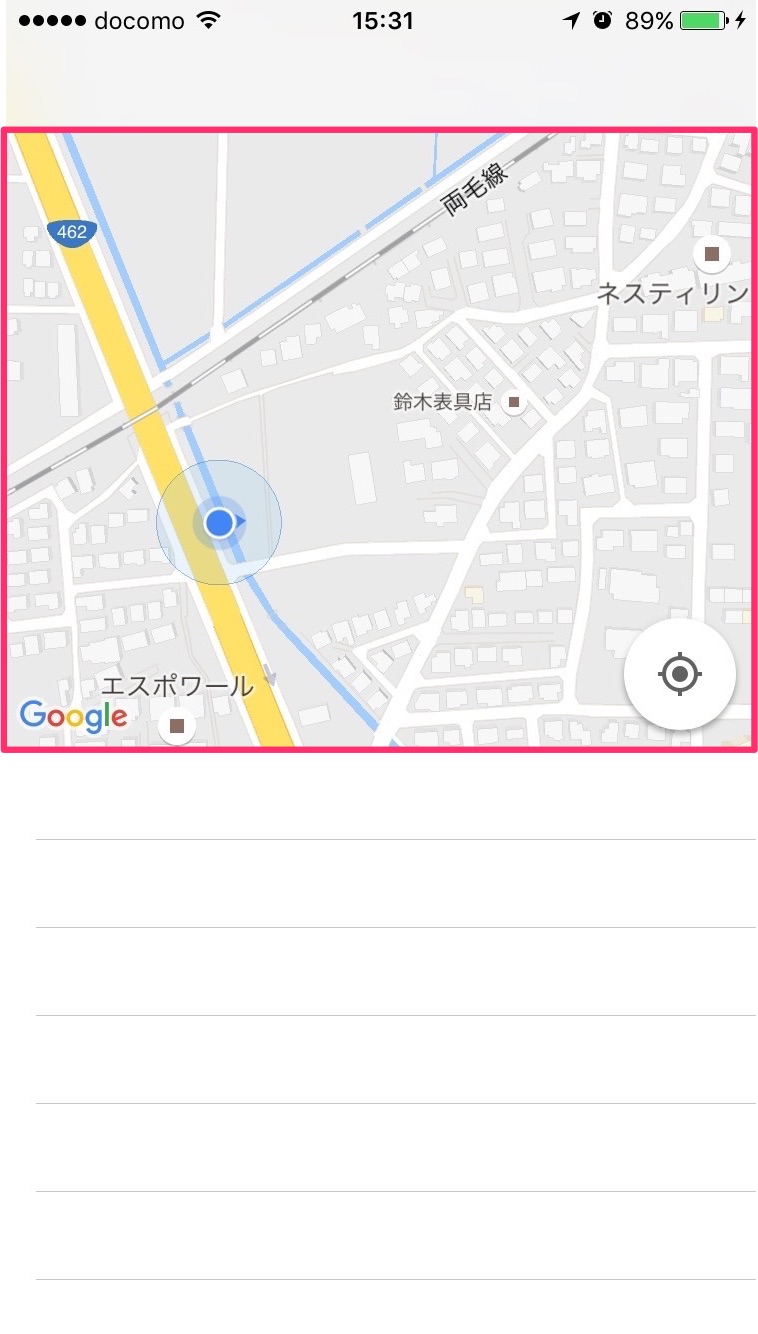
一度Runしてみましょう。現在位置でマップが表示されていればOKです。
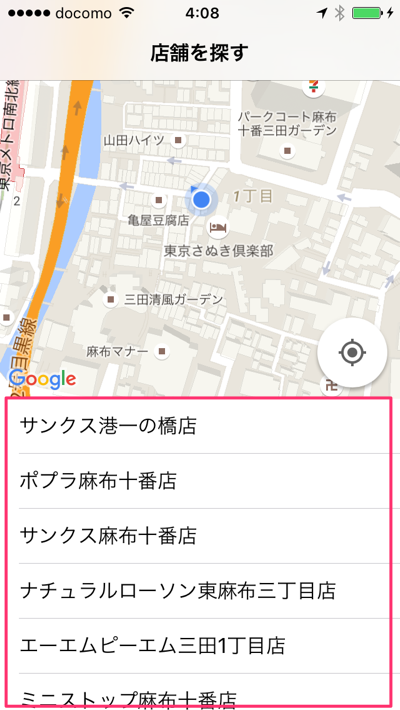
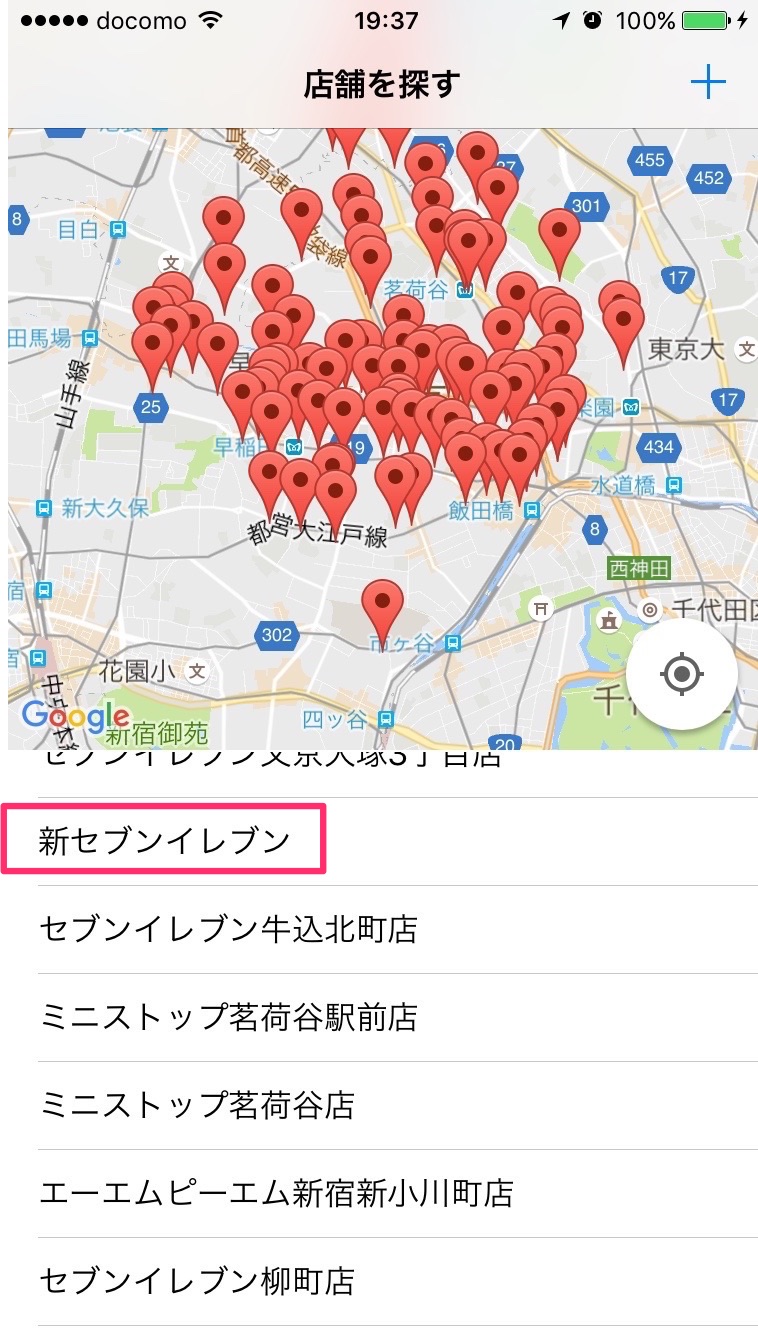
店舗データ取得(現在地から近い店舗) それでは次はインポートしたDBデータからレコードを取得してTableViewに表示する処理を追加します。
Main.storyboardを開きTableViewのIBOutletで関連付けてください。
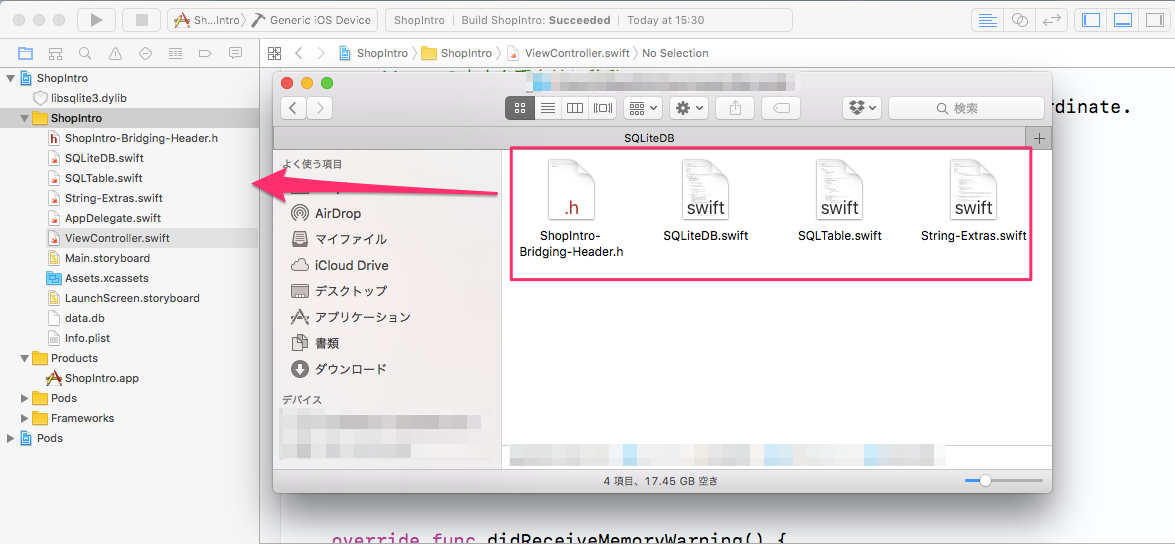
SQLiteを操作するためのライブラリをインポートします。
SQLiteライブラリダウンロード
zipファイルを解凍したらプロジェクトにドラッグしてコピーしてください。
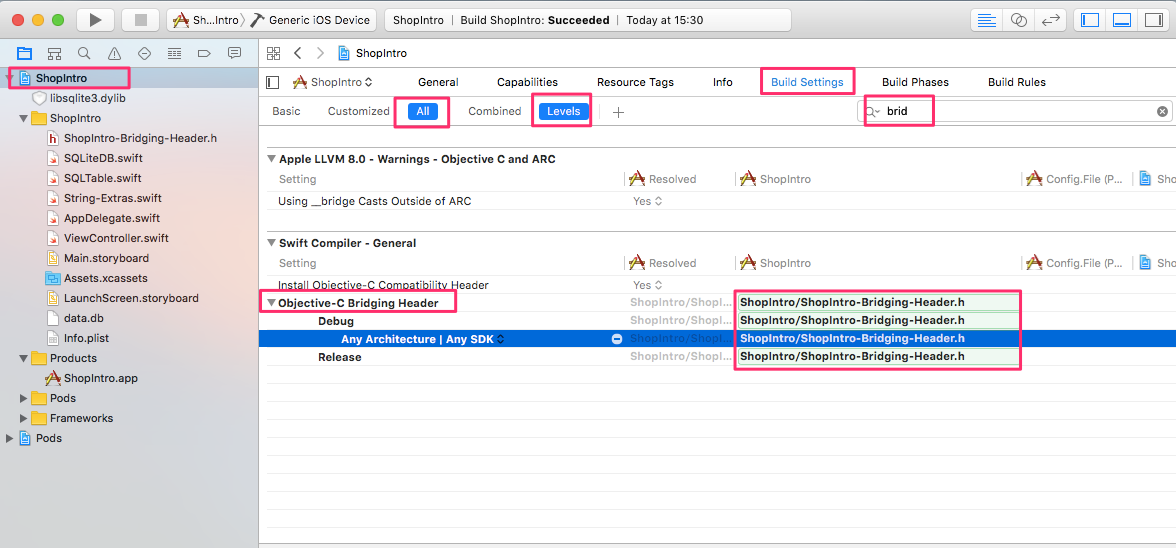
コピーしたら、下図のとおりにBuild Settingsでbridgと検索して表示されるObjective-C Bridging Headerの値をShopIntro/ShopIntro-Bridging-Header.hと入れてください。
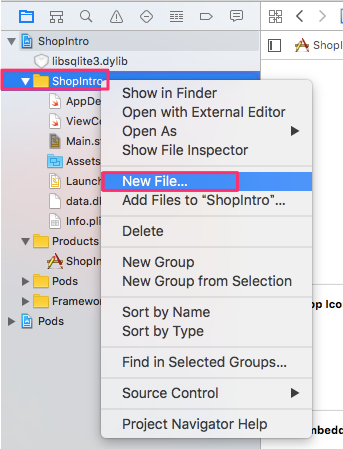
次に、新しくファイルを作成します。Shop.swiftというファイル名で作成してください。
Controllerクラスから作成します。ナビゲーターエリアの中にある、「ShopIntro」と書かれたフォルダを右クリックし、New File…メニューをクリックします。
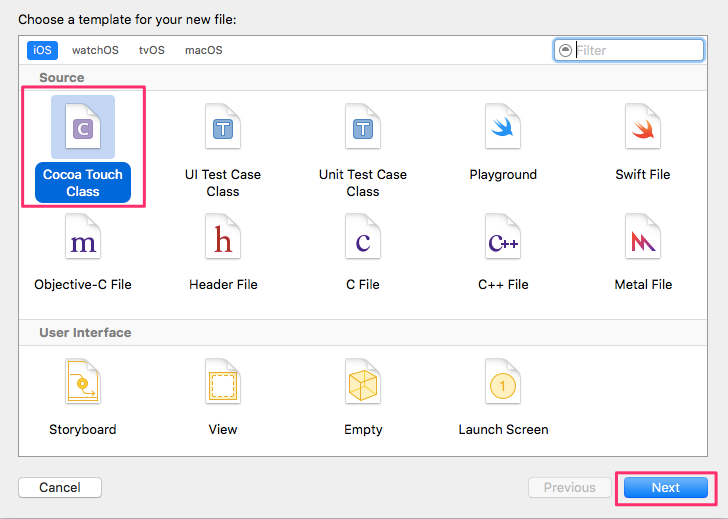
ここで新規ファイル作成のダイアログが表示されるので、Cocoa Touch classを選択し、Nextをクリックします。
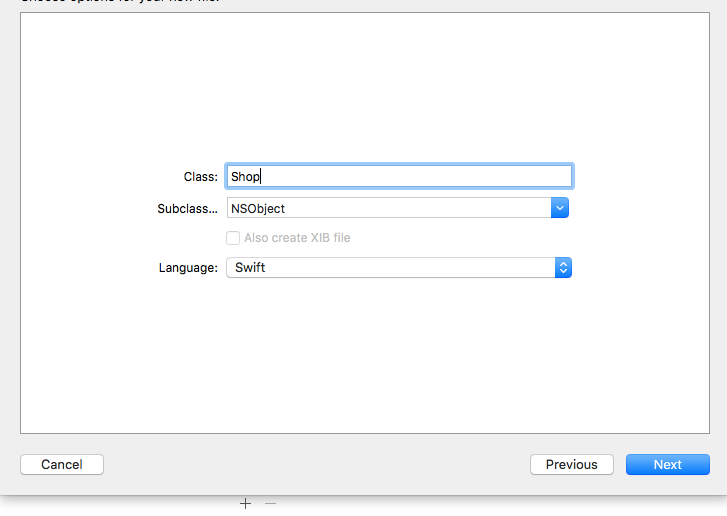
以下の表の通り、クラス名とオプションを設定し、Nextをクリックし、既存のView Controllerとフォルダに保存します。
入力項目
入力値
Class
Shop
Subclass of
NSObject
Also create XIB file
チェックを外す
Language
Swift
Shop.swiftファイルを開いて以下を追加してください。
Shop.swift//////////////// ▼▼ 追加 ▼▼ //////////////// import UIKit class Shop:SQLTable { var id = -1 var name = "" var address = "" var longitude = 0.0 var latitude = 0.0 init() { super.init(tableName:"shop") } required convenience init(tableName:String) { self.init() } } //////////////// ▲▲ 追加 ▲▲ ////////////////
ViewController.swift
class ViewController : UIViewController ,CLLocationManagerDelegate ,GMSMapViewDelegate ,UITableViewDataSource ,UITableViewDelegate var data = [Shop ]() let db = SQLiteDB .sharedInstance() : : override func viewDidLoad () super .viewDidLoad() getMyLocation() tableView.delegate = self tableView.dataSource = self } : : func moveCameraPosition (latitude: CLLocationDegrees,longitude:CLLocationDegrees) let camera = GMSCameraPosition .cameraWithLatitude( latitude, longitude: longitude, zoom: 17 ) mapView.myLocationEnabled = true mapView.settings.myLocationButton = true mapView.delegate = self mapView.camera = camera dbUpdateFromLocationAndMarkerSet(latitude,longitude:longitude) } : : func dbUpdateFromLocationAndMarkerSet (latitude: CLLocationDegrees,longitude:CLLocationDegrees) data = Shop ().allRows( order: "ABS(latitude - \(latitude) )+ABS(longitude - \(longitude) ) ASC" , wheresql: "" , limit: "100" ) tableView.reloadData() } func numberOfSections (in tableView: UITableView) Int { return 1 } func tableView (_ tableView: UITableView, numberOfRowsInSection section: Int) Int { return data.count } func tableView (_ tableView: UITableView, cellForRowAt indexPath: IndexPath) UITableViewCell { let cell = tableView.dequeueReusableCell(withIdentifier: "Cell" , for : indexPath) let shop = data[indexPath.row] cell.textLabel!.text = shop.name return cell } : }
この状態で実行してみましょう。TableViewに店舗名が表示されればOKです。
マーカー表示 ViewController.swift
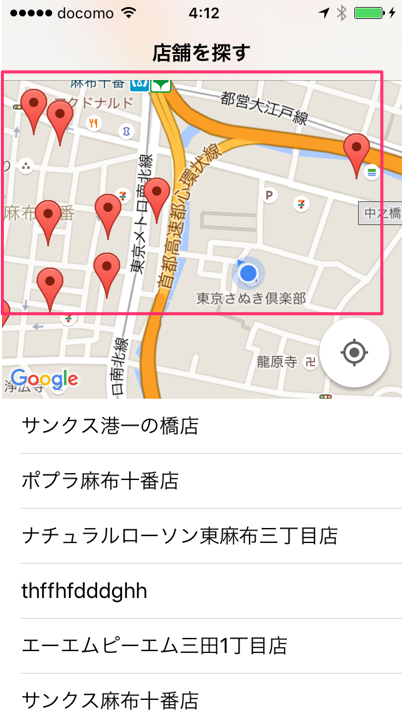
func dbUpdateFromLocationAndMarkerSet (latitude: CLLocationDegrees,longitude:CLLocationDegrees) data = Shop ().allRows( "ABS(latitude - \(latitude) )+ABS(longitude - \(longitude) ) ASC" , wheresql: "" , limit: "100" ) tableView.reloadData() showMarkers() : : func showMarkers () for shop in data{ let marker = GMSMarker () marker.position = CLLocationCoordinate2DMake (shop.latitude,shop.longitude) marker.title = shop.name marker.map = self .mapView marker.userData = shop } } func mapView (_ mapView: GMSMapView, idleAt position: GMSCameraPosition) print ("緯度:\(position.target.latitude) " ) print ("経度:\(position.target.longitude) " ) dbUpdateFromLocationAndMarkerSet(latitude: position.target.latitude,longitude:position.target.longitude) presentMapLatidude = position.target.latitude presentMapLongitude = position.target.longitude } }
この状態でRunしてみましょう。マップに店舗がマーカーとして表示している事を確認しましょう。
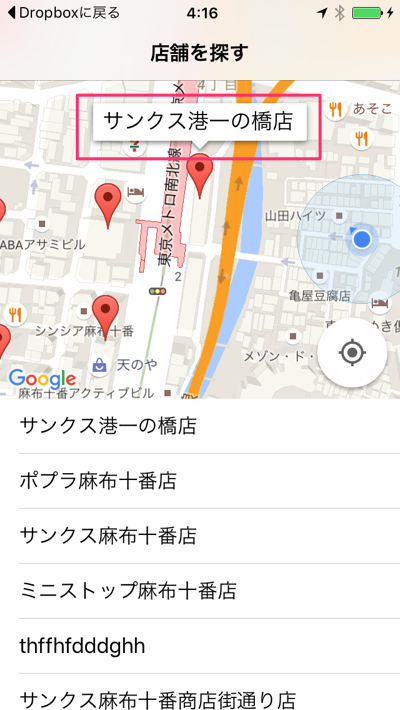
マーカータップ時の処理 マーカーをタップしたら吹き出しを表示するようにします。
ViewController.swift
func mapView (_ mapView: GMSMapView, didTap marker: GMSMarker) Bool { print ("mapView.didTapMarker" ) let shop = marker.userData as ! Shop print ("shop:\(shop.id) ,\(shop.name) " ) return false } func mapView (_ mapView: GMSMapView, markerInfoContents marker: GMSMarker) UIView ? { print ("mapView.didTapMarker" ) let shop = marker.userData as ! Shop print ("shop:\(shop.name) " ) return nil }
この状態でRunしてみましょう。マーカーをタップしたら吹き出しが表示される事を確認してください。
店舗詳細画面 それでは次にマーカーの吹き出しをタップしたとき、及びTableViewのセルをタップしたときに店舗の詳細画面を表示するようにします。
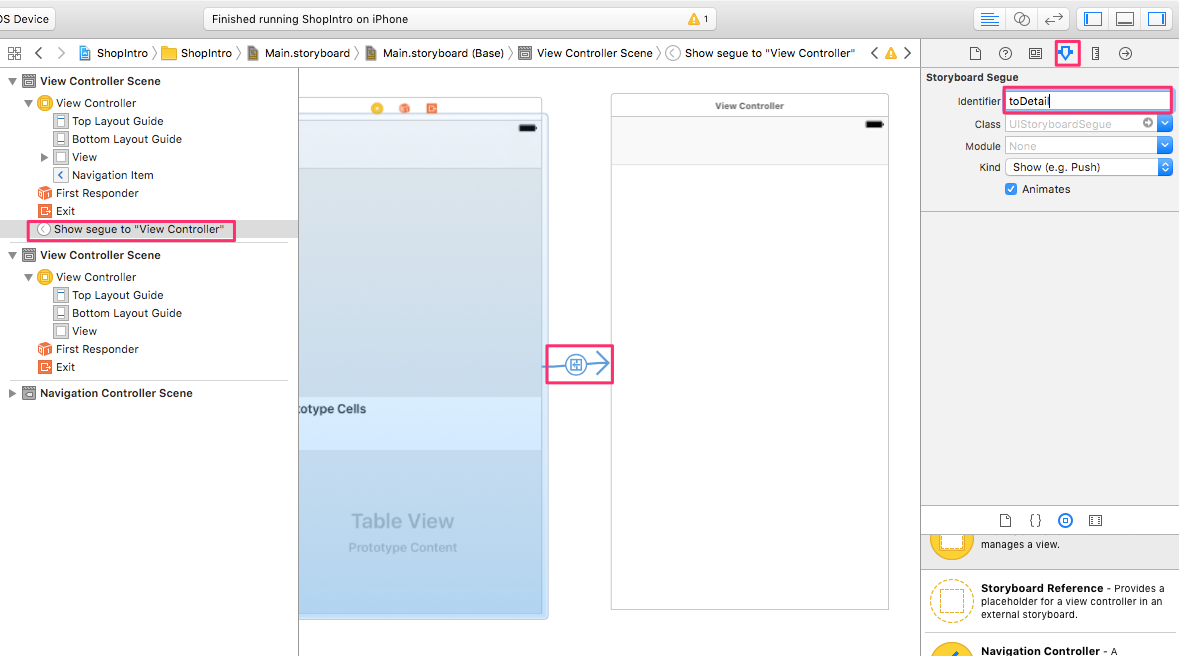
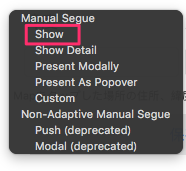
画面レイアウト Main.storyboardを開き、新しくViewControllerを追加して、店舗を探す画面とSegue(Show)で接続します。identifierはtoDetailにしてください。
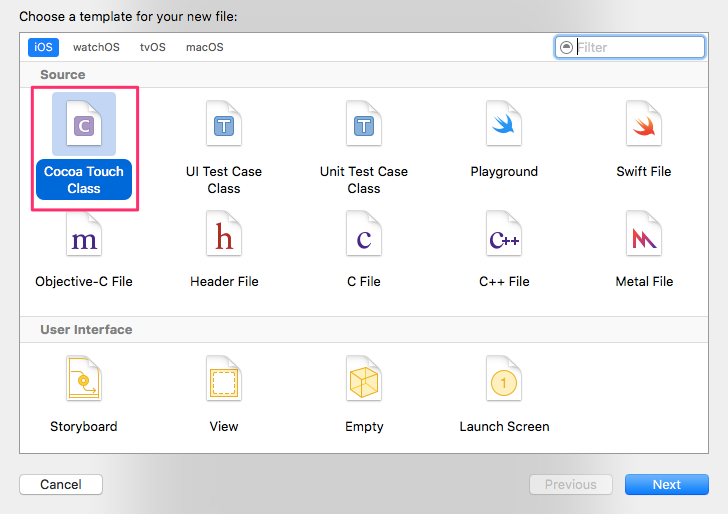
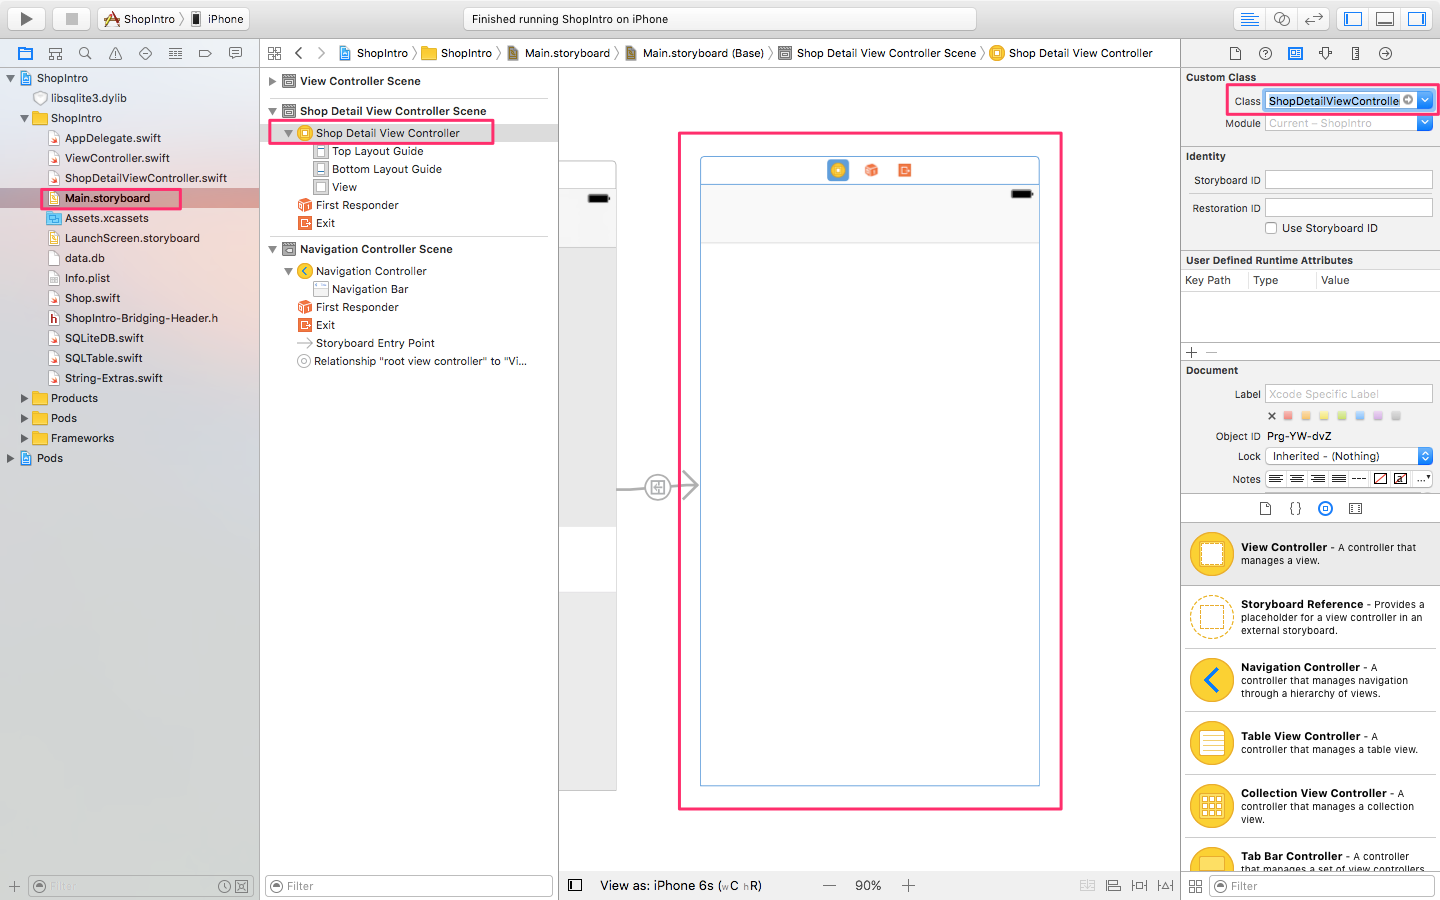
新しいView Controllerに対応するファイル「ShopDetailViewController.swift」を作成し、Identity InspectorでClassを「ShopDetailViewController」に設定します。
Fileメニューから「New▶File…」を選択します。そして、テンプレートメニューのiOSのSourceから「Cocoa Touch Class」を選択し、「Next」をクリックします。
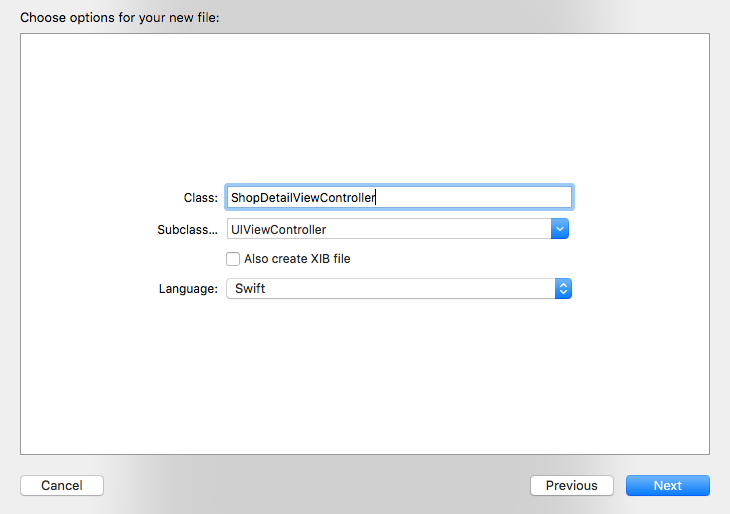
以下の表の通り、クラス名とオプションを設定し、「Next」をクリックし、既存のView Controllerとフォルダに保存します
入力項目
入力値
Class
ShopDetailViewController
Subclass of
UIViewController
Also create XIB file
チェックを外す
Language
Swift
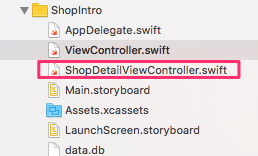
そうすると、ナビゲーターエリアの一覧に今回作成したShopDetailViewControllerクラス(ShopDetailViewController.swift)が表示されます。
次に、新たに作ったShopDetailViewControllerをViewにアサインします。
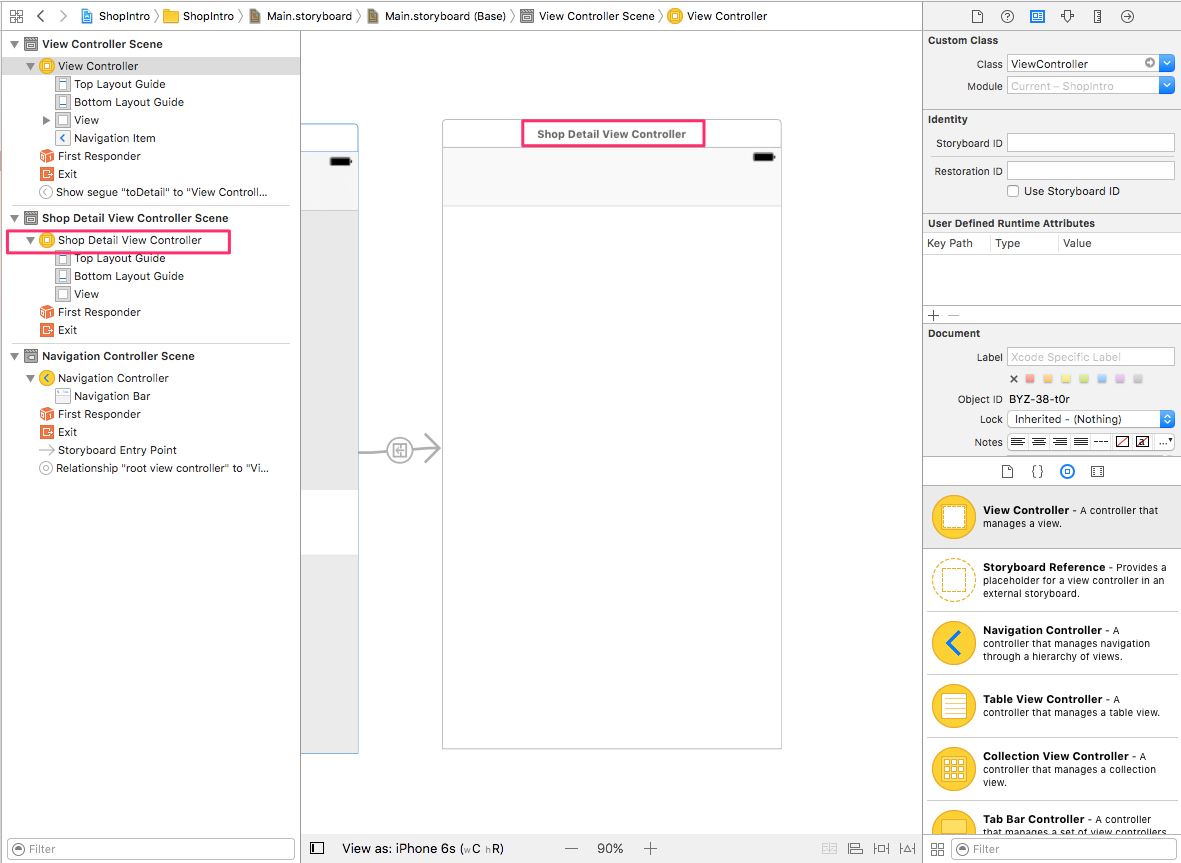
まずは、Storyboard上で先ほど追加した「View Controller」をクリックし、画面全体を選択します。次に、インスペクターを開き、以下のメニューから「ShopDetailViewController」を選びます。
正しくアサインできたことを確認するために、Storyboardをズームアウトしてください。新しくアサインしたView Controllerの名前が表示されていればOKです。
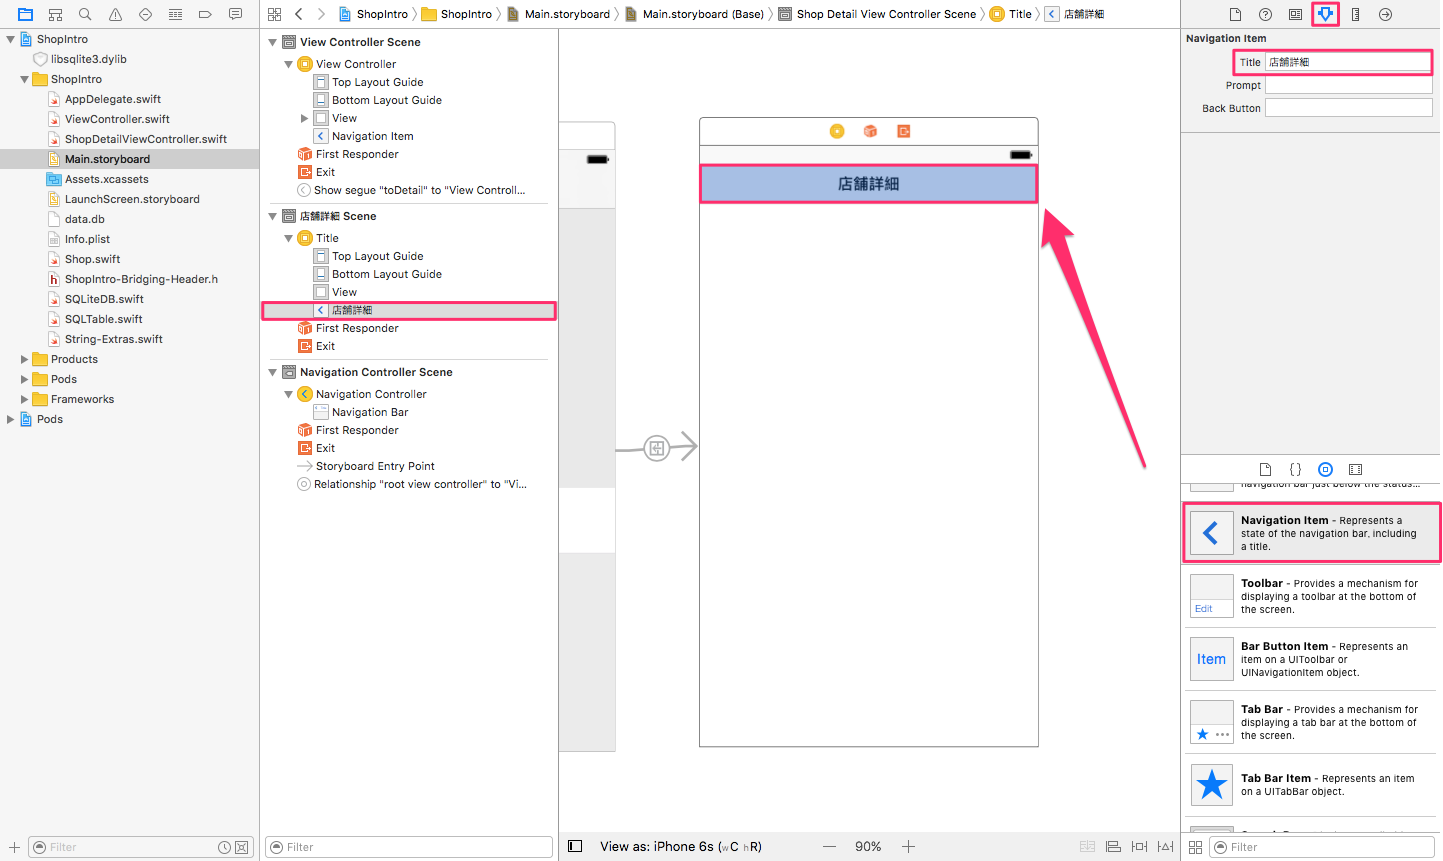
Navigation itemを追加してタイトルを店舗詳細としておきます。
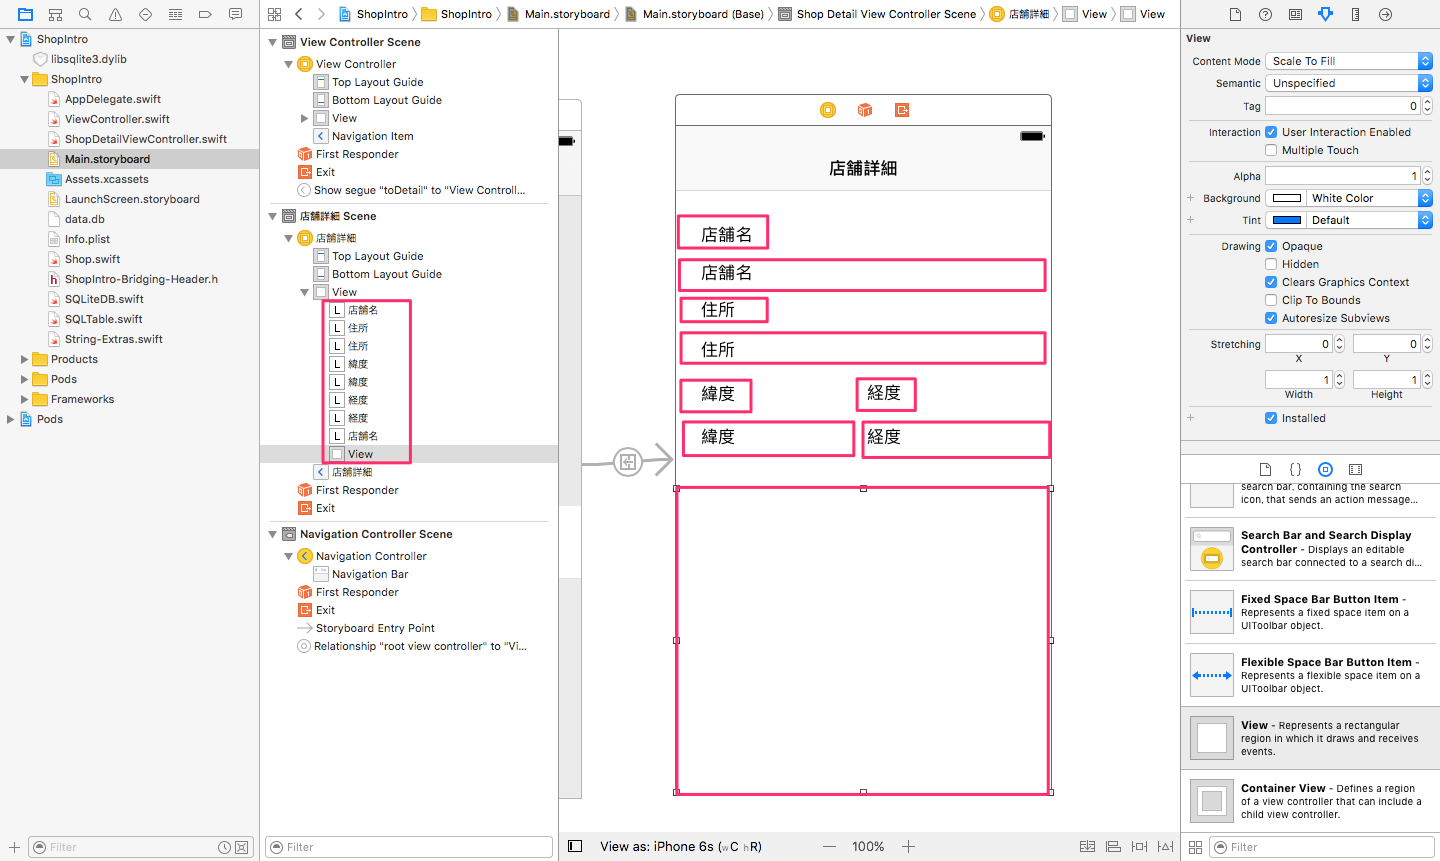
下図のようにLabelとViewを配置して画面レイアウトしてください。
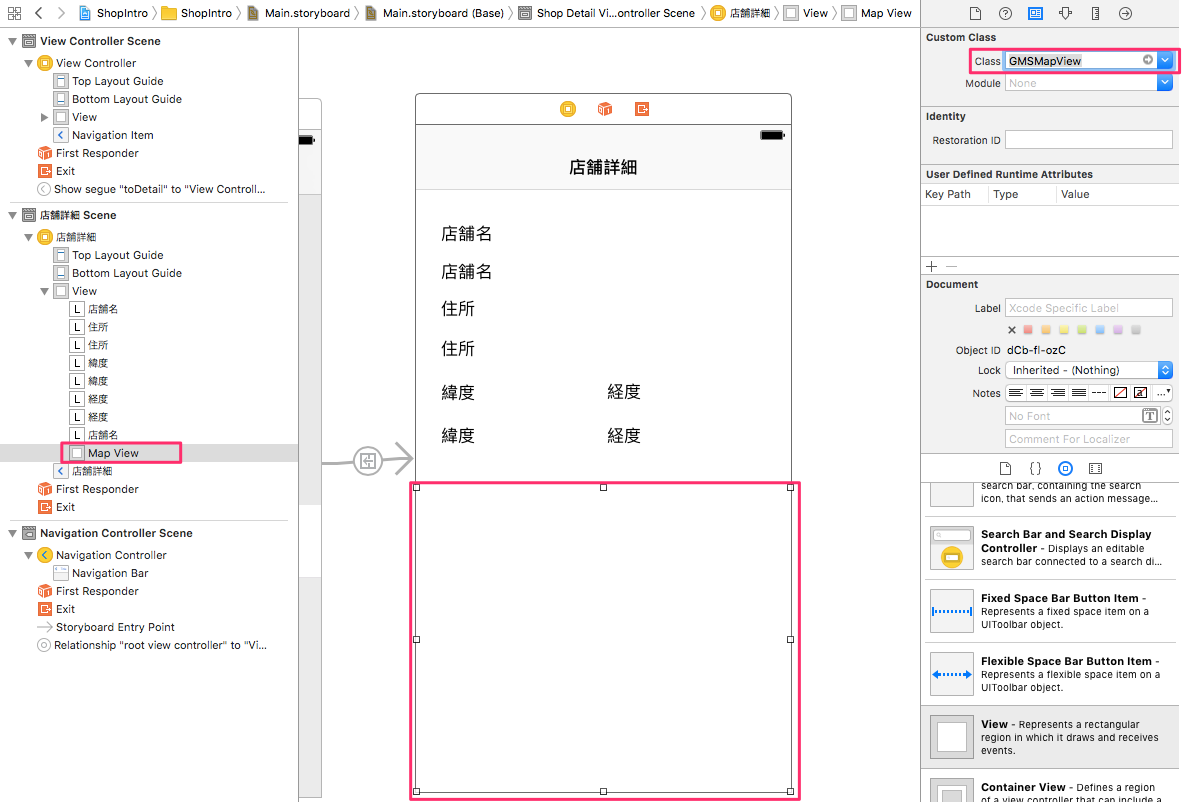
先程と同様に下図の部分はマップを表示するのでGMSMapViewに変更してください。
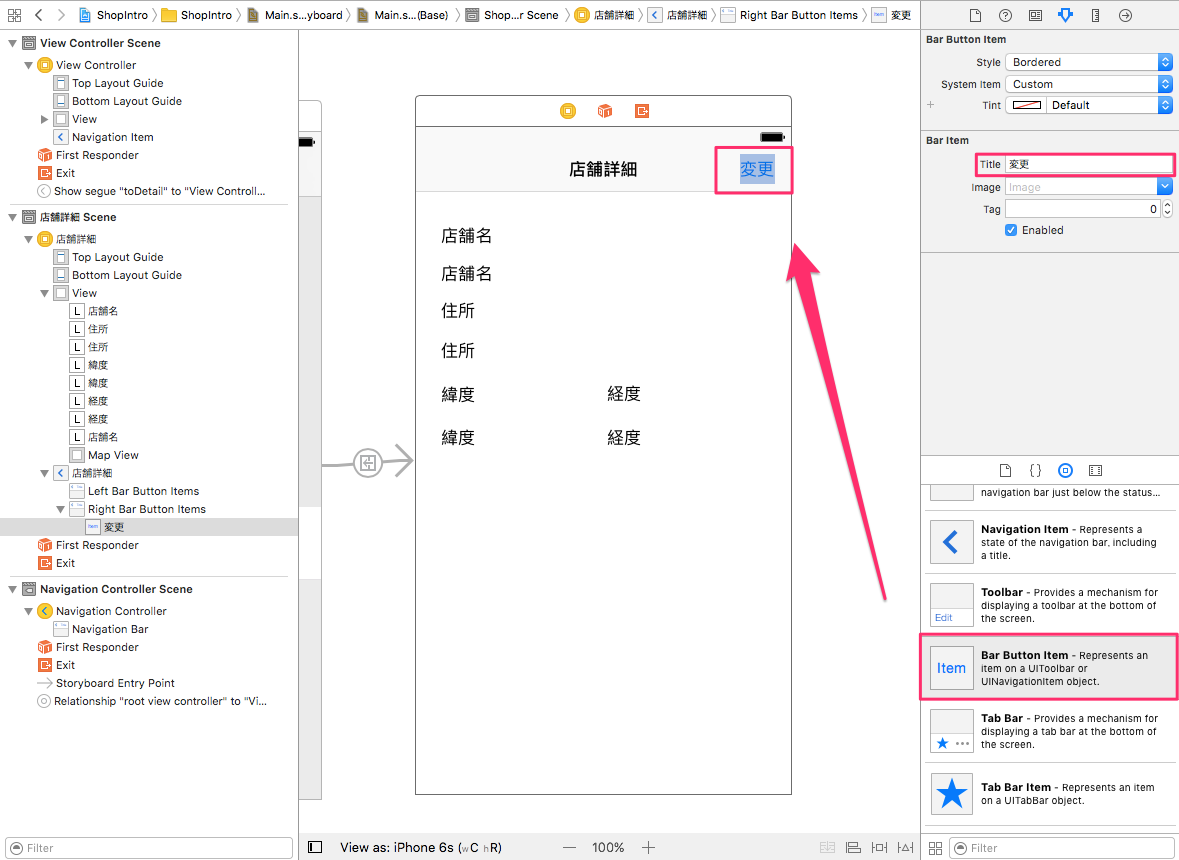
Bar Button Itemを下図のように配置し、Titleを「変更」にしてください。
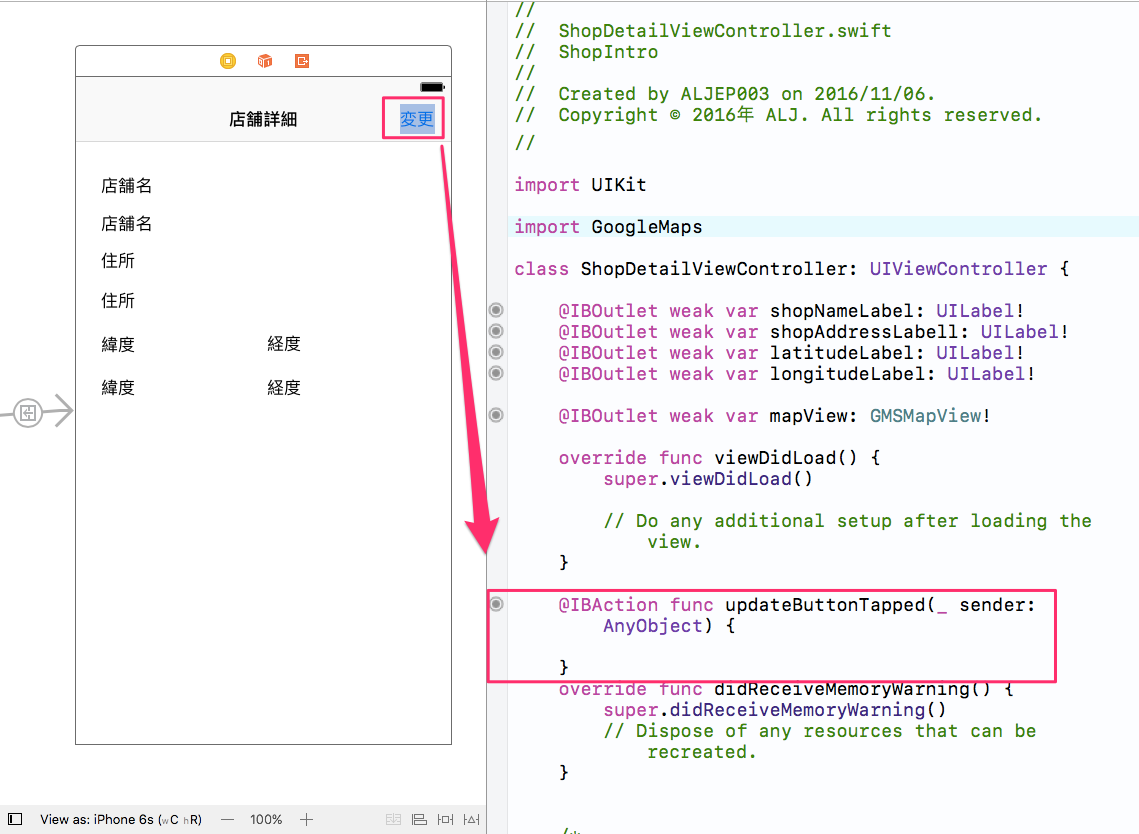
IBOutLet、IBActionで関連付けしてください。
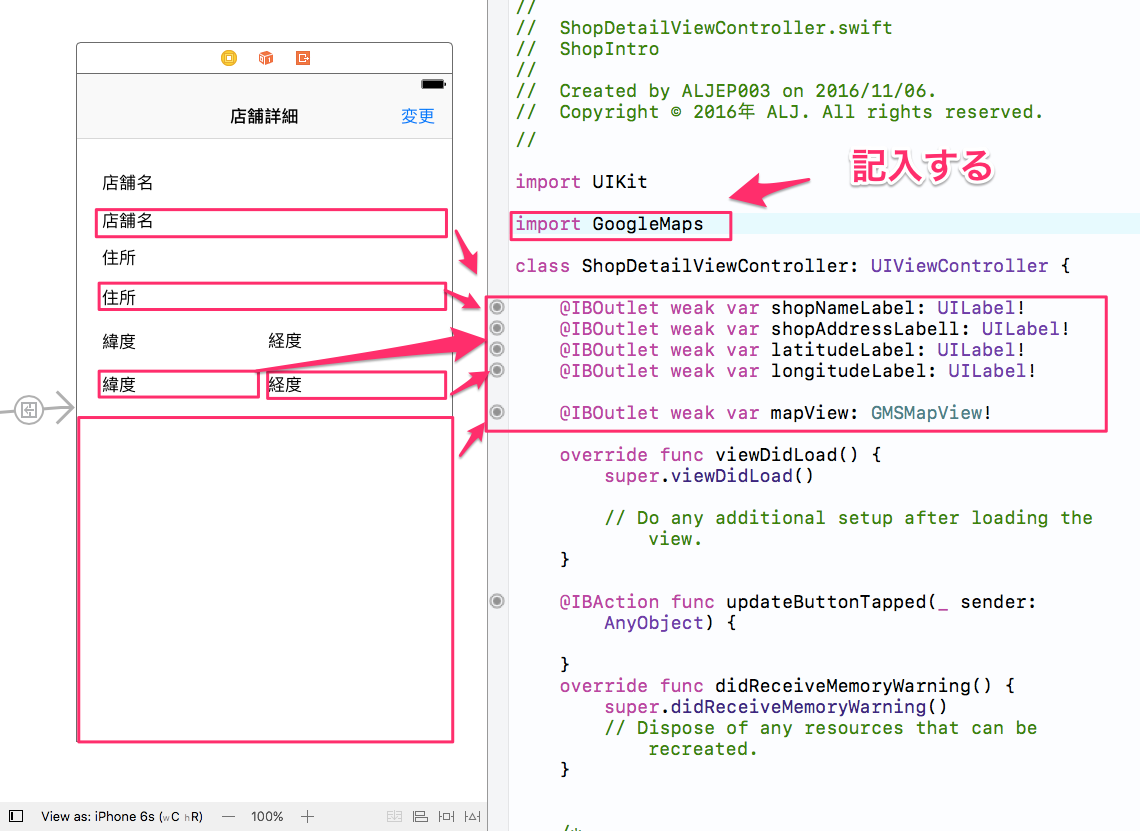
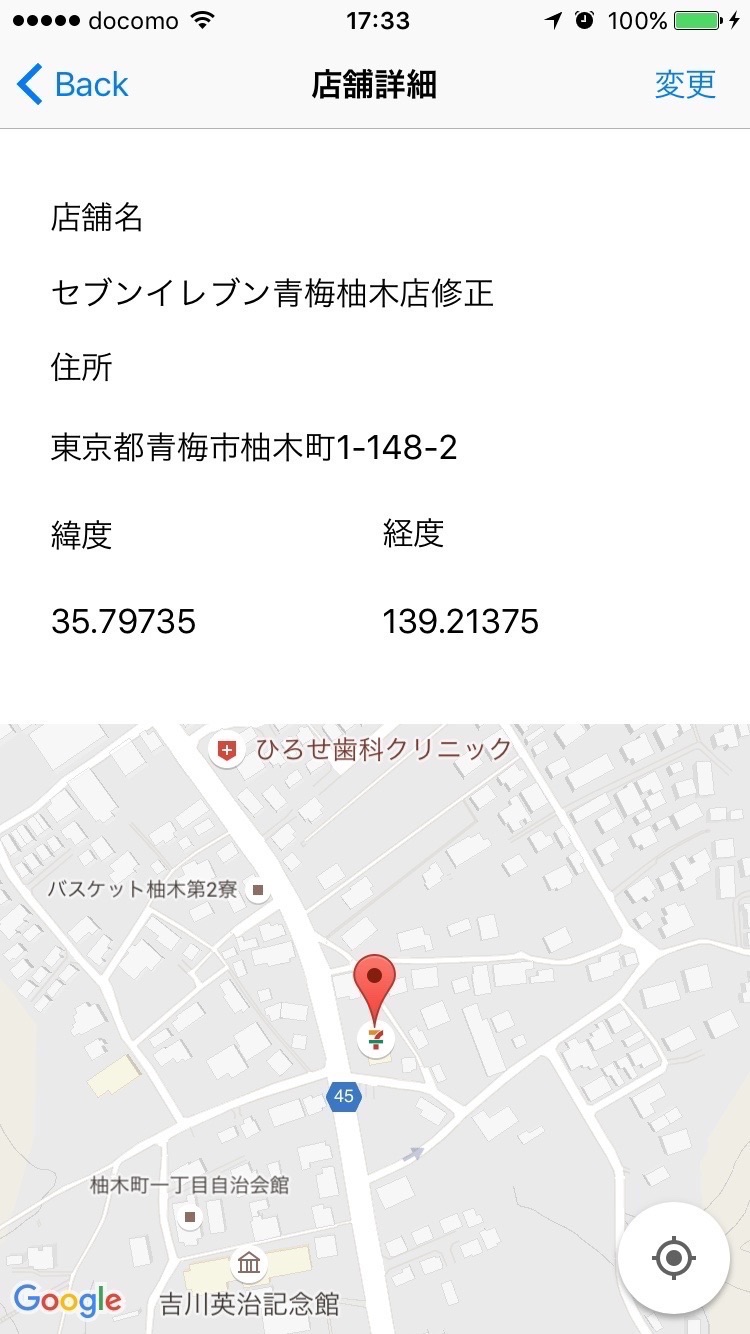
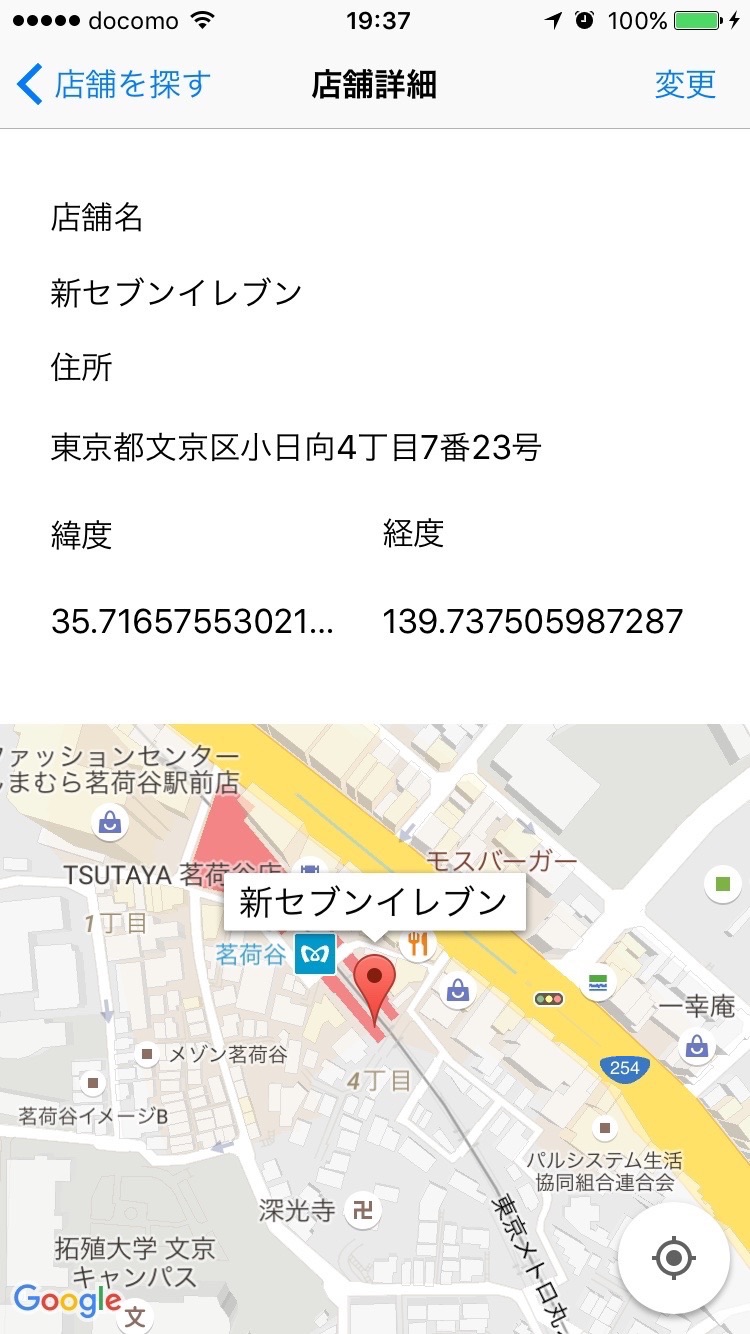
店舗詳細情報表示 店舗詳細情報を表示する処理を追加します。下記のとおりにコードを追加してください。
ShopDetailViewController.swift
import UIKitimport GoogleMapsclass ShopDetailViewController : UIViewController ,GMSMapViewDelegate @IBOutlet weak var shopNameLabel: UILabel ! @IBOutlet weak var shopAddressLabell: UILabel ! @IBOutlet weak var latitudeLabel: UILabel ! @IBOutlet weak var longitudeLabel: UILabel ! @IBOutlet weak var mapView: GMSMapView ! var shop:Shop = Shop () override func viewDidLoad () super .viewDidLoad() shopNameLabel.text = shop.name shopAddressLabell.text = shop.address latitudeLabel.text = String (shop.latitude) longitudeLabel.text = String (shop.longitude) let camera = GMSCameraPosition .camera( withLatitude: shop.latitude, longitude: shop.longitude, zoom: 17 ) mapView.isMyLocationEnabled = true mapView.settings.myLocationButton = true mapView.delegate = self mapView.camera = camera let marker = GMSMarker () marker.position = CLLocationCoordinate2DMake (shop.latitude,shop.longitude) marker.title = shop.name marker.map = self .mapView marker.userData = shop } }
店舗を探す画面からの遷移を記述していきます。
ViewController.swift
func tableView (_ tableView: UITableView, didSelectRowAt indexPath: IndexPath) let shop = data[indexPath.row] as Shop self .performSegue(withIdentifier: "toDetail" , sender: shop) } func mapView (_ mapView: GMSMapView, didTapInfoWindowOf marker: GMSMarker) print ("mapView.didTapInfoWindowOfMarker" ) let shop = marker.userData as ! Shop print ("shop:\(shop.name) " ) self .performSegue(withIdentifier: "toDetail" , sender: shop) } override func prepare (for segue: UIStoryboardSegue, sender: Any?) if segue.identifier == "toDetail" { let vc = segue.destination as ! ShopDetailViewController vc.shop = sender as ! Shop } }
これでRunしてみましょう。マーカー吹き出しタップ時、またはテーブルセルタップ時に詳細画面に遷移すればOKです。
店舗編集機能 次に店舗情報を編集する機能を追加します。
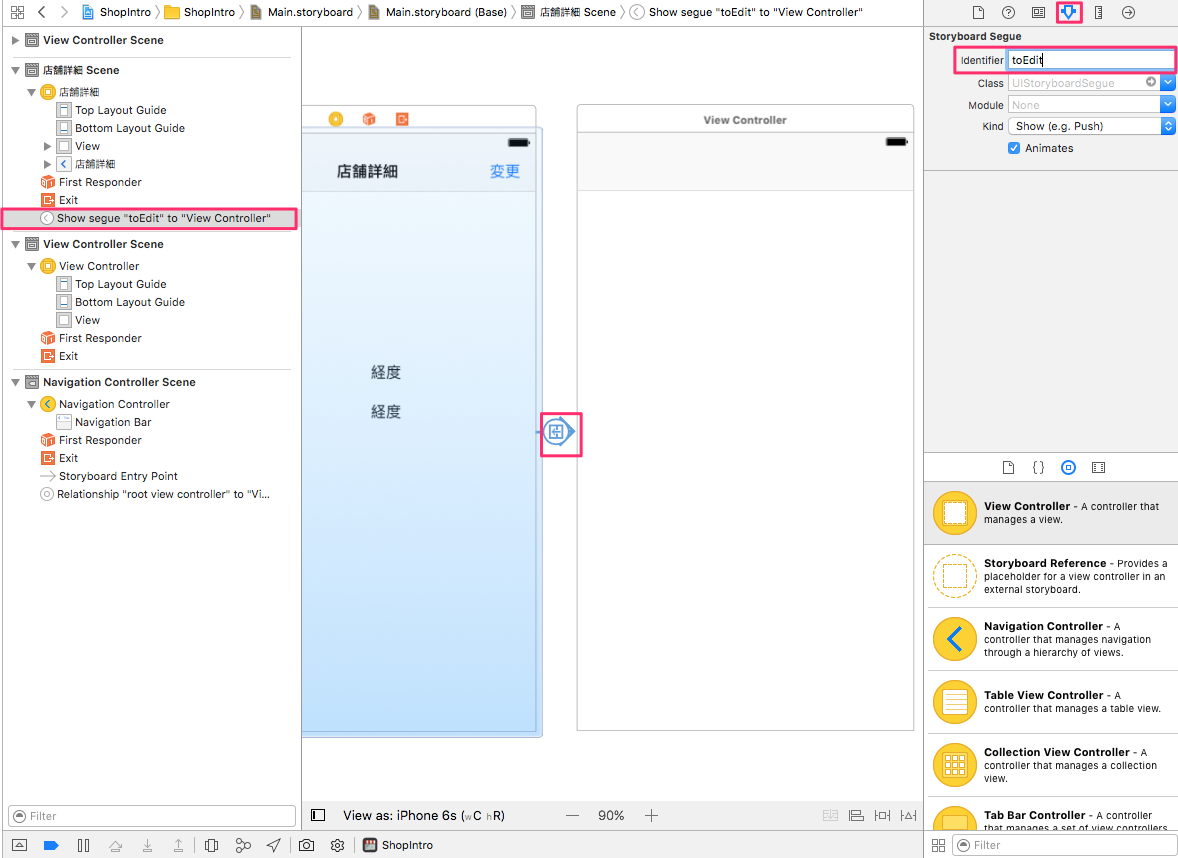
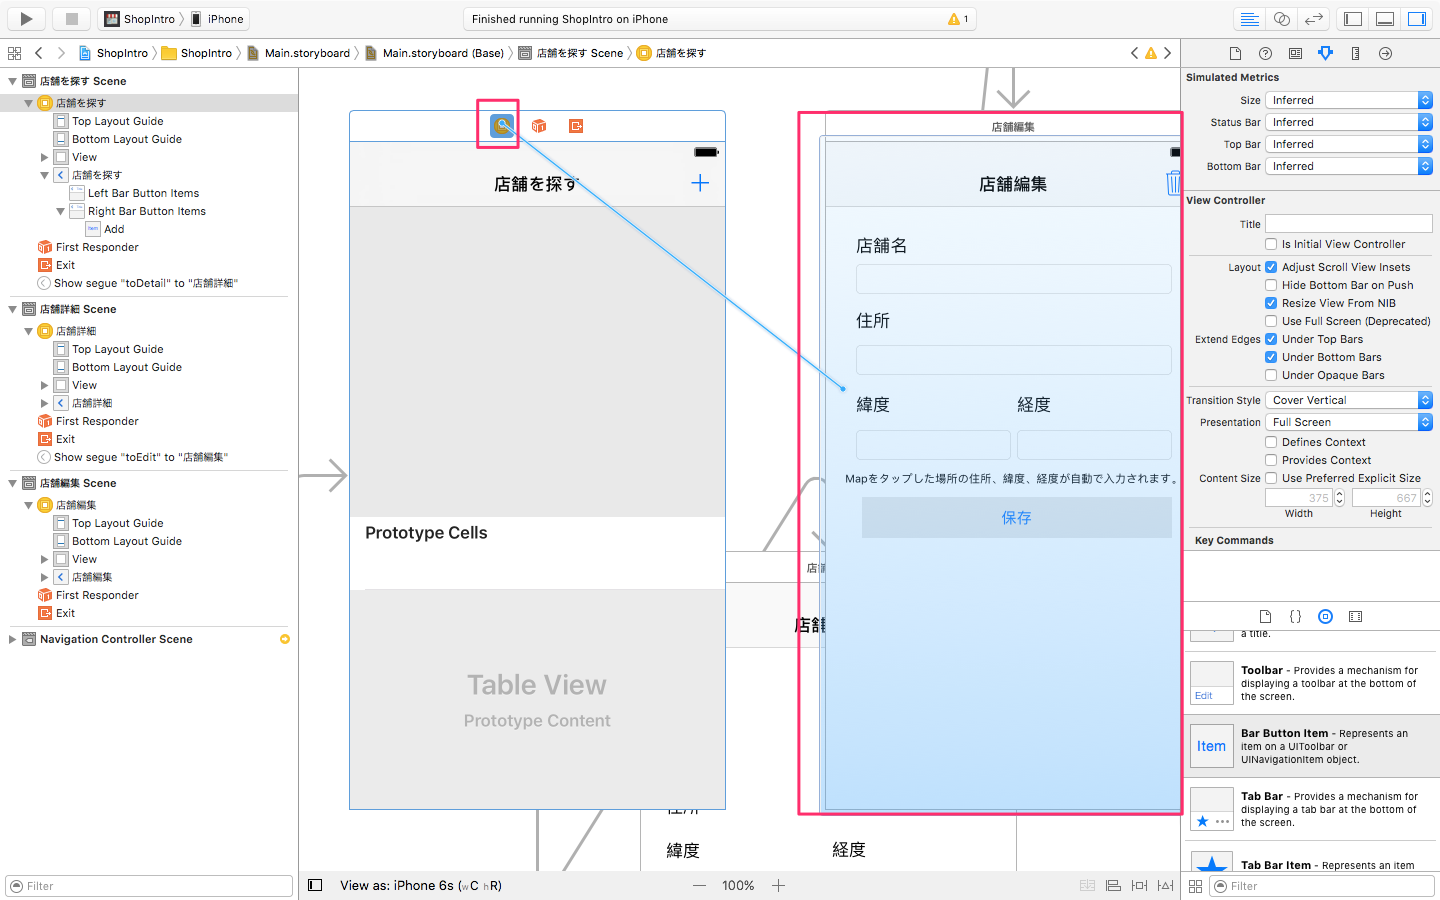
画面レイアウト Main.storyboardを開き、新しくViewControllerを追加して、店舗を探す画面とSegue(Show)で接続します。identifierはtoEditにしてください。
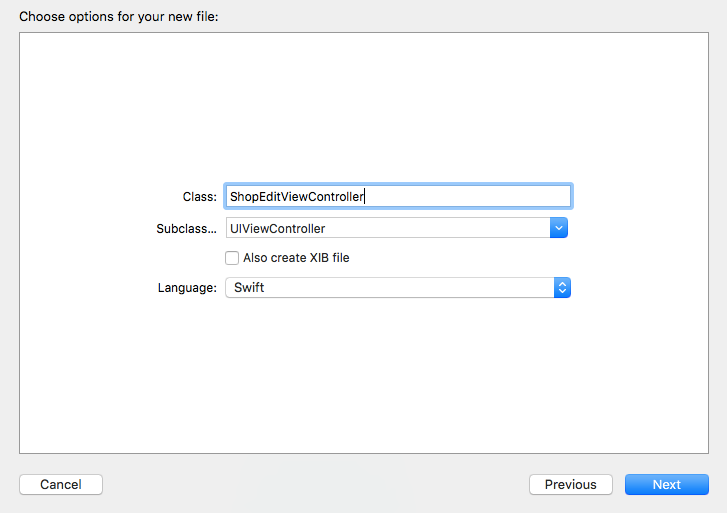
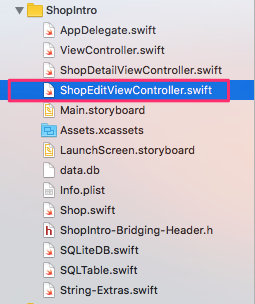
新しいView Controllerに対応するファイル「ShopEditViewController.swift」を作成し、Identity InspectorでClassを「ShopEditViewController」に設定します。
Fileメニューから「New▶File…」を選択します。そして、テンプレートメニューのiOSのSourceから「Cocoa Touch Class」を選択し、「Next」をクリックします。
以下の表の通り、クラス名とオプションを設定し、「Next」をクリックし、既存のView Controllerとフォルダに保存します
入力項目
入力値
Class
ShopEditViewController
Subclass of
UIViewController
Also create XIB file
チェックを外す
Language
Swift
そうすると、ナビゲーターエリアの一覧に今回作成したShopEditViewControllerクラス(ShopEditViewController.swift)が表示されます。
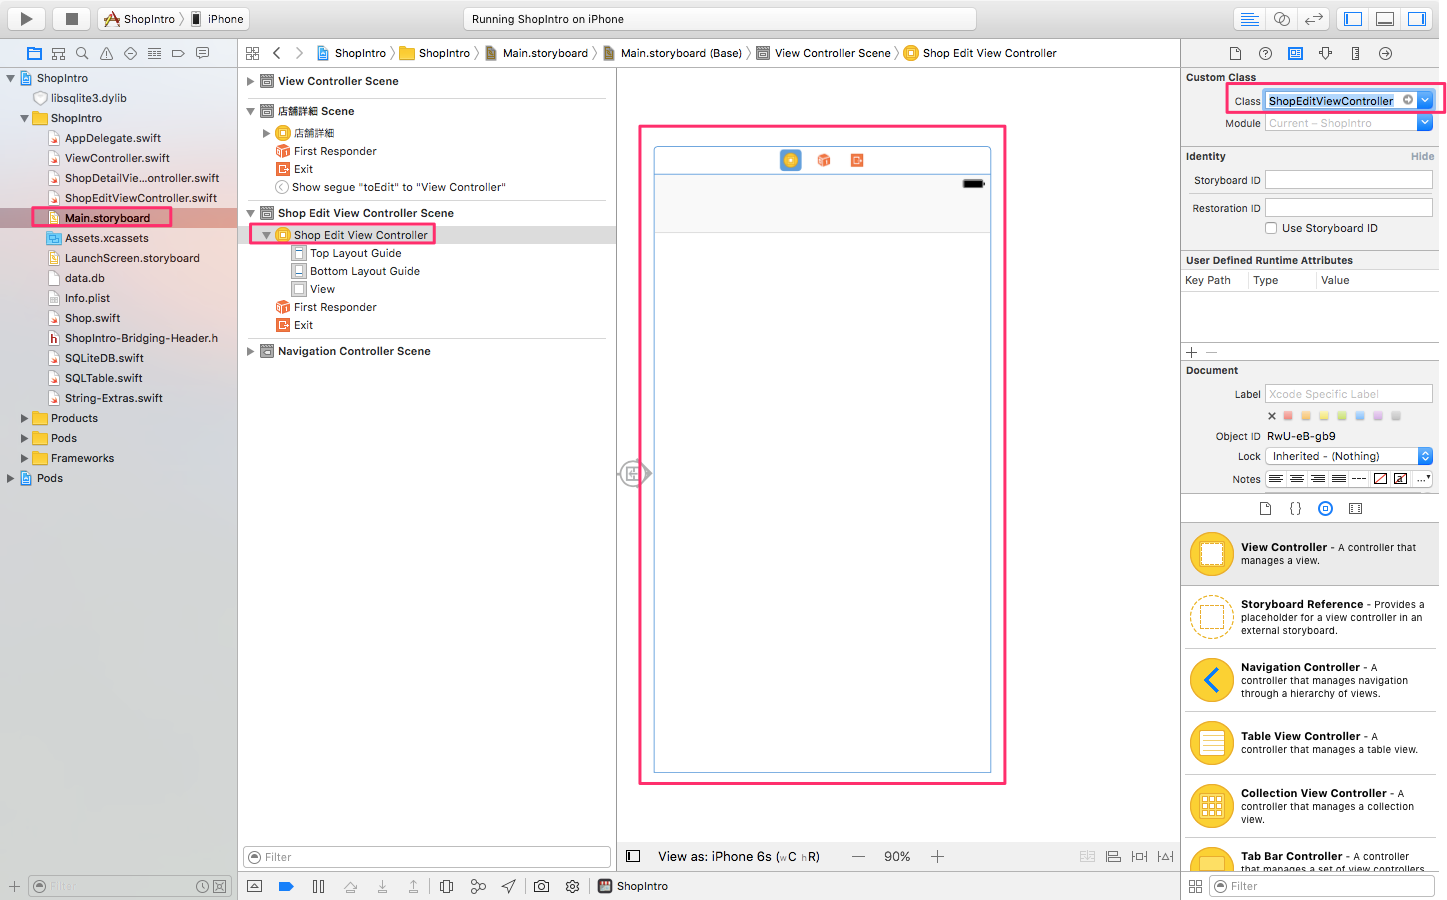
次に、新たに作ったShopEditViewControllerをViewにアサインします。
まずは、Storyboard上で先ほど追加した「View Controller」をクリックし、画面全体を選択します。次に、インスペクターを開き、以下のメニューから「ShopEditViewController」を選びます。
正しくアサインできたことを確認するために、Storyboardをズームアウトしてください。新しくアサインしたView Controllerの名前が表示されていればOKです。
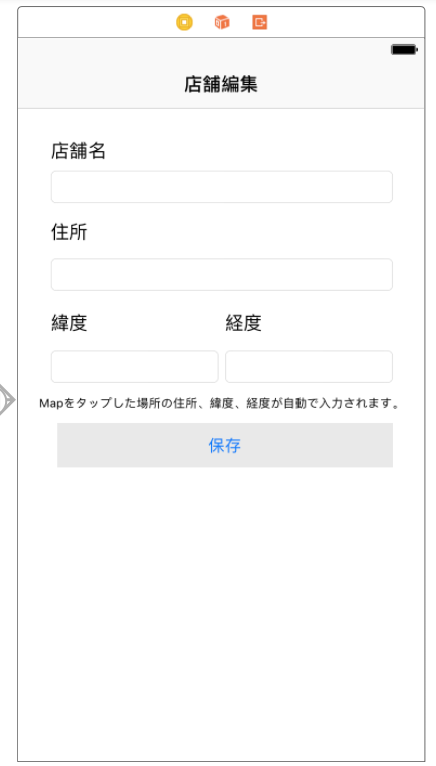
Navigation itemを追加してタイトルを店舗編集としておきます。
下図のようにTextField、Label、Button、Viewを配置して画面レイアウトしてください。
先程と同様に下図の部分はマップを表示するのでGMSMapViewに変更してください。
Bar Button Itemを下図のように配置してください。
IBOutLet、IBActionで関連付けしてください。
初期表示 画面が表示したら既に店舗が選択されている状態なので、その店舗情報をテキストフィールドに入力された状態にします。
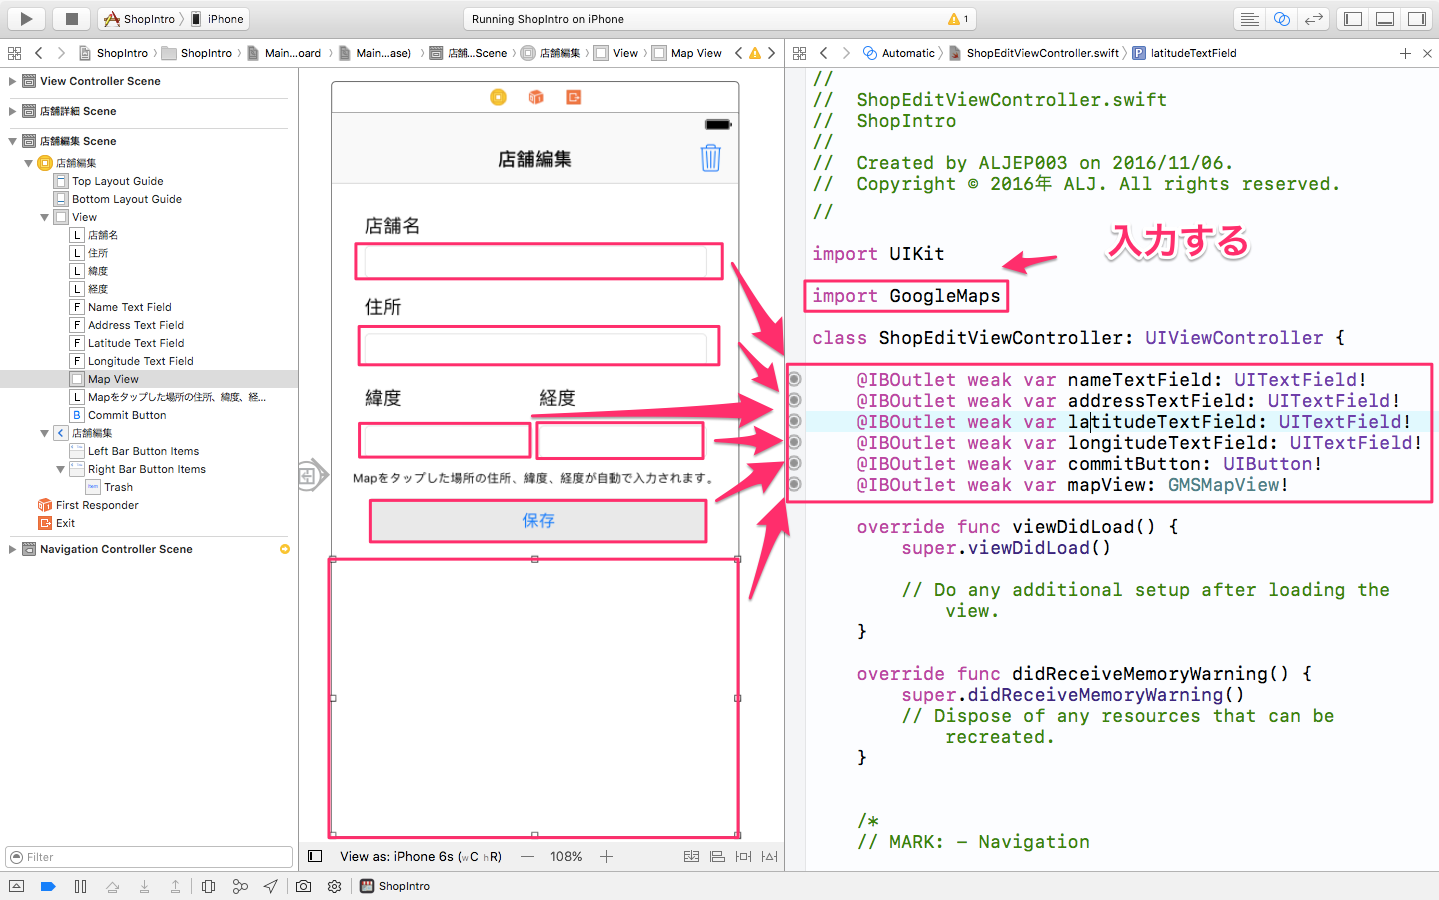
ShopEditViewController.swift
class ShopEditViewController : UIViewController @IBOutlet weak var nameTextField: UITextField ! @IBOutlet weak var addressTextField: UITextField ! @IBOutlet weak var latitudeTextField: UITextField ! @IBOutlet weak var longitudeTextField: UITextField ! @IBOutlet weak var commitButton: UIButton ! @IBOutlet weak var mapView: GMSMapView ! var shop = Shop () override func viewDidLoad () super .viewDidLoad() } override func viewWillAppear (_ animated: Bool) super .viewWillAppear(animated) self .initView() } func initView () self .title = "店舗編集" self .commitButton.setTitle("更新" , for : .normal) self .commitButton.addTarget(self , action: Selector (("dbUpdate:" )), for : .touchUpInside) self .nameTextField.text = shop.name self .addressTextField.text = shop.address self .latitudeTextField.text = String (shop.latitude) self .longitudeTextField.text = String (shop.longitude) } }
次に店舗詳細画面から画面遷移できるようにします。
ShopDetailViewController.swift
@IBAction func updateButtonTapped (_ sender: AnyObject) self .performSegue(withIdentifier: "toEdit" , sender: nil ) } override func prepare (for segue: UIStoryboardSegue, sender: Any?) if segue.identifier == "toEdit" { let vc = segue.destination as ! ShopEditViewController vc.shop = self .shop } }
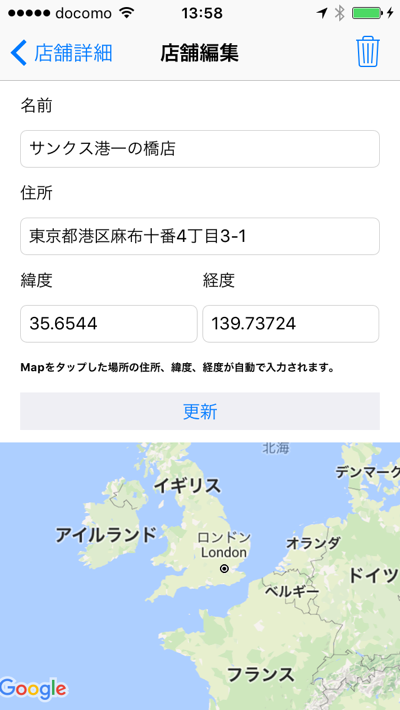
この状態で確認しましょう。テキストフィールドに店舗情報が表示されている事を確認してください。
マップ表示 選択された店舗がマップ上でどこなのかがわかるように、マップ表示して店舗がある場所にマーカーを追加します。
ShopEditViewController.swift
class ShopEditViewController : UIViewController ,CLLocationManagerDelegate ,GMSMapViewDelegate @IBOutlet weak var nameTextField: UITextField ! @IBOutlet weak var addressTextField: UITextField ! @IBOutlet weak var latitudeTextField: UITextField ! @IBOutlet weak var longitudeTextField: UITextField ! @IBOutlet weak var commitButton: UIButton ! @IBOutlet weak var mapView: GMSMapView ! var shop = Shop () var locationManager:CLLocationManager ! var marker = GMSMarker () : override func viewDidLoad () super .viewDidLoad() getMyLocationAndShowMap() } : : func getMyLocationAndShowMap () locationManager = CLLocationManager () locationManager.delegate = self locationManager.desiredAccuracy = kCLLocationAccuracyBest locationManager.distanceFilter = 100 locationManager.startUpdatingLocation() let status = CLLocationManager .authorizationStatus() if (status == CLAuthorizationStatus .notDetermined) { print ("didChangeAuthorizationStatus:\(status) " ); self .locationManager.requestAlwaysAuthorization() } locationManager.startUpdatingLocation() } private func locationManager (manager: CLLocationManager, didChangeAuthorizationStatus status: CLAuthorizationStatus) var statusStr = "" ; switch (status) { case .notDetermined: statusStr = "NotDetermined" case .restricted: statusStr = "Restricted" case .denied: statusStr = "Denied" case .authorizedAlways: statusStr = "Authorized" case .authorizedWhenInUse: statusStr = "AuthorizedWhenInUse" } print (" CLAuthorizationStatus: \(statusStr) " ) } func locationManager (_ manager: CLLocationManager, didFailWithError error: Error) print (error) } func locationManager (_ manager: CLLocationManager, didUpdateLocations locations: [CLLocation]) locationManager.stopUpdatingLocation() let cordinate = locations[0 ].coordinate print ("緯度:\(cordinate.latitude) " ) print ("経度:\(cordinate.longitude) " ) moveCameraPosition( latitude: cordinate.latitude, longitude:cordinate.longitude ) } func moveCameraPosition (latitude: CLLocationDegrees,longitude:CLLocationDegrees) let camera = GMSCameraPosition .camera( withLatitude: latitude, longitude: longitude, zoom: 17 ) mapView.isMyLocationEnabled = true mapView.settings.myLocationButton = true mapView.delegate = self mapView.camera = camera } }
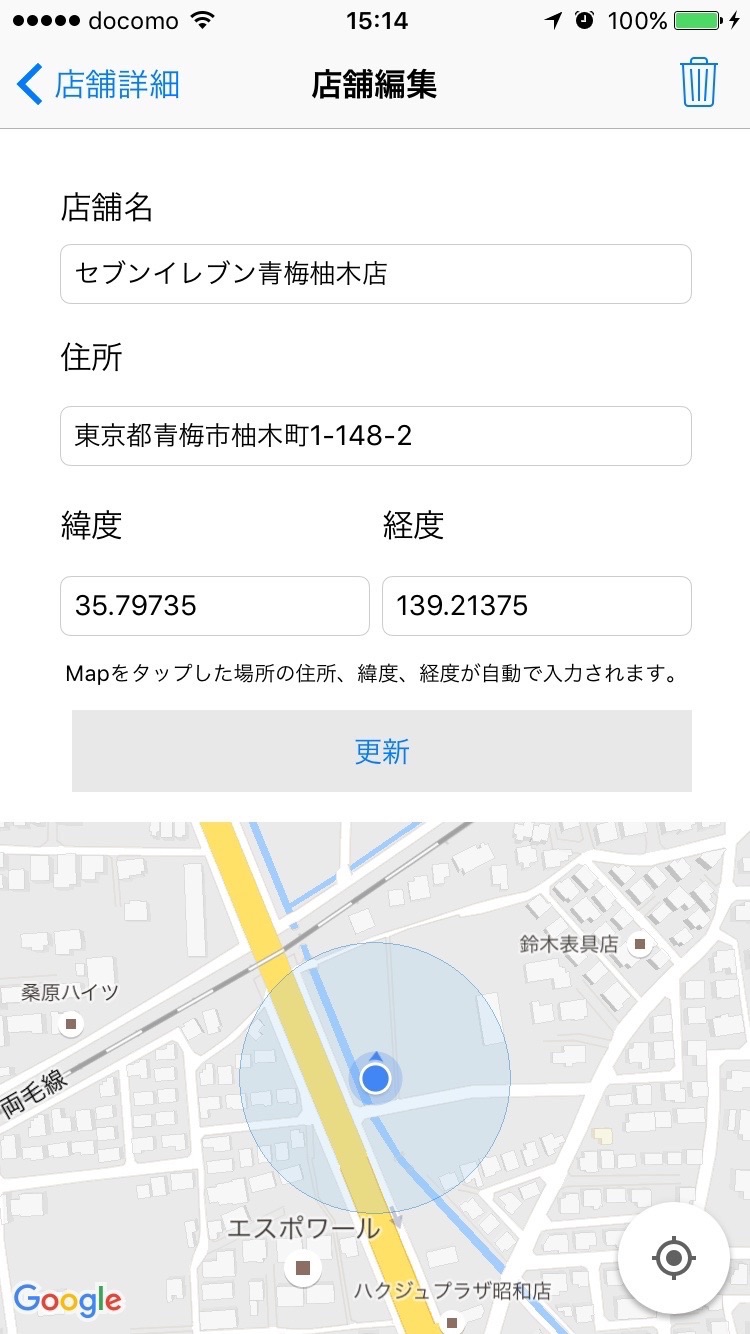
この状態でRunして確認してみましょう。編集画面でマップの中央が選択した店舗の場所が表示される事を確認してください。
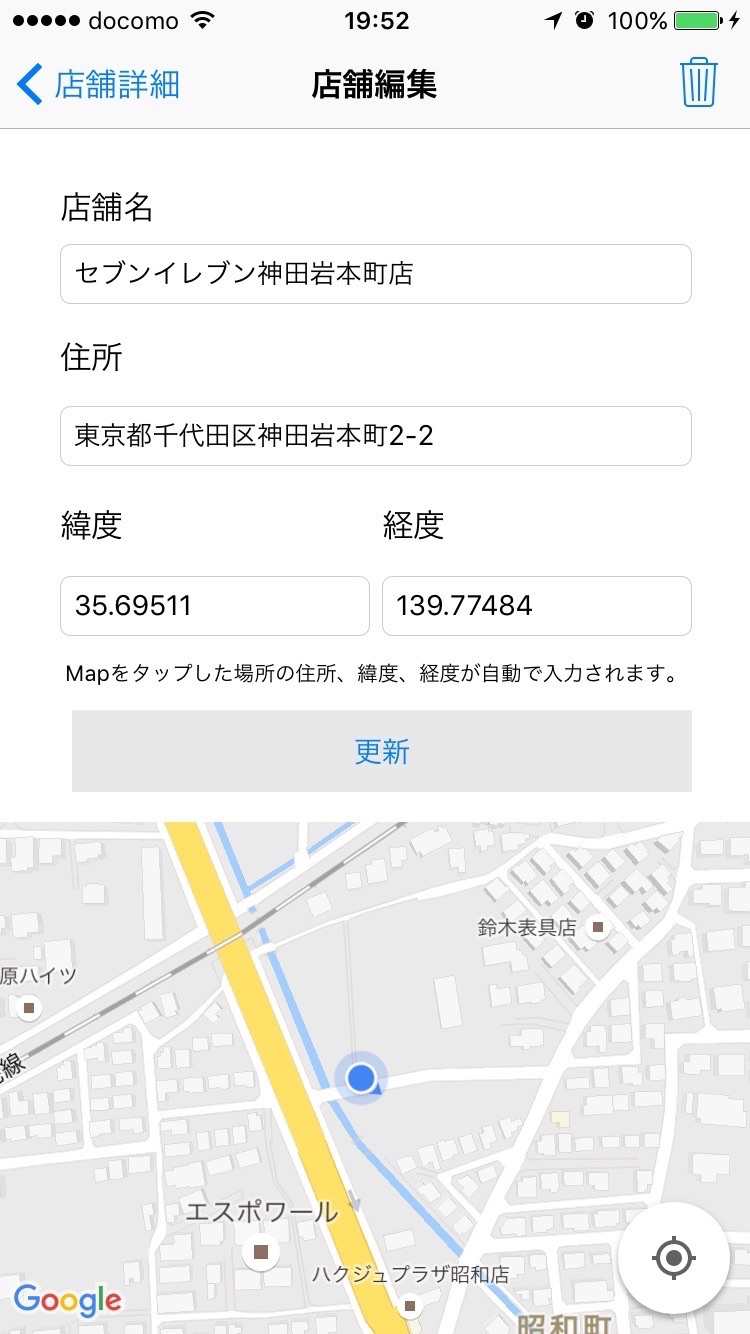
マップをタップしたらその情報が入力されるようにする(ジオコーディング) マップをタップした場所から緯度・経度、住所を入力できるようにします。ジオコーディング
ShopEditViewController.swift
func mapView (_ mapView: GMSMapView, didTapAt coordinate: CLLocationCoordinate2D) marker.position = CLLocationCoordinate2DMake ( coordinate.latitude, coordinate.longitude ) marker.title = shop.name marker.map = self .mapView latitudeTextField.text = String (coordinate.latitude) longitudeTextField.text = String (coordinate.longitude) geoCoding(coordinate: coordinate) } func geoCoding (coordinate: CLLocationCoordinate2D) let location = CLLocation ( latitude: coordinate.latitude, longitude: coordinate.longitude ) let geocoder = CLGeocoder () geocoder.reverseGeocodeLocation(location, completionHandler: { (placemarks, error) -> Void in for placemark in placemarks! { print ("Name: \(placemark.name) " ) print ("Country: \(placemark.country) " ) print ("ISOcountryCode: \(placemark.isoCountryCode) " ) print ("administrativeArea: \(placemark.administrativeArea) " ) print ("subAdministrativeArea: \(placemark.subAdministrativeArea) " ) print ("Locality: \(placemark.locality) " ) print ("PostalCode: \(placemark.postalCode) " ) print ("areaOfInterest: \(placemark.areasOfInterest) " ) print ("Ocean: \(placemark.ocean) " ) self .addressTextField.text = "\(placemark.administrativeArea!) \(placemark.locality!) \(placemark.name!) " } }) }
この状態で確認しましょう。マップ内でタップした場所にマーカーがつき、緯度・経度と住所が更新されるのが確認できます。
店舗編集(DB UPDATE) 店舗情報の内容を変更して「更新」ボタンをタップする事によりDBを更新できるようにします。
ShopEditViewController.swift
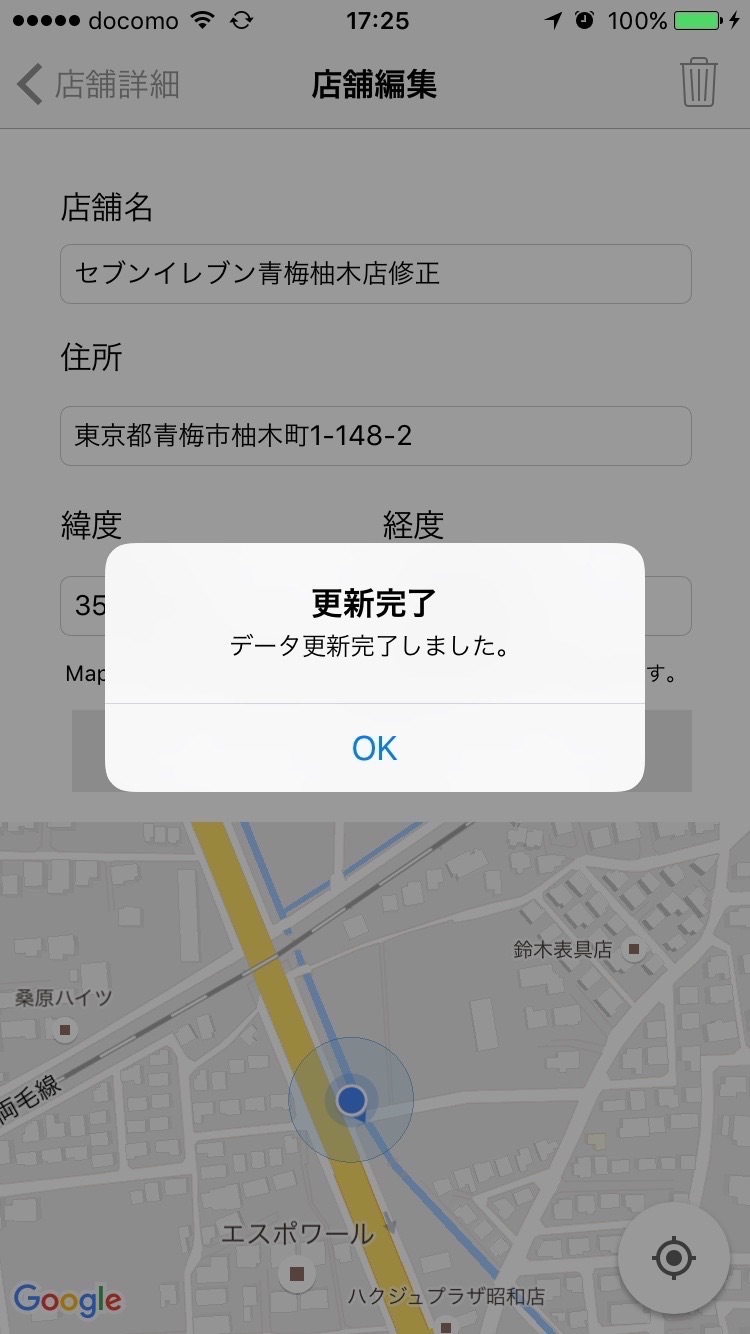
class ShopEditViewController : UIViewController ,CLLocationManagerDelegate ,GMSMapViewDelegate : : let db = SQLiteDB .sharedInstance : : @IBAction func dbUpdate (_ sender: AnyObject) if isValidateInputContents() == false { print ("入力チェック:\(isValidateInputContents() )" ) return } var sql = "UPDATE shop set " sql += "name = '\(nameTextField.text!) '," sql += "address = '\(addressTextField.text!) '," sql += "latitude = \(latitudeTextField.text!) ," sql += "longitude = \(longitudeTextField.text!) " sql += " WHERE id =\(shop.id) " print ("update sql:\(sql) " ) _ = db.query(sql: sql) let myAlert: UIAlertController = UIAlertController (title: "更新完了" , message: "データ更新完了しました。" , preferredStyle: .alert) let myOkAction = UIAlertAction (title: "OK" , style: .default ) { action in print ("action ok" ) _ = self .navigationController?.popViewController(animated: true ) } myAlert.addAction(myOkAction) present(myAlert, animated: true , completion: nil ) } private func isValidateInputContents () Bool { if let name = nameTextField.text{ if name.characters.count == 0 { return false } } else if let address = addressTextField.text{ if address.characters.count == 0 { return false } } else if let latitude = latitudeTextField.text { if latitude.characters.count == 0 { return false } if atof(latitude) < 0 || atof(latitude) > 180 { return false } } else if let longitude = longitudeTextField.text { if longitude.characters.count == 0 { return false } if atof(longitude) < 0 || atof(longitude) > 90 { return false } } else { return false } return true }
dbUpdateメソッドでは、DBを操作するたえのSQL文(UPDATE)を発行しています。db.query(sql)の箇所で実際にDBを更新している処理が走りDBが更新されます。isValidateInputContentsで入力された値が問題ないかチェックして問題ないか確認しています。
編集するときにTextFieldをタップしてキーボードを表示したときに
編集完了後に店舗を探す画面でその変更内容が更新されるように下記を追加します。
ViewController.swift
override func viewWillAppear (_ animated: Bool) super .viewWillAppear(animated) if presentMapLatidude != nil && presentMapLongitude != nil { mapView.clear() dbUpdateFromLocationAndMarkerSet(latitude: presentMapLatidude!,longitude:presentMapLongitude!) } }
また、テキストフィールドを選択してキーボードが表示された後にエンターボタンでキーボードを閉じるようにしておきましょう。
ShopEditViewController.swift
class ShopEditViewController : UIViewController ,CLLocationManagerDelegate ,GMSMapViewDelegate ,UITextFieldDelegate : : func textFieldShouldReturn (_ textField: UITextField) Bool { textField.resignFirstResponder() return true } : : }
また、TextFieldへdelegateを設定します。
ShopEditViewController.swift
override func viewDidLoad () super .viewDidLoad() nameTextField.delegate = self addressTextField.delegate = self latitudeTextField.delegate = self longitudeTextField.delegate = self getMyLocationAndShowMap() }
それではこの状態でRunして動作確認してください。
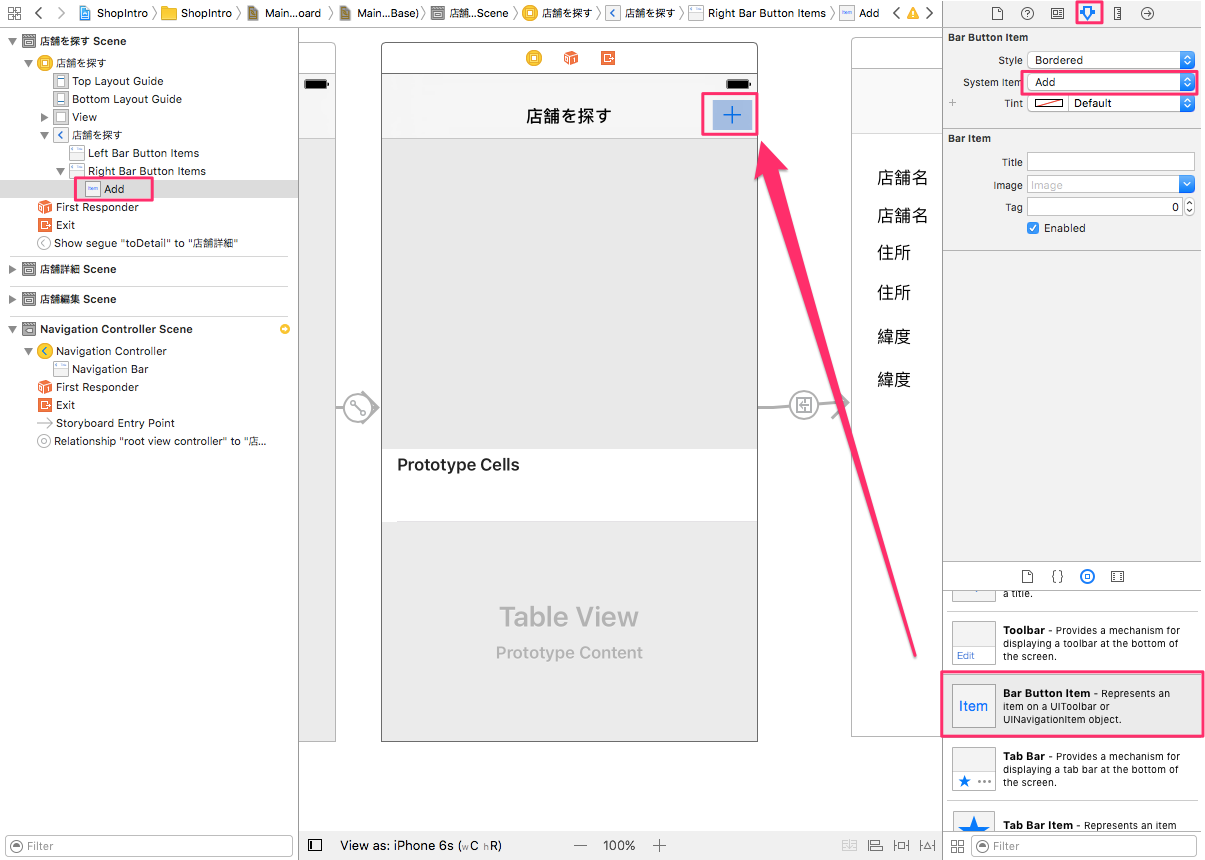
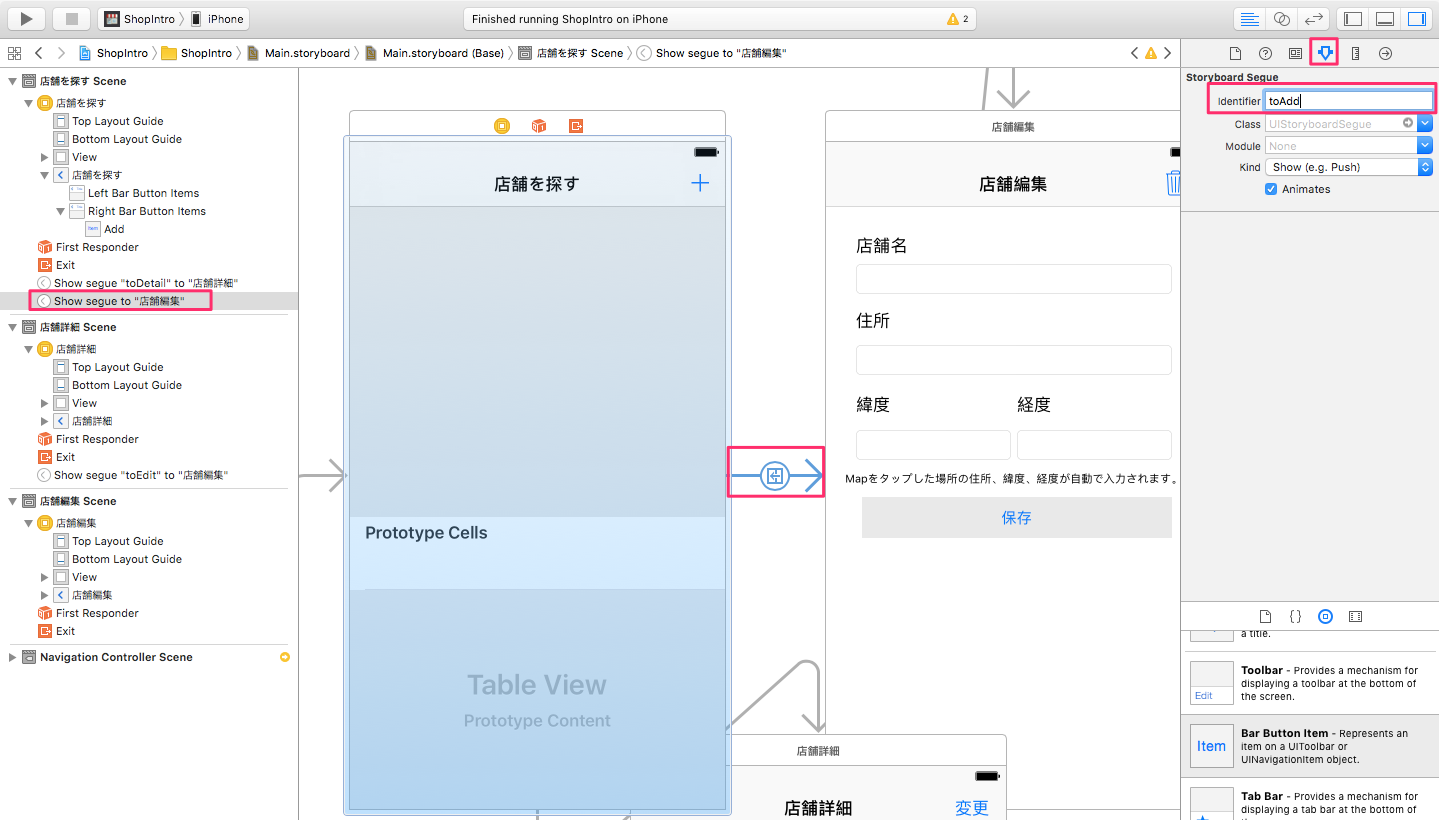
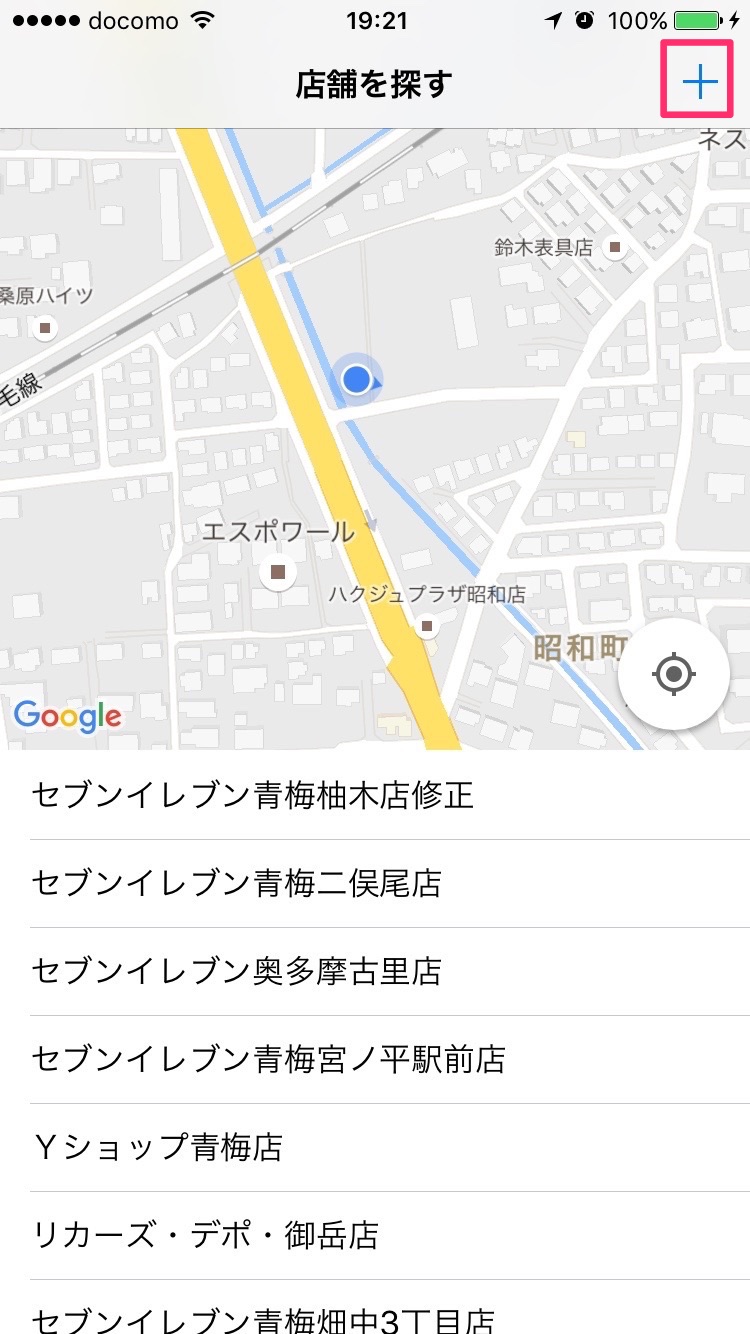
店舗追加機能 店舗を新しく追加する機能を追加していきます。ShopEditViewControllerを使います。+ボタンをタップしてShopEditViewControllerに遷移したときに、DBに新規追加されるようにします。+のBar Button Itemを追加します。
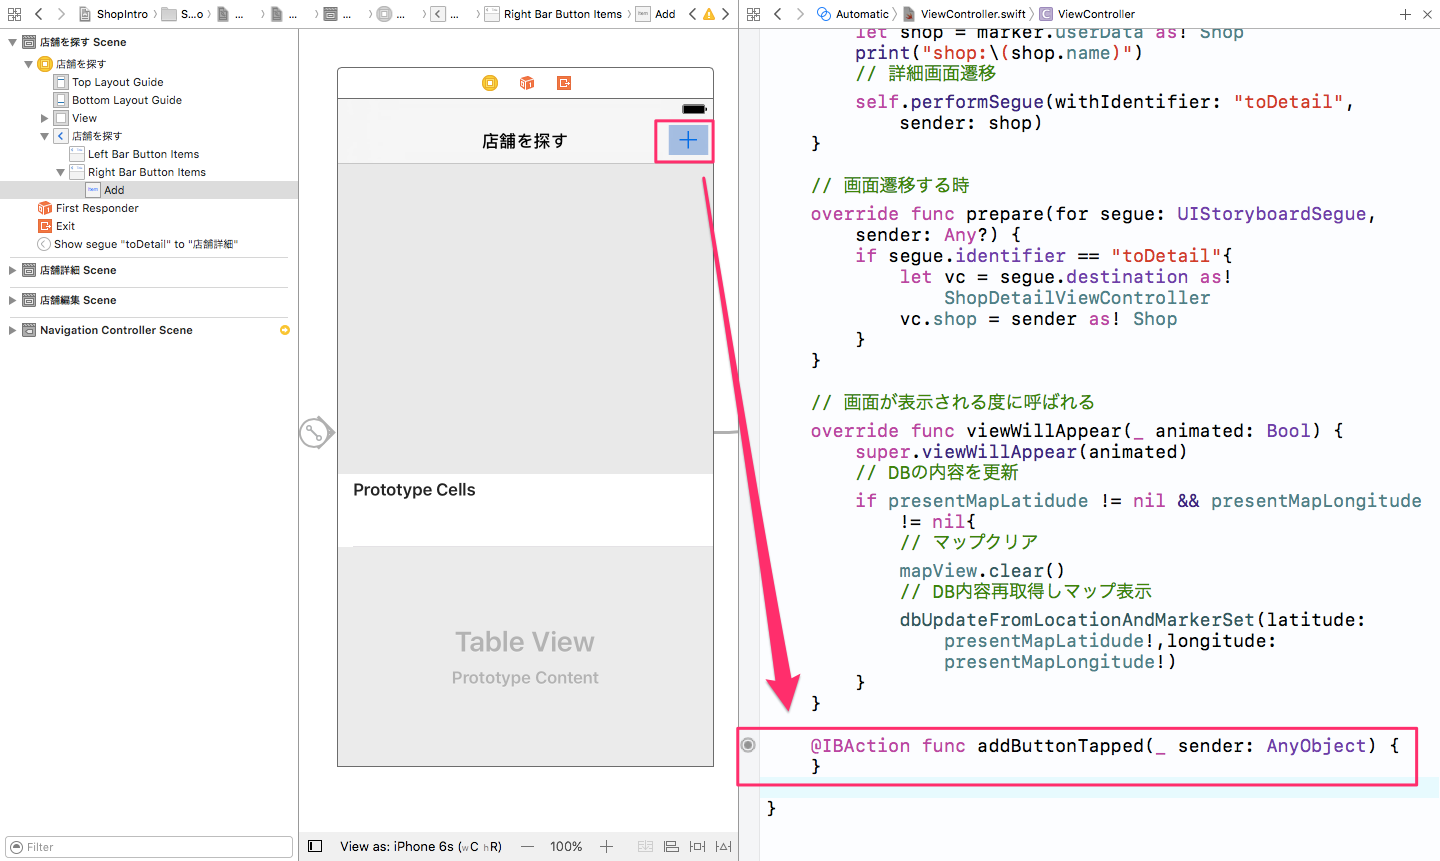
+をIBActionで関連付けし、addButtonTappedメソッドを追加します。
店舗を探す画面と店舗編集画面をSegue(Show)で接続します。
SegueのIdentifierはtoAddにしてください。
addButtonTappedメソッドに下記を追加してください。
ViewController.swift
@IBAction func addButtonTapped (_ sender: AnyObject) let actionType = "NEW" performSegue(withIdentifier: "toAdd" , sender: actionType) }
さらに、prepareForSegueメソッドの箇所を下記のように変更します。
ViewController.swift
override func prepare (for segue: UIStoryboardSegue, sender: Any?) if segue.identifier == "toDetail" { let vc = segue.destination as ! ShopDetailViewController vc.shop = sender as ! Shop } else if segue.identifier == "toAdd" { let vc = segue.destination as ! ShopEditViewController vc.actionType = sender as ! String } }
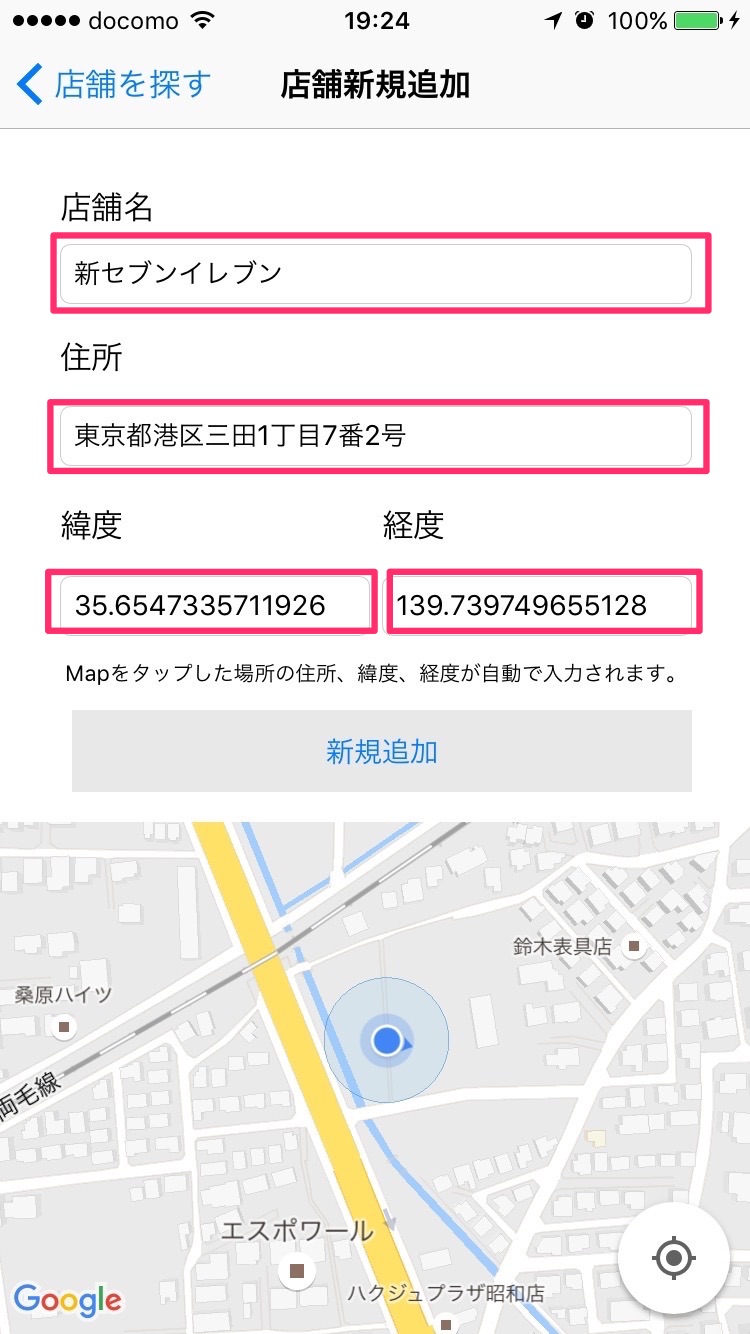
次に、ShopEditViewController側にactionTypeのメンバ変数を追加します。actionTypeで画面の表示切り替え、ボタンクリック時にDBに新規追加されるよう処理を追加します。
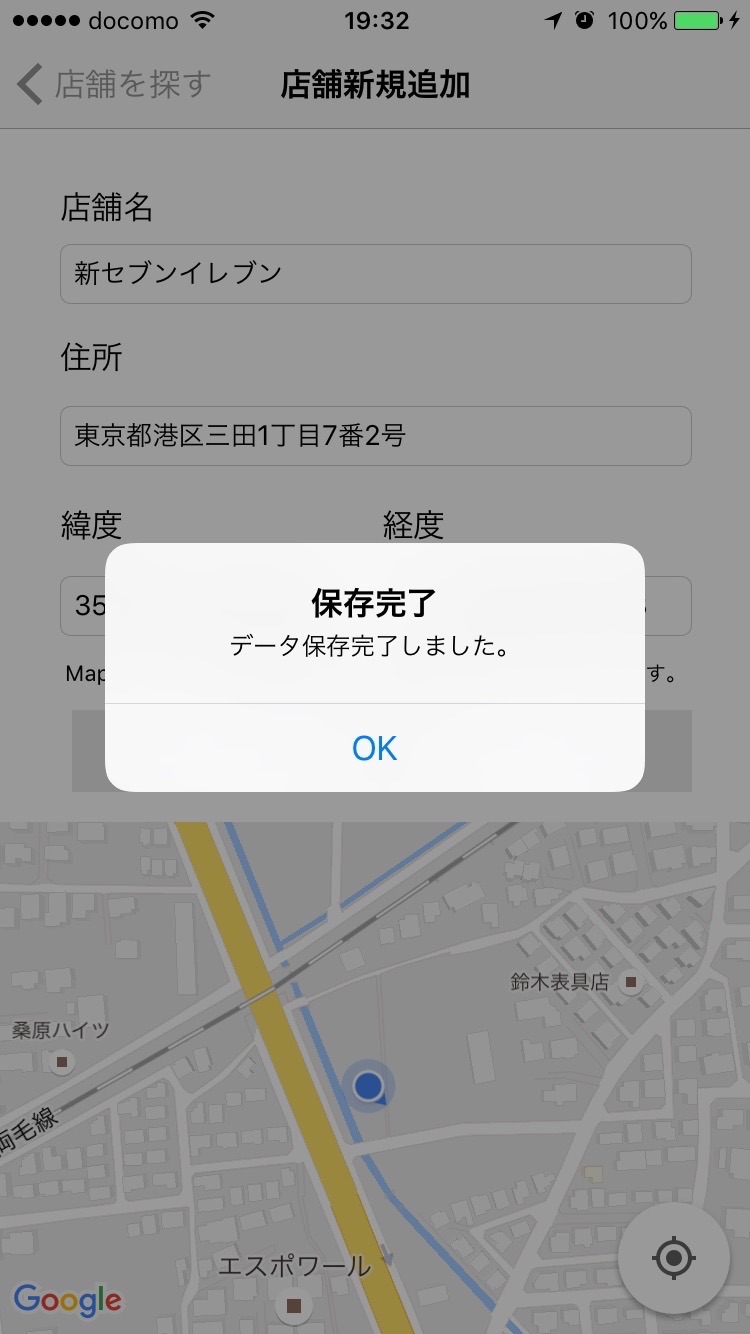
class ShopEditViewController : UIViewController ,CLLocationManagerDelegate ,GMSMapViewDelegate ,UITextFieldDelegate : var actionType = "" : : func initView () if actionType == "NEW" { self .title = "店舗新規追加" self .commitButton.setTitle("新規追加" , for : .normal) self .commitButton.addTarget(self , action: #selector(self .dbAdd(_ :)), for : .touchUpInside) self .navigationItem.rightBarButtonItem = nil } else if actionType == "UPDATE" { self .title = "店舗編集" self .commitButton.setTitle("更新" , forState: .Normal ) self .commitButton.addTarget(self , action: "dbUpdate:" , forControlEvents: .TouchUpInside ) self .nameTextField.text = shop.name self .addressTextField.text = shop.address self .latitudeTextField.text = String (shop.latitude) self .longitudeTextField.text = String (shop.longitude) } } : : @IBAction func dbAdd (_ sender: AnyObject) if isValidateInputContents() == false { print ("入力チェック:\(isValidateInputContents() )" ) return } var sql = "INSERT INTO shop(name,address,latitude,longitude) " sql += "VALUES ('\(nameTextField.text!) ','\(addressTextField.text!) ',\(atof(latitudeTextField.text!) ),\(atof(longitudeTextField.text!) ))" _ = db.query(sql: sql) let myAlert: UIAlertController = UIAlertController (title: "保存完了" , message: "データ保存完了しました。" , preferredStyle: .alert) let myOkAction = UIAlertAction (title: "OK" , style: .default ) { action in print ("action ok" ) _ = self .navigationController?.popViewController(animated: true ) } myAlert.addAction(myOkAction) present(myAlert, animated: true , completion: nil ) }
dbAddメソッドでは今度はDBにレコードを新規追加するためにINSERT文を発行しています。actionTypeを追加しておきます。
この状態だと編集時にエラーが出てしまいますので、店舗詳細画面側から編集時の処理にもコードを追加します。
ShopDetailViewController.swift
@IBAction func updateButtonTapped (_ sender: AnyObject) let actionType = "UPDATE" self .performSegue(withIdentifier: "toEdit" , sender: actionType) self .performSegue(withIdentifier: "toEdit" , sender: nil ) } override func prepare (for segue: UIStoryboardSegue, sender: Any?) if segue.identifier == "toEdit" { let vc = segue.destination as ! ShopEditViewController vc.shop = self .shop vc.actionType = sender as ! String } }
この状態で確認してみましょう。店舗の変更や店舗を新規作成する事ができるか確認してください。
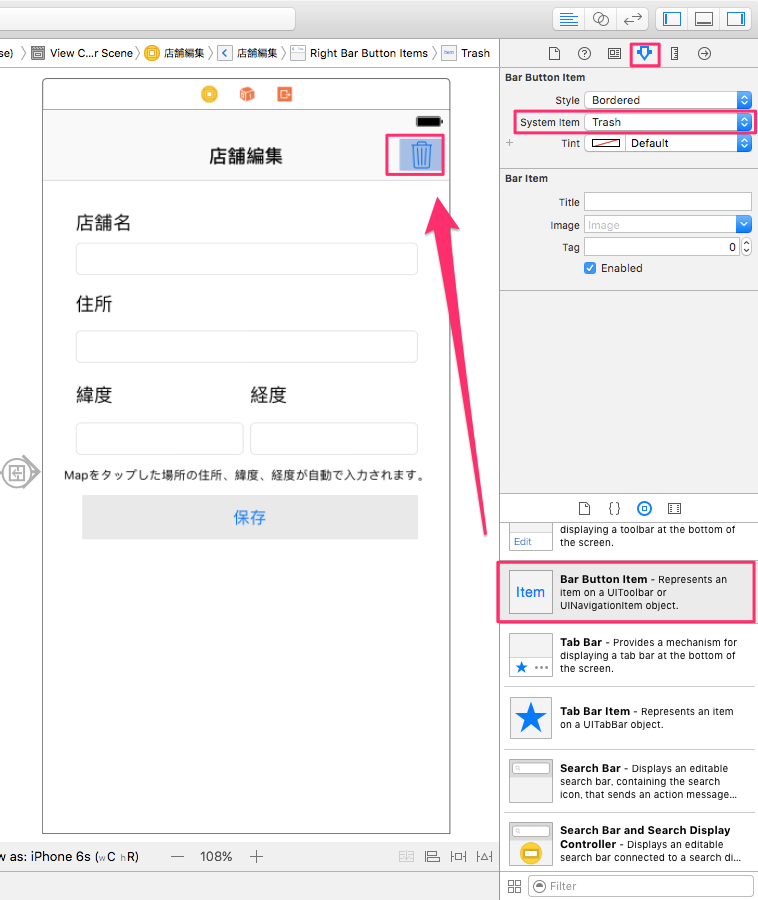
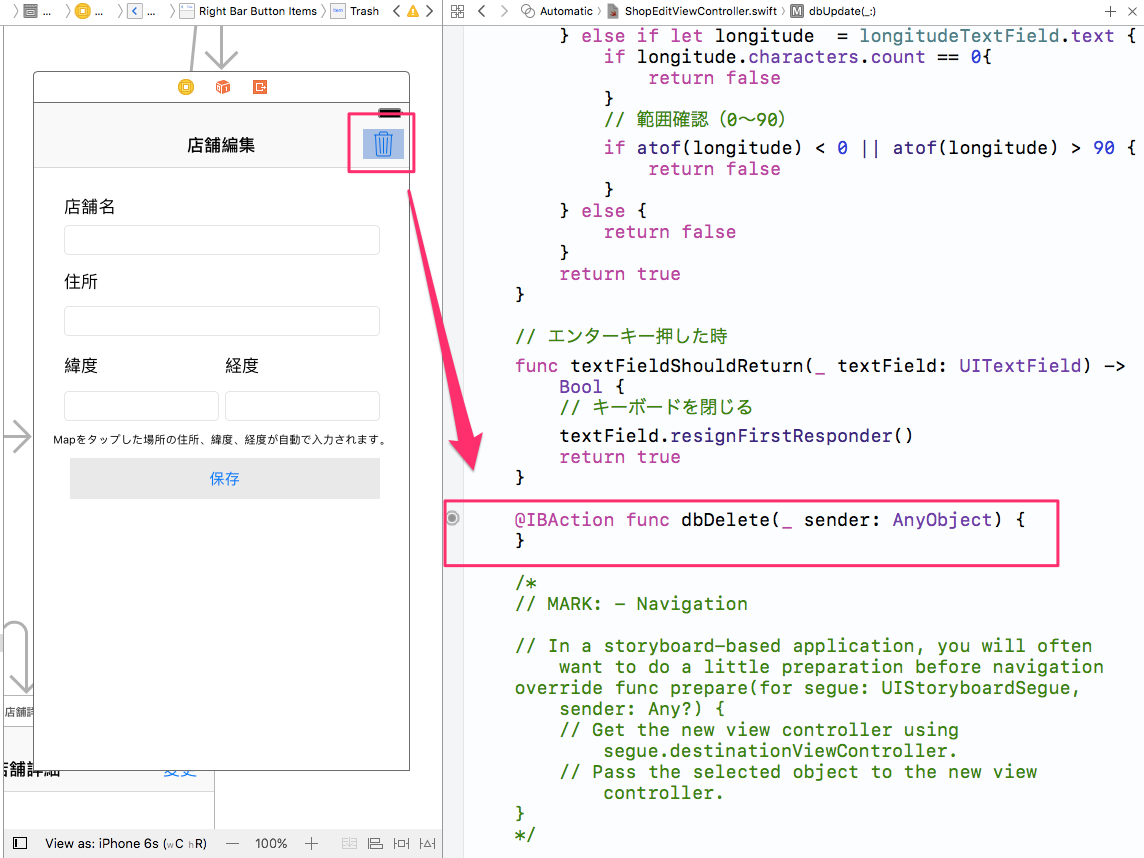
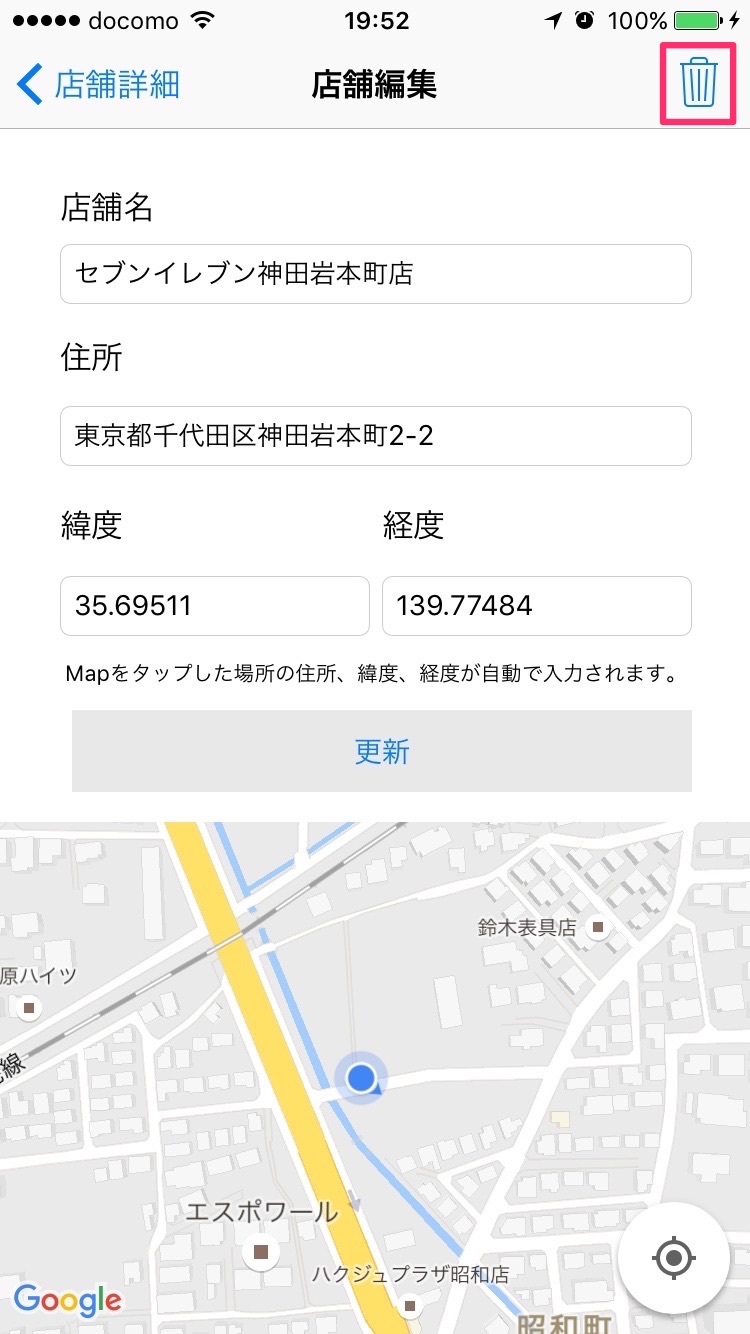
店舗削除機能 最後に店舗を削除する機能を追加します。IBActionを下図のように追加します。IBActionでdbDeleteとして関連付けしてください。
ShopEditViewController.swift
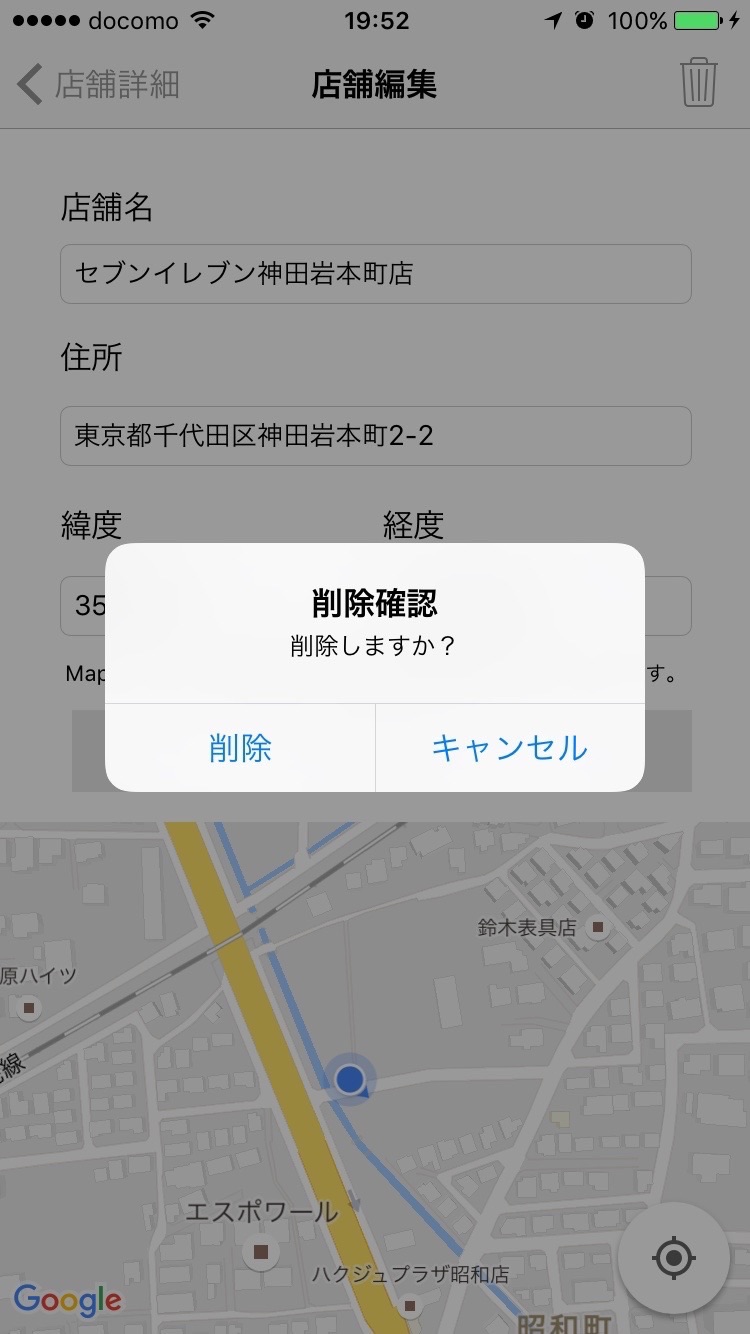
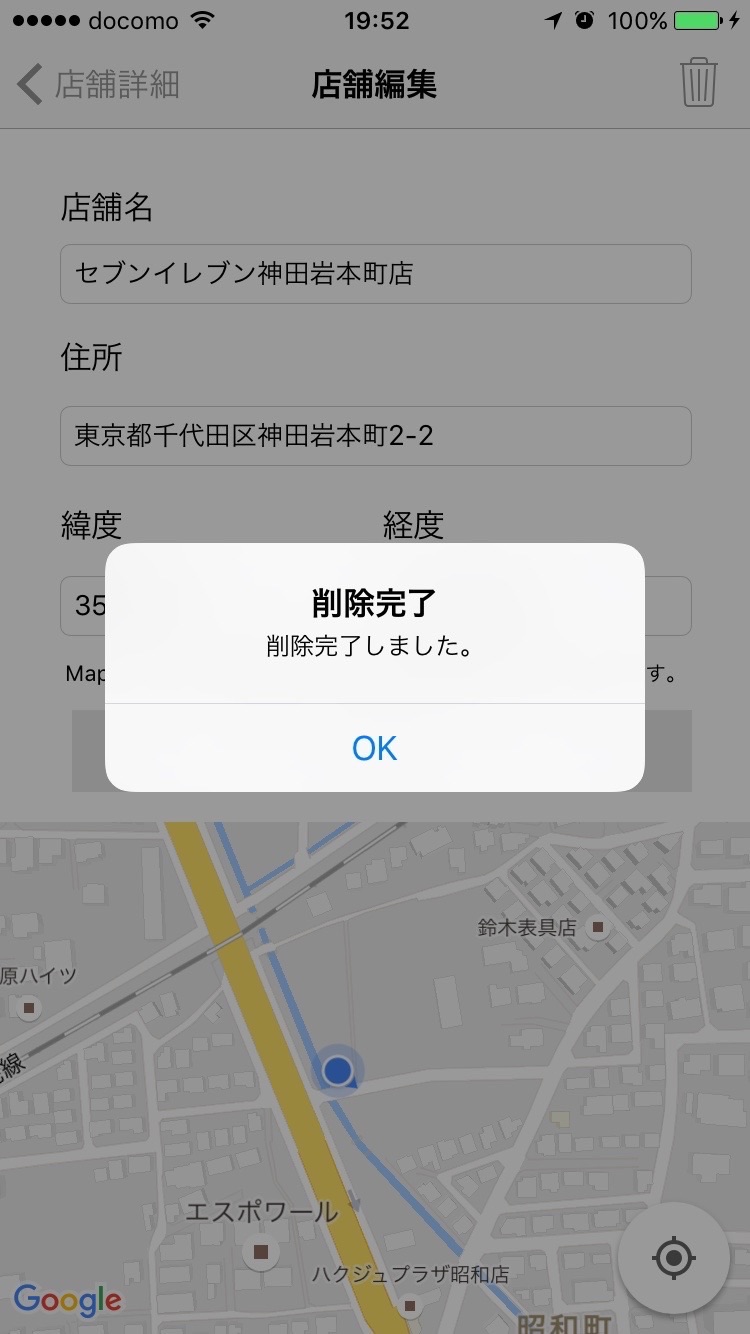
@IBAction func dbDelete (_ sender: AnyObject) let myAlert: UIAlertController = UIAlertController (title: "削除確認" , message: "削除しますか?" , preferredStyle: .alert) let okAction = UIAlertAction (title: "削除" , style: .default ) { action in _ = self .db.query(sql: "DELETE FROM shop WHERE id = \(self .shop.id) " ) let myAlert: UIAlertController = UIAlertController (title: "削除完了" , message: "削除完了しました。" , preferredStyle: .alert) let okAction = UIAlertAction (title: "OK" , style: .default ) { action in _ = self .navigationController?.popToRootViewController(animated: true ) } myAlert.addAction(okAction) self .present(myAlert, animated: true , completion: nil ) } let canselAction = UIAlertAction (title: "キャンセル" , style: .default ) { action in print ("キャンセル" ) } myAlert.addAction(okAction) myAlert.addAction(canselAction) present(myAlert, animated: true , completion: nil ) }
店舗情報が削除されるかRunして確認してください。
これでアプリは完成です。このアプリは店舗(コンビニ)を紹介するアプリですが、カフェやレストランなど、色々なジャンルの店舗紹介のアプリにできますのでどんどんカスタマイズしてみてください。